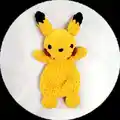
About This Pika the Electric Mouse Amigurumi Pattern
This pattern creates a plush, amigurumi style Pika the Electric Mouse using bulky Bernat Blanket yarn for a soft, chunky texture. You will crochet and assemble head, body, arms, ears, legs, cheeks and tail with clear round-by-round instructions and photo references. The finished piece is squishy, tactile, and great as a cuddly toy or a unique handmade gift.
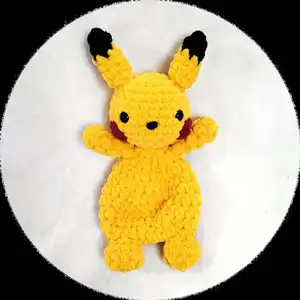
The pattern includes an invisible colour change technique and guidance for attaching safety eyes and facial features. Detailed assembly steps and helpful photos show exact placement for a professional finish.
Why You'll Love This Pika the Electric Mouse Amigurumi Pattern
I absolutely love this pattern because it turns simple stitches into a charming, tactile character that people want to hold. I enjoy using bulky yarn to create a cozy, plush texture that is quick to work up and very satisfying. The design balances easy shaping with small details like cheek patches and an invisible colour change to make the finished piece feel special. I also love that the pattern includes clear photos and step-by-step construction so I can reproduce consistent results every time.
Switch Things Up
I love how easy it is to customize this pattern: change the colours to create your own characters, from pastel versions to bright, bold hues.
You can make the piece larger or smaller by choosing a different yarn weight and matching hook size; for a mini keychain version use lighter yarn and a smaller hook.
I sometimes add felt details or tiny embroidered features for a different finish—felt cheeks or an embroidered mouth are quick upgrades.
Try swapping safety eyes for embroidered eyes if you prefer a softer, child-safe toy; embroidering gives a very sweet expression.
Experiment with different stuffing amounts to alter firmness and posture; a slightly flatter body gives a relaxed, squishy look.
I also like to add a small loop or keyring to the head to turn it into a bag charm or keychain for gifting.
If you want posable limbs, consider inserting thin craft wire into the arms before sewing them closed and positioning them as desired.
For a seasonal twist, change the cheek colour or add a tiny scarf or accessory to make a themed version for holidays.
Try different stitch textures for the body, such as alternating half double crochet rows with single crochet rows, to create subtle body striping or texture changes.
I recommend testing colour placement before finishing; pin pieces in place with safety pins to preview how the assembled toy will look before permanently sewing.
Common Mistakes & How to Fix Them
✗ Skipping stitch markers when marking leg placement leads to misaligned legs; use stitch markers to mark the 5-stitch leg sections and a consistent gap between them.
✗ Adding safety eyes too late or in the wrong spot can disrupt the face proportions; place safety eyes between rounds 7 & 8 and ensure they are 5 stitches apart before stuffing.
✗ Overstuffing the head causes a lumpy, misshapen look; stuff gradually and test firmness frequently to keep smooth contours.
✗ Forgetting to leave long yarn tails for sewing makes assembly awkward; leave the recommended 6" or 10" tails when instructed for secure sewing and finishing.