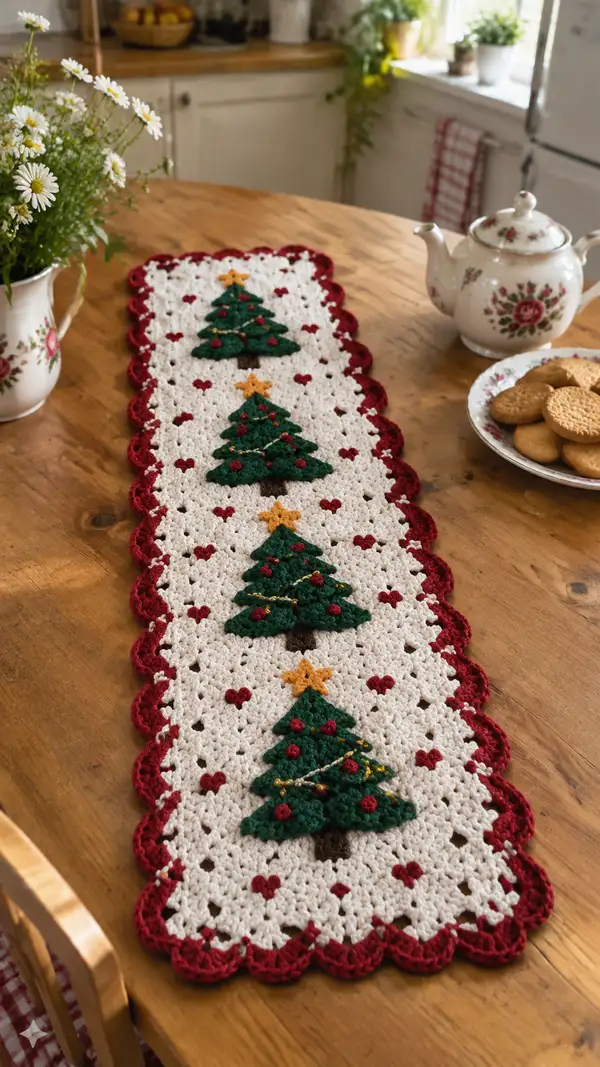
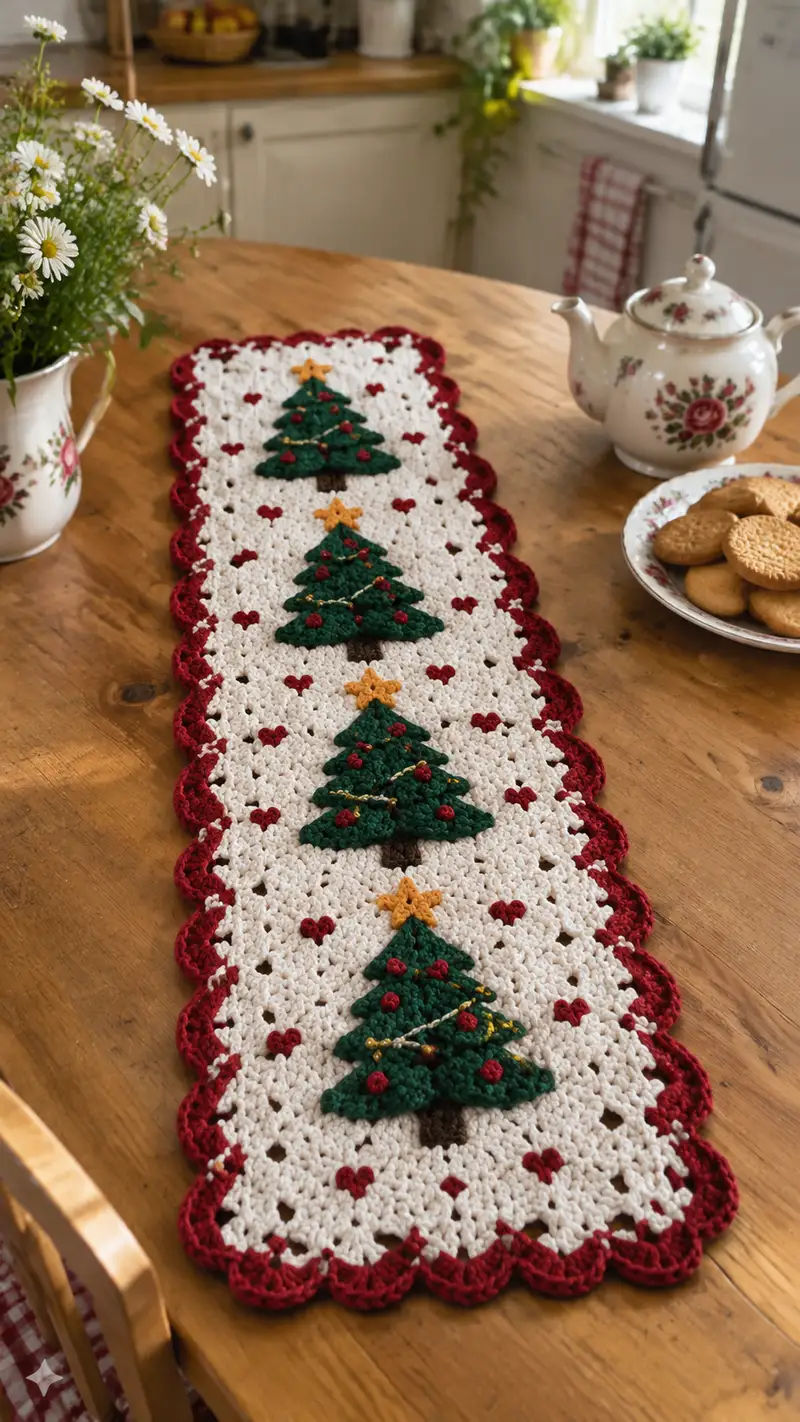
Create a charming Christmas tree table runner with layered 3D tree appliques, tiny heart accents and a scalloped red border. This runner features a warm cream granny-style background, four stacked green trees with golden stars and beaded garlands, and tiny burgundy hearts scattered between motifs — perfect for holiday tabletops and cozy seasonal decor.
Progress Tracker
0% Complete
— Materials & Gauge :
Info :
Use worsted weight cotton yarn and a 4.0mm hook. Gauge is approximate since this is a decorative runner: 10 clusters (granny shell groups) wide = approximately 10cm and 10 rows = approximately 10cm. Adjust hook if you want a denser or looser fabric. Final runner in sample measures about 14cm wide x 92cm long (excluding scalloped edging).
— Legend & Notes :
Info :
Granny shell/cluster is worked here as a 3-dc cluster (3 dc in same space separated by one chain where indicated). For clarity we count clusters across width (a cluster = one 'group' that forms a little triangle of stitches). Use stitch markers to mark the first stitch at the end of each row to maintain straight edges. Join rows with a ch-3 or ch-4 turning chain as specified.
— Base Panel (Cream) :
Round 1 :
Foundation: Ch 66. (This foundation yields 22 cluster positions across when the pattern of groups of ch and dc is worked; ch-count is a multiple to make an even row with 11 cluster spaces across each half row - you will be working into ch-spaces to create clusters.)
Round 2 :
Row 1 (RS): Skip ch 3 (counts as first dc), *3 dc in next ch-3 space, ch 1, sk 2 ch, sc in next ch; rep from * across to last ch, finish 3 dc in final ch, turn. (You will have placed 11 main cluster groups across; count cluster groups as 11.)
Round 3 :
Row 2: Ch 3 (counts as first dc), *in the ch-1 space between clusters: (3 dc, ch 1), sk to next ch-1 and work 1 sc into the corresponding sc from previous row; rep across ending with 3 dc in turning space. Maintain 11 clusters across (11).
Round 4 :
Row 3: Repeat Row 2 exactly for a uniform granny grid (11 clusters).
Info :
On the first few rows, ensure you are working your sc placement directly above the sc of previous row to create a vertical line of small single crochet posts that will serve as invisible grid lines for later applique placement.
Rounds 5-6 :
Repeat Row 2. (11 clusters)
Round 7 :
Row 7: Continue as Row 2, check for even tension and straight edge. (11 clusters)
Rounds 8-14 :
Work even in the established granny cluster pattern, keeping counts consistent across each row. (11 clusters each row)
Info :
Mark the center of the runner lengthwise visually and with a removable stitch marker — this will be used to center the four tree appliques later. In the sample, the first tree center is 10 clusters down from the top edge; measure and mark so all trees are evenly spaced.
Rounds 15-18 :
Continue even. At the end of Round 18 you will have established a balanced field for the top tree placement. (11 clusters)
Info :
If making a longer or shorter runner, adjust number of rows evenly between tree placements. Trees will occupy roughly 12 rows of height each (including placement rows), with spacing rows of 6-8 between trees.
Round 19 :
Continue even in cream pattern. (11 clusters)
Round 20 :
Row 20: Make a count check — confirm 11 clusters across. If counts are off, correct before proceeding to applique placement. (11 clusters)
Round 21 :
Continue even. This row forms the base where the topmost star and tree will be centered. (11 clusters)
Info :
Decide which row will host the center of the first tree apex. In the sample each tree apex aligns centered within a cluster (the central cluster of the 11 across). Mark that spot on the RS using a small safety pin or removable marker.
Rounds 22-26 :
Work even granny rows (11 clusters). These rows add length and provide space between trees. (11 clusters each row)
Round 27 :
Placement row for 1st tree apex — work Row 2 pattern but pause after completing the central sc line so you can identify the exact center st for 3D applique attachment. (11 clusters)
Info :
When attaching 3D trees, you will sew them to the RS of this row centered over a vertical line of sc. This ensures the tree sits squarely on the runner; pre-pin the applique now to check fit before sewing so you don't misplace it.
Rounds 28-30 :
Work even rows for spacing after first tree (11 clusters)
Round 31 :
Second tree placement row — identical to Round 27 but positioned lower on the field. (11 clusters)
Rounds 32-34 :
Work even rows for spacing after second tree. (11 clusters)
Round 35 :
Third tree placement row — identical routine. (11 clusters)
Rounds 36-38 :
Even rows to add spacing. (11 clusters)
Round 39 :
Fourth tree placement row — center and prepare to attach last tree. (11 clusters)
Rounds 40-44 :
Even rows to create the bottom portion of the runner body. (11 clusters)
Info :
At this point you should have marked four evenly spaced apex rows for the trees. Count rows between marks to ensure even distribution (in sample spaces are approximately 9-10 rows between tree centers). Adjust by adding or subtracting even rows before edging.
Rounds 45-46 :
Finish the base body by working two more even rows in cream to give a neat margin before edging. (11 clusters)
Info :
We now move to secure a clean edge for the scalloped border: work a tidy single crochet round in cream around the entire rectangle to create a firm base for the red scallops.
Round 47 :
Border Preparation Round: With Cream, RS facing, sc evenly around entire perimeter of the rectangle: 1 sc in each sc and 3 sc in each corner chain space to turn. Place 2 sc in each small ch-1 gap where needed to keep edge straight. (Edge sc count will equal approx. perimeter total; keep placement even.)
Info :
When working the perimeter sc, adjust the number of sc in corners and small gaps so the final scallop border sits flat and symmetrical. Count your sc per long side to ensure pairs align opposite each other for matching scallop locations.
— Small Hearts (Burgundy) — Make multiple :
Round 1 :
Start in burgundy: Ch 6, join with sl st to form ring. (6)
Round 2 :
Ch 1, in ring work: (1 sc, 1 hdc, 2 dc, 1 hdc, 1 sc) — sl st to join. Fasten off leaving 12–15cm tail for sewing. This small motif resembles a tiny heart when pinned with the two dc bulges at the top. (6 major stitches)
Info :
Make 12–16 hearts depending on spacing between trees. In the sample, three small hearts are placed on each side of each tree (12 hearts total). Sew hearts to RS at evenly spaced positions between tree appliques using the tail left from fastening off.
— Tree Applique (Make 4 identical) :
Round 1 :
With Green and 3.5–4.0mm hook, ch 6, join with sl st to form a small ring. (foundation ring)
Round 2 :
Rnd 1 (base tip): Ch 2 (counts as first hdc), work 5 hdc into ring, sl st to first hdc — total 6 hdc forming a small triangle tip. (6)
Round 3 :
Rnd 2: Ch 2, turn, working across the front of the piece to create the first expanded tier: (1 dc in first st, ch 1, 2 dc cluster in center top, ch 1, 1 dc in last st). This forms a small row wider than the tip; visually you now have an apex and two small side stitches. (approx 4 groups)
Info :
These first rounds establish the tree apex. Keep tension slightly looser than the base so applique lays flat when sewn. You may optionally block the applique lightly by pinning to a flat surface before attachment.
Round 4 :
Rnd 3: Ch 2, flip to work across the previous row: Work 3-dc clusters across the new row as follows: at each increase point make (3 dc in same st) with a ch 1 spacer between groups. You should increase the cluster count from the apex by 2-3 clusters to shape a small triangular tier. (approx 6 clusters)
Round 5 :
Rnd 4: Ch 2, continue adding a wider tier: in each ch-1 space along the bottom of the piece work (3 dc, ch 1) to create an outward scalloped tier. This forms a little 'shelf' that will be folded slightly to create depth when attached. Count should increase by about 2 clusters from previous row (approx 8 clusters).
Info :
Technique :
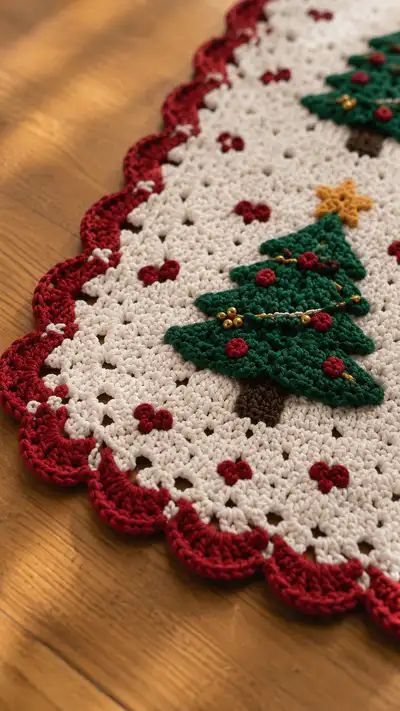
To achieve the layered look seen in the photo, each tier is worked as a short row of clusters that extends farther than the row above; after making 3-4 tiers, fold each tier slightly forward and reinforce by sewing the back of the tier down along the row seam with a few small whip stitches. This gives the tree subtle dimensional tiers.
Round 6 :
Rnd 5: Ch 2, work a wider tier (approx 10 clusters). The aim is to build 4 tiers total (apex + 3 expanding tiers) so the overall piece looks triangular and layered. (approx 10 clusters)
Round 7 :
Rnd 6: Last green tier: Ch 2, work across to make the broad bottom tier (approx 12 clusters). Fasten off leaving a long tail for sewing. The final triangle should be roughly 6–8 cm tall in sample gauge.
Info :
Before fastening off, place small gathering stitches behind each tier to shape the tier into a subtle overhang. Optionally add a tiny bit of fiberfill between tiers for pronounced puffiness — use just a pinch to avoid flattening the runner.
— Tree Trunk (Make 4) :
Round 1 :
With dark brown, ch 4, join to form small ring. Rnd 1: Ch 1, work 6 sc into ring, sl st to join. (6)
Round 2 :
Rnd 2: Ch 1, work 6 sc around maintaining small cylinder feel. (6)
Round 3 :
Rnd 3: Ch 1, work 6 sc, fasten off leaving a 15cm tail for sewing. The trunk should be a short rectangle/cylinder about 0.8–1.0cm tall in sample gauge.
Info :
Sew the trunk just beneath the bottom-most green tier so it peeks out slightly; if you prefer a taller trunk, continue a few more rounds of sc to reach desired height.
— Tree Star (Make 4) :
Round 1 :
With mustard/gold, ch 5, join to make small ring. Rnd 1: Ch 1, work 5 sc into ring, sl st to join. (5)
Round 2 :
Rnd 2: Ch 2, in next st work (2 dc, ch 1, 2 dc), sl st in next st to form a point. Move to next st and repeat for total of 5 points (small star). Fasten off leaving tail for sewing. Star diameter approx 1.0–1.5cm.
Info :
Pin the star to the apex of each tree and stitch down with small stitches through the star center and the top of the apex tier; secure thread on WS. Optionally add a seed bead to the center for sparkle.
— Red Baubles (Small Rosettes) :
Round 1 :
With burgundy, ch 6, join to form ring. Rnd 1: Ch 1, make 6 sc in ring, sl st to join, then in same ring work (ch 2, 3 dc) and sl st to create a lifted rosette. Fasten off leaving short tail for sewing. Make 12 small rosettes per tree set (sample uses 3 rosettes per tree).
Info :
Sew rosettes singly to tree tiers in pleasing, asymmetrical positions. Use a small anchor stitch through the base of each rosette so the surface sits proud like a bauble.
— Gold Beaded Garland (Decorative Embroidery) :
Round 1 :
Thread a length of metallic gold thread (or thin gold yarn) about 20–30cm long and pre-string small gold beads onto it (6–8 beads per tree depending on look). With a small embroidery needle, bring thread to RS at left edge of tree, weave in a gentle curved line across tiers, catching through the green tiers with tiny stitches and slipping a bead into place at 2–3 positions. End with a small knot on WS and weave in ends.
Info :
Alternate method: Use small jump stitches of gold yarn and sew single seed beads at intervals from top to bottom of each tree to mimic a garland. Secure beads tightly with small stitches and tie off on WS.
— Attaching Trees, Trunks, Stars & Baubles :
Round 1 :
Info : Positioning: On RS, pin each completed tree centered over the marked apex row. The center of the tree aligns with the central sc column (center cluster of 11 across). Place trunk centered beneath lowest tier and pin star at apex. Use as a guide: top tree apex at approx Row 27, second at Row 31, third at Row 35, fourth at Row 39 in this sample field — adjust if you changed the base row counts.
Round 2 :
Sewing: Using long tail from the tree or a matching green strand on a yarn needle, use small whip stitches along the back seam and the bottom edge of each tier to secure the applique to the cream base. Sew trunk in place with brown tail through the soft sc column so trunk sits neatly under tiers. Affix star with mustard tail and add rosettes then bead garland last. Weave all tails to the WS and trim close.
Info :
Attach the appliques with small even stitches so the front remains neat — avoid large visible loops on RS. If you want more stability, sew a few invisible ladder stitches through the applique body into the base at each tier junction.
— Heart Placement :
Round 1 :
Info : Placement: Space small burgundy hearts in pairs along each side of the runner field between the trees. In sample each tree has 3 small hearts (left and right positions staggered) — pin hearts temporarily and step back to ensure visual balance before final sewing.
Round 2 :
Sew hearts using short tails and small whip stitches to the RS; flatten gently if necessary and weave ends to WS.
— Scalloped Red Border :
Round 1 :
With red yarn join to any sc at border prep round with sl st. Round A: Ch 3, *2 dc in next sc, ch 1, sk 1 sc* repeat across long edge. Make 3 dc in corners to curve. Work all way around. (This creates base red shell groups at even intervals.)
Round 2 :
Round B: Sl st into space between shell sets, ch 1, (sc, ch 2, 5 dc, ch 2, sc) into same space to make rounded scallop; skip to next shell space and repeat around. Make 5 full scallops across each long side and a scallop at each short end so scallops are evenly distributed. Count equal scallops on opposite sides. (approx 22–26 scallops depending on length)
Info :
To make the scalloped edge sit flat, place pins at each scallop apex while the final round is fresh, then gently steam or wet-block once finished. If scallops curl, add a final round of sc between scallops to anchor them.
Round 3 :
Round C (Finishing Row): In each scallop: sl st into top of 5-dc shell, ch 1, work 1 sc around to anchor; finish with a tidy sl st, weave ends. In sample, a tiny cream picot was added into every third scallop with a small sl st and ch-3 picot worked in cream and anchored to add a little link to the base; this is optional.
Info :
Check symmetry by folding runner lengthwise and comparing scallop placement on both sides; adjust by adding or subtracting small sc at base row before starting scallops if needed.
— Final Finishing Touches :
Round 1 :
Info : Weave in all ends to the WS using a yarn needle. Use small invisible catch stitches to secure appliques, then weave tails through several stitches and trim close. Double check bead security — tie off beading thread and drop a tiny dab of fabric glue on knots if you wish for added hold (allow to dry fully).
Round 2 :
Light Blocking: Pin runner to desired final dimensions on flat blocking surface, gently dampen or steam and allow to dry. This flattens the base grid and sets scallops evenly. Do not oversteam the beads or metallic thread.
Info :
Optional: Add a backing fabric if you want to protect furniture from beads or rough yarn: cut cotton backing to runner size and whip-stitch in place from WS with small even stitches.
— Pattern Variations & Sizing :
Info :
To make a longer runner, add multiples of the granny rows including additional even space rows between trees or simply repeat the pattern of rows between trees. To shorten, remove an even number of rows distributed between tree placements. Colors may be swapped for non-holiday use — try pastels for spring or harvest tones for autumn.
This festive table runner brings cozy holiday charm to any table with its layered 3D trees, tiny hearts and classic scalloped edging. Each section is satisfying to stitch and the appliques give the finished piece a handmade, heirloom feel. Perfect for gift-giving or adding a seasonal accent to your home. 🎄🧶 Spread some handmade cheer this season and enjoy showing off your beautiful table centerpiece! ✨