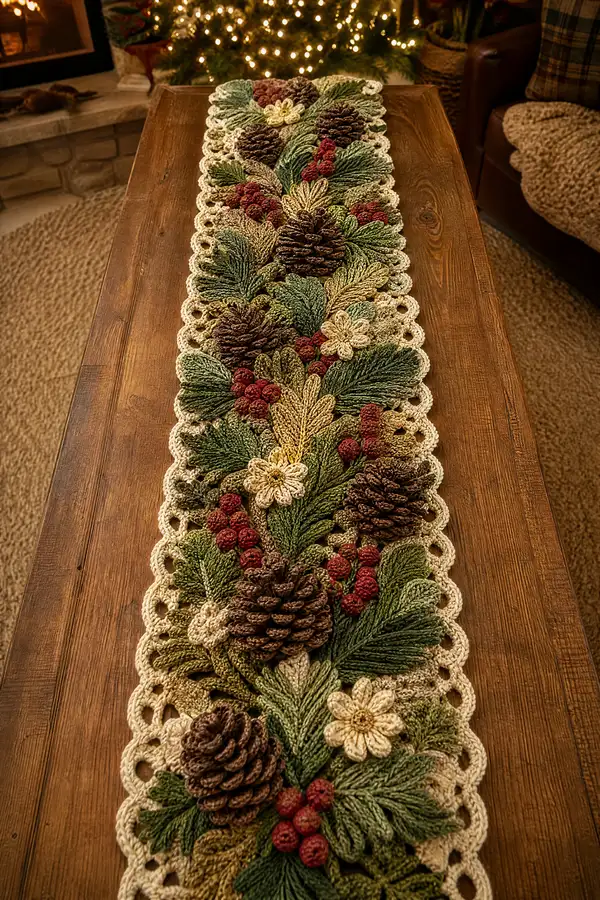
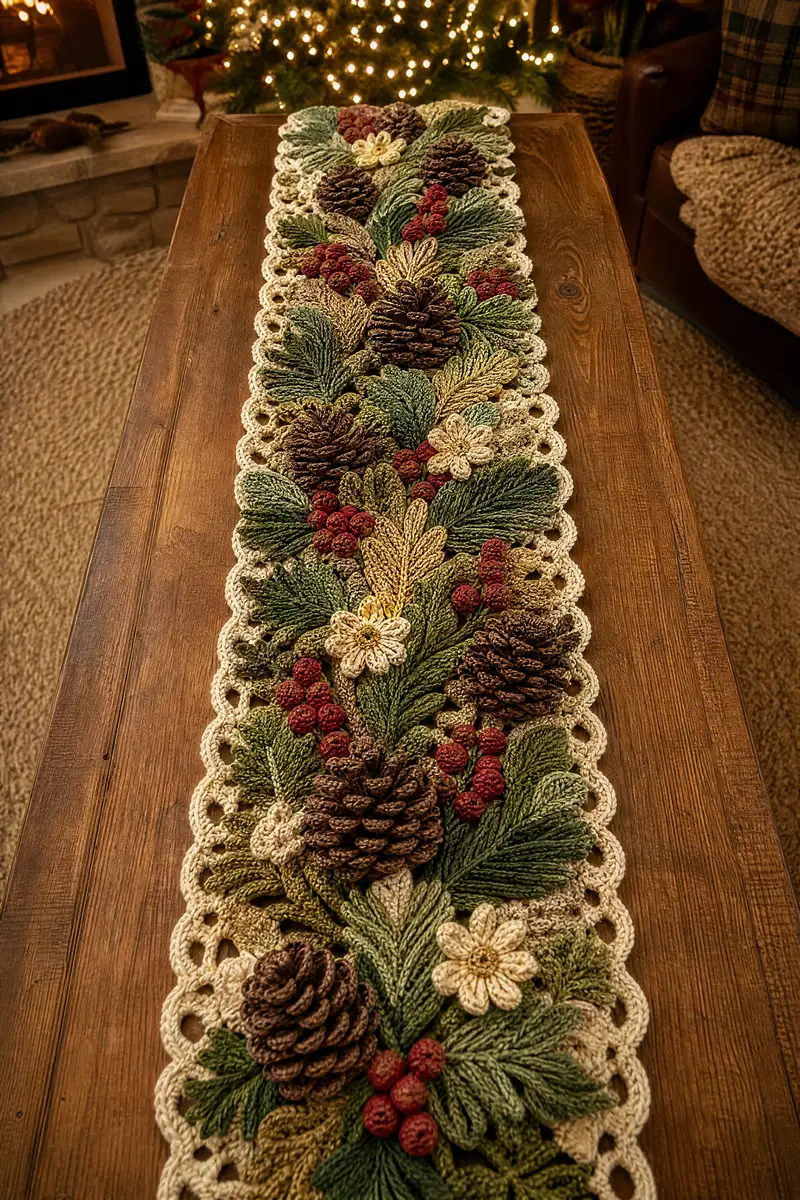
A richly textured holiday table runner inspired by woodland evergreens and pinecones. This long runner features layered crochet pinecones, feathered leaves in multiple green tones, clusters of red berries, and delicate cream flowers framed by a scalloped border. Perfect for a cozy mantel or dining table centerpiece, the pattern uses surface texture, post stitches and clustered bobbles for a lifelike, dimensional look. Designed to be assembled motif-by-motif, it creates a warm seasonal statement piece.
Progress Tracker
0% Complete
— Base Panel :
Round 1 :
Using cream/ivory, make a foundation chain of 120 (or adjust to desired runner width). Join with sl st to first ch to work in the round, taking care not to twist (120)
Info :
The base panel is worked as a long narrow strip in joined rows to give stability and allow motifs to be sewn on. If you prefer a longer runner, increase foundation chain by multiples of 4.
Round 2 :
Ch1, 1 sc in each ch around, join with sl st (120)
Round 3 :
Ch2 (counts as hdc), 1 hdc in next st, *1 hdc in next 4 sts, 1 hdc in next st BLO*; rep from * to * around to create faint ridge texture, join (120)
Round 4 :
Ch1, 1 sc in each st around, join (120)
Round 5 :
Ch2, 1 hdc in each st around for even surface, join (120)
Info :
Work the base with even tension so sewn motifs glue to the fabric nicely. If your runner shrinks or ripples, block flat before attaching elements.
Round 6-8 :
Repeat Rounds 3-5 once more to build a sturdy base (120)
Round 9 :
Ch1, sc in next 6, *ch5, sk 4 sts, sc in next 6; rep from * across to create scallop anchors for later border. Work last anchor to fill remaining sts, join (pattern dependent)
Info :
The ch-5 loops along the edges will later be used to work the scalloped border in cream, spacing anchors evenly across both long edges.
Round 10-14 :
Ch1, 1 sc in every st and in each ch-5 space across rounds to tidy the edges and create even mounting surface for motifs (120)
Info :
Block the base panel flat now; this makes it easier to position and sew motifs. Use pins lightly and steam or wet-block according to yarn instructions.
— Large Pinecone (Make 4) :
Round 1 :
With deep brown, make a magic ring, ch1, 6 sc in ring (6)
Round 2 :
Inc in each st around (12)
Round 3 :
(1 sc, inc) x6 (18)
Round 4 :
(2 sc, inc) x6 (24)
Round 5 :
(3 sc, inc) x6 (30)
Info :
This creates the conical base; we will build scales in spirals using layered petals. Keep the piece relatively flat for now.
Round 6 :
Ch1, 1 sc in each st around (30)
Round 7 :
Ch1, *(sk1, 5 dc cluster in next st) in next st, sl st in next st*; rep around to create first row of raised scales (30 clusters)
Round 8 :
Work in BLO: ch1, sc in each st and in top of each cluster (30)
Round 9 :
Change to tan/moka for slight variegation. Ch1, in front loop of previous round work *(sk2, 5 dc cluster in next st, sl st in next st)*; rep around offsetting clusters between previous clusters (30 clusters)
Info :
When changing color, leave a 6-8 cm tail for weaving. Use contrast yarn sparingly to keep scales natural. Each cluster will form a visible scale edge; offsetting gives the spiral pinecone look.
Round 10 :
Ch1, sc in each st around catching top loops of clusters (30)
Round 11 :
Switch to deep brown again. In FLO, *(3 dc in next st, sl st in next) rep around* to create a raised ridge under each cluster (30)
Round 12 :
Sc around in both loops (30)
Round 13 :
Repeat Round 7 but place clusters slightly closer together: *(sk1, 5 dc cluster in next, sl st next)* to create second spiral tier (30 clusters)
Round 14 :
Sc around in BLO to set clusters (30)
Info :
Use a blunt tool to gently shape clusters outward as they dry so they stack like cone scales. Work loosely on cluster posts so they have life and movement.
Round 15 :
Alternate deep brown and tan clusters for 4 more rounds, repeating the cluster rows and sc setting rows: Rounds 15-22: *(cluster round, sc round)* repeating the color switch every other cluster round to mimic natural variation (30 clusters)
Round 23 :
Begin to taper top: (2 sc, dec) x10 (20)
Round 24 :
(1 sc, dec) x10 (10)
Info :
Lightly stuff the center core of the pinecone with fiberfill so scales sit proud. Stuff gently so clusters keep their shape rather than flattening.
Round 26 :
Fasten off leaving long tail for sewing. Weave tail through remaining sts to close if desired and secure.
— Medium Pinecone (Make 3) :
Round 1 :
With mocha, magic ring, 6 sc (6)
Round 3 :
(1 sc, inc) x6 (18)
Round 4 :
Ch1, sc around (18)
Round 5 :
*(sk1, 5 dc cluster in next) sl st next* rep around (18 clusters)
Round 6 :
Sc in each st around securing clusters (18)
Round 7 :
Repeat cluster round then sc round for 3 tiers (18 clusters)
Round 8 :
Begin top decreases: (2 sc, dec) x4, sc in last 2 (14)
Round 9 :
(1 sc, dec) x4, sc in last 2 (10)
Round 10 :
Dec 5 (5). Fasten off leaving sewing tail. Stuff lightly and close.
Info :
Medium pinecones are useful to vary scale sizes and create a natural clustered look on the runner. Make a mix of colors.
— Small Spiral Pinecone Accent (Make 6) :
Round 1 :
With dark brown, magic ring, 6 sc (6)
Round 2 :
Inc in each st (12)
Round 3 :
Ch1, sc in each st, join (12)
Round 4 :
In FLO, *(picot dc cluster: yo, insert, pull up loop, yo and draw through 2 loops until cluster has 5 loops, complete cluster) in every second st* to create tiny overlapping scales around (12 small clusters)
Round 5 :
Sc around to set clusters (12)
Round 6 :
Fasten off leaving long tail for sewing. No stuffing required; these sit flat and are sewn with stitches through cluster bases to secure.
Info :
These accents are great to tuck under leaves or near berry clusters to enhance natural look. Make in varying browns and tans.
— Evergreen Leaf A (Long Feathered, Make 12) :
Round 1 :
With forest green, ch18, sl st to first ch to create a loop foundation if desired, or work back and forth across ch (18)
Round 2 :
Work along chain foundation: in 2nd ch from hook, 1 sc, hdc in next, *dc in next 6 sts, hdc next 3 sts, sc next 2 sts* to shape a tapered feathery leaf, turn (18)
Round 3 :
Fpdc around central stitches to create raised veins: ch1, 1 sc in first 2 sts, *fpdc around each of next 6 dc to create ribs*, sc in last 2 sts, fasten off at tip leaving tail to sew (18)
Info :
Stagger placement of fpdc ribs on some leaves to give a more organic look. Block leaves flat pulling gently to stretch ribbed texture.
Round 4 :
Make second side: Attach yarn at base on other side, repeat a mirror of Round 2 to give leaf thickness: sc, hdc, dc x6, hdc x3, sc x2 then finish and fasten off (36 total rows counted as one leaf)
Round 5 :
Using a needle, tack the center ridge with a running stitch of matching green to pull center slightly raising both sides for a realistic curve
Info :
Vary the length of chain start (14-22 ch) to create shorter or longer sprigs. Use olive green for aged needles and moss green for fresh tips.
— Evergreen Leaf B (Short Fan, Make 10) :
Round 1 :
With moss green, ch12, 1 sc in 2nd ch from hook, hdc next, dc next 6, hdc next, sc last, fasten off (12)
Round 2 :
Return to base and work sl st along one side into base to puff edge and create thicker fan; replicate on other side with mirror stitches to give two-layered fan (12)
Info :
Leaf B works nicely to tuck under pinecones and create fullness in clusters. Make some in different greens for depth.
— Golden Accent Leaf (Make 6) :
Round 1 :
With gold/tan variegated, ch14, 1 sc in 2nd ch from hook, hdc, dc x8, hdc, sc last, fasten off (14)
Round 2 :
Add fpdc ribs on dc area (4 ribs) to create shine and texture; tack center with running stitch if desired
Info :
Golden leaves add bright highlights; place near central pinecones to draw the eye.
— Berry Cluster (Make 16 clusters; each cluster contains 4-6 berries) :
Round 1 :
With deep red, make magic ring, ch1, 6 sc in ring (6)
Round 3 :
Work bobble round: *bobble in next st, sc next 2* around to create bumpy texture (approximately 4 bobbles per berry), finish and fasten off leaving tail (12)
Round 4 :
Make each berry 3-4 rounds tall by repeating a sc round and a bobble round forming dense spheres; final diameter ~1-1.5cm depending on tension
Info :
Cluster 4-6 berries close together when sewing to runner. Vary sizes by changing bobble round count; secure berries by stitching through bases into the runner.
— Cream Flower (Make 8) :
Round 1 :
With cream, magic ring, ch2, 10 hdc into ring, join (10)
Round 2 :
*Ch3, sk next st, sl st into next st* repeat around to create 5 petal loops. Adjust to achieve 5 or 6 petals depending on desired look (5-6 loops)
Round 3 :
Into each ch3 loop work: (sc, hdc, dc, hdc, sc) to form a petal; fasten off and weave tails (approx 25-30 sts per flower)
Round 4 :
Stitch a small gold French knot or sew a tiny tan yarn pom at center for contrast
Info :
Block flower petals gently to open them up. Cream flowers act as focal light spots to break up dense greens and browns.
— Leaf Textures and Veining Additional Rounds :
Round 1 :
For extra raised veins, pick a leaf and add 6 fpdc ribs along center from base to tip; anchor ends with a sl st (work on 1/3 of total leaves)
Round 2 :
On alternate leaves, add a row of picots along one edge to imitate older needle clusters: *(ch3, sl st into same st)* every 3rd st along edge
Info :
Alternate textured leaves and plain leaves for variety. Use muted greens for older needles and brighter greens for new growth.
— Border and Scallop Edge :
Round 1 :
With cream, attach to any foundation ch-5 loop along base edge. Work: *(ch1, sc in anchor, ch5, sl st in next anchor)* across long edges to re-establish anchors if needed
Round 2 :
In each ch-5 loop work: *(sc, hdc, 3 dc, hdc, sc) to form a scallop*, sl st to next anchor and repeat across both long sides
Round 3 :
Turn corners into short edges: create 6 dc shell to wrap ends neatly, continue scallops across opposite side for a framed look
Info :
The scalloped border frames the composition and provides mounting points if you prefer to sew motifs into loops rather than onto flat base. Block scallops after finish to even arcs.
Round 4 :
Work one finishing round of sc around whole runner to tidy edge and hide join stitches (work into top of scallops and between shells) (approx circumference dependent on size)
— Assembly & Layering Guide (Extensive rounds act as placement steps) :
Round 1 :
Layout: Place base panel flat and arrange large pinecones at even intervals along the center — suggested spacing: 18-22 cm between large pinecone centers depending on runner length
Round 2 :
Position medium pinecones in offset clusters beside large cones, fill gaps with small pinecone accents and clusters of berries to create triangular focal compositions
Round 3 :
Arrange evergreen leaves in radiating fans from each pinecone: 3-4 long leaves (Leaf A) per side, 2-3 short fan leaves (Leaf B) to fill lower layers
Info :
Pin motifs in place lightly using straight pins. Stand back and check symmetry often — motifs may overlap; aim for a natural, slightly irregular look rather than perfect symmetry.
Round 4 :
Sewing order: Start by sewing large elements down first (large pinecones) using long tails and whip stitch through base rounds, then tack leaves and flowers in layers, finally stitch berry clusters to hide join points
Round 5 :
Use small stitches through the base panel and into motif underside; aim for at least 6-10 secure stitches per large motif and 3-6 for smaller motifs
Info :
When sewing clusters, run a small thread between nearest motif bases and pull slightly to hold multiple pieces as a group before final tacking. This prevents gaps and slippage.
Round 6 :
Hide tails by threading them into underside and weaving through several stitches. Trim close to fabric after secure weaving.
Round 7 :
Optional: lightly steam set the entire runner on low heat to relax yarn and set shapes. Use a press cloth and avoid direct pressing on bobbled surfaces to preserve texture
Info :
Placement variations: create asymmetrical layout or two mirror halves depending on table length and center placement — the modular approach makes customization easy.
— Finishing Touches and Reinforcements :
Round 1 :
Inspect underside and add extra reinforcing stitches to any motifs that shift when runner is lifted; add 2-3 extra stitches per motif base if needed
Round 2 :
Trim any excess fuzz and tidy edges with small scissors. Use a bit of fabric glue under very small slip points if necessary but test on scrap first
Round 3 :
Block the finished runner on a flat surface, pinning scallops and leaf tips into a natural spread, allow to dry fully before use
Info :
Store runner flat or rolled with tissue to preserve shape when not in use. Avoid folding across heavy textured areas to prevent crushing scales.
Completing this runner is such a joyful holiday moment — every layered leaf, bobbled berry, and spiral pinecone builds into a textured centerpiece full of warmth and seasonal charm. The steps are satisfying and the modular construction lets you add your own touches along the way. I hope you enjoy every stitch and the delight it brings to your home! 🎄🧶✨