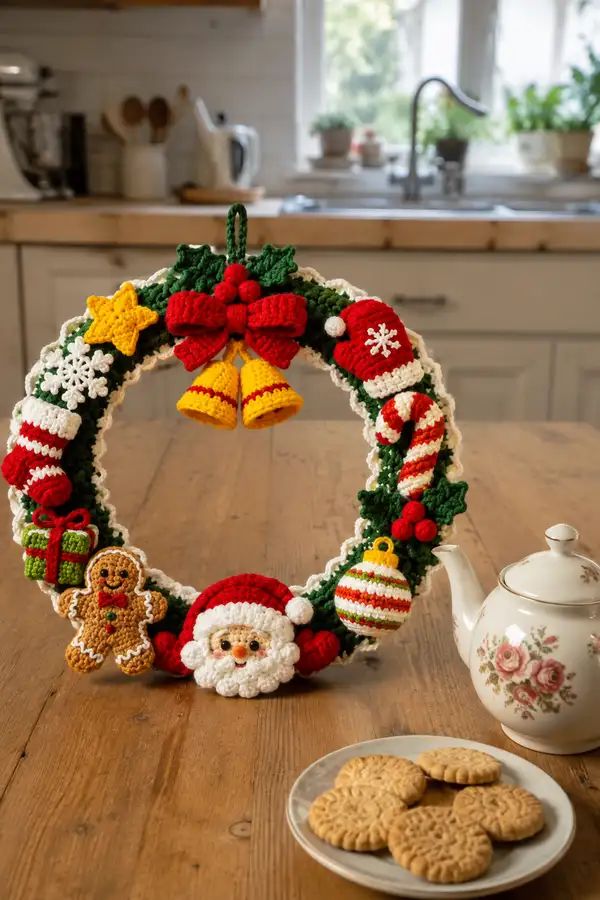
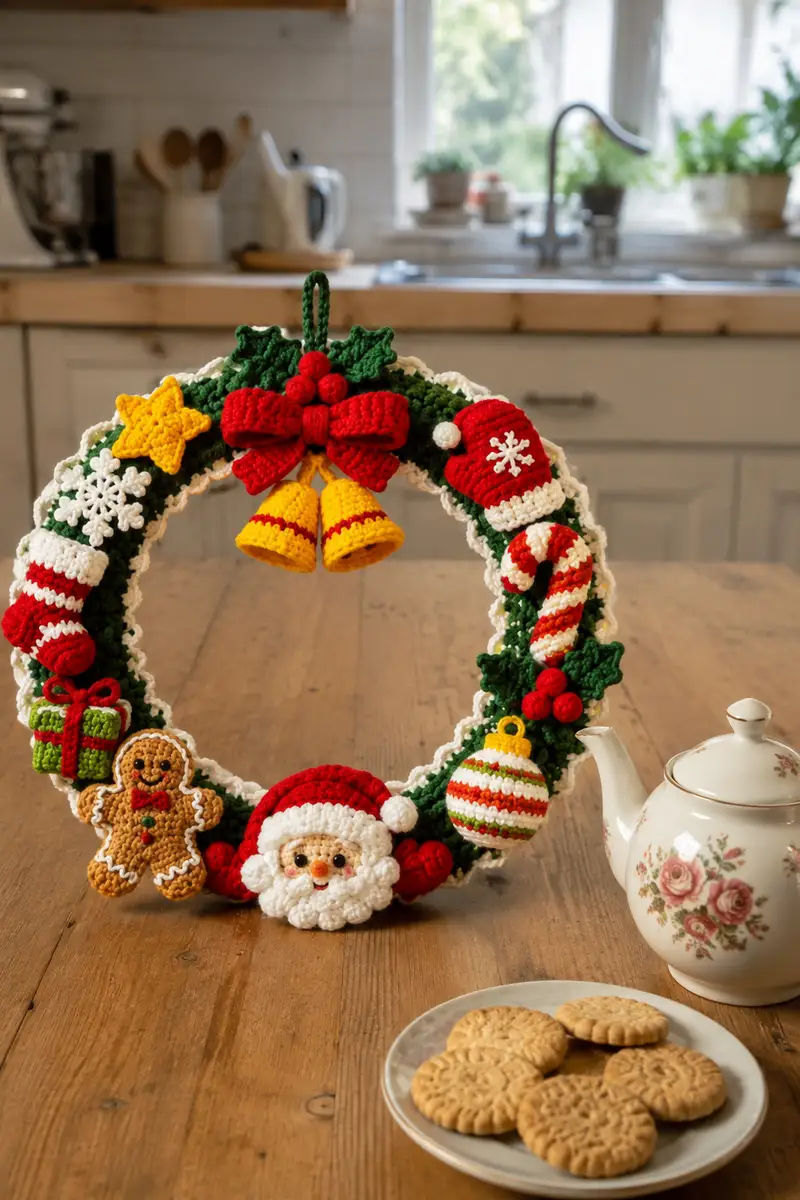
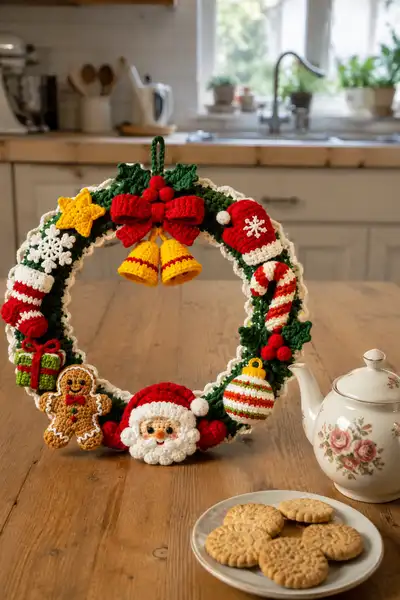
Create a charming crochet Christmas wreath decorated with tiny amigurumi ornaments: Santa face, gingerbread, candy cane, bells, stocking, mitten, holly and baubles. This pattern uses worsted weight yarn and small motifs assembled onto a plush wreath base — perfect for a front door or tabletop display. Detailed round-by-round instructions, tips and assembly notes included so you can recreate each tiny seasonal piece with confidence.
Progress Tracker
0% Complete
— Wreath Base (Make 1) :
Info :
This wreath is constructed as a long stuffed tube (a 'rope') that is joined into a ring. The sample wreath measures approximately 12-14 inches (30-36 cm) outer diameter when the tube circumference is about 120 stitches. Adjust chain length to change finished size. Work in continuous rounds; join seam invisibly when closing the tube and secure stuffing evenly.
Round 1 :
Ch 120, join with sl st to first ch to form a ring (120)
Round 2 :
1 sc in each ch around, join with sl st (120)
Round 3-6 :
1 sc in each st (120)
Info :
Work the first 6 rounds to create a flat tube edge. Place stitch marker at beginning of round and keep consistent. Stretch ring gently to keep it slightly circular while working.
Round 7 :
1 sc in each st BLO (120) (this creates a slight ridge inward, helping the scallop edge sit neatly)
Round 8-14 :
1 sc in each st (120). After round 10 begin lightly stuffing the tube with polyester filling, adding a small amount each round so stuffing distributes evenly and tube remains soft but firm.
Info :
Keep stuffing moderate to allow the wreath to be flexible when joined. Aim for a uniform cross-section. If you prefer a plumper wreath, add two extra rounds of even sc before closing.
Round 15 :
1 sc in each st BLO (120)
Round 16-18 :
1 sc in each st (120). Final stuffing: push fiberfill into all sections, ensuring tube is evenly filled and not lumpy.
Round 19 :
Work 60 sc (do not join) across back half of the ring to create a recessed seam allowance for joining ends (60)
Round 20 :
Fold the ring so the ends meet and use an invisible whip/ladder stitch to sew the tube ends together through the back loops only so the seam sits flat and hidden; you will close into a continuous circular wreath.
Info :
After joining, run one round of sl st around both inner and outer edges to even the join if necessary. Secure and weave in ends long enough for later anchoring of motifs.
— Scalloped White Edging :
Info :
The scalloped edging is worked around the outer circumference in white yarn. Work through both loops around the outermost edge every 6th stitch to create even scallops. This adds a snowy trimmed look.
Round 1 :
Join white yarn to outer edge at a chosen point. *Ch 1, sc in next 3 sts, 5 dc in next st (shell made), sc in next 3 sts; sl st in next st* repeat around; adjust last repeat to match 120 sts circumference (approx 20 shells)
Round 2 :
Work slip stitch in the center of each shell to define scallop (no change in stitch count)
Info :
Fasten off and weave in ends. The scallop should sit slightly raised for a decorative border and provide contrast to green body.
— Santa Face (Make 1) :
Round 1 :
mr, 6 sc in magic ring (6)
Round 3 :
(1 sc, inc) x 6 (18)
Round 4 :
(2 sc, inc) x 6 (24)
Round 5 :
(3 sc, inc) x 6 (30)
Round 6 :
(4 sc, inc) x 6 (36)
Round 7 :
(5 sc, inc) x 6 (42)
Round 8 :
(6 sc, inc) x 6 (48)
Round 9-12 :
1 sc in each st (48)
Info :
Place eyes between rounds 11-12 approximately 10-12 sts apart (center to center) depending on desired expression. For 6mm eyes place them 12 sts apart; for 8mm place them 10 sts apart. Mark positions with removable markers. Leave space for nose embroidery between eyes on round 10-11.
Round 13 :
(6 sc, dec) x 6 (42)
Round 14 :
(5 sc, dec) x 6 (36)
Info :
Begin stuffing head gently but firmly after round 13. Use small amounts of stuffing and push into facial curves to create a round, plump face. Stuff to just before final decreases so face remains full.
Round 15 :
(4 sc, dec) x 6 (30)
Round 16 :
(3 sc, dec) x 6 (24)
Round 17 :
(2 sc, dec) x 6 (18)
Round 18 :
(1 sc, dec) x 6 (12)
Info :
Fasten off leaving a long tail for sewing the face to the wreath. Weave tail through remaining stitches and pull closed. Position Santa at bottom center of wreath and tack in place before final sewing. Add blush to cheeks with a touch of fabric-safe chalk or pink yarn embroidery.
— Santa Hat (Make 1) :
Round 1 :
mr, 6 sc in magic ring (6)
Round 3 :
(1 sc, inc) x 6 (18)
Round 4 :
(2 sc, inc) x 6 (24)
Round 5-9 :
1 sc in each st (24)
Info :
Switch to white yarn for rim trim: join white, work 2 rounds of sc around base of hat for fluffy trim. Optionally work 1 round of popcorn stitches for extra puffiness.
Round 10 :
Change to white, 1 sc in each st (24)
Round 11 :
1 sc in each st (24)
Round 12 :
Change to red, 1 sc in each st (24)
Round 13 :
(3 sc, dec) x 6 (18)
Round 14 :
(2 sc, dec) x 6 (12)
Round 15 :
(1 sc, dec) x 6 (6)
Round 16 :
6 dec (3) - finish and fasten off, leave tail to sew on top of Santa head. Add a tiny white pom pom (work 6 sc in mr, fasten off) and stitch to point.
Info :
Sew hat to top of Santa head with a few stitches at back and sides so it sits slightly forward over the eyes. Place pom pom centered on hat tip.
— Santa Beard and Cheeks :
Round 1 :
With white yarn, ch 18, join to lower face edge and work 18 sc across to form a base strip (18)
Round 2 :
Turn and work along strip: 1 sc in each st, fasten off (18)
Round 3 :
Attach yarn and work 6 clusters of 5 sc bobbles across the strip (6 bobbles). Each bobble: (yo, insert, pull up loop) x 5, pull through all loops, ch 1 to secure.
Info :
The bobble clusters create a curly beard. Sew the strip to the lower edge of Santa face so the bobbles overlap the face and hide the seam. Add two small round cheeks by making 2 sl st circles in pale pink (mr, 6 sc, fasten off) and stitch centered on cheeks above beard.
— Gingerbread Person (Make 1) :
Round 1 :
mr, 6 sc in magic ring (6) - this forms head center of gingerbread
Round 3 :
(1 sc, inc) x 6 (18)
Round 4 :
Change to tan yarn for body, 1 sc in each st around (18)
Round 5 :
(2 sc, inc) x 6 (24)
Round 6 :
1 sc in each st (24)
Round 7 :
Divide for arms: (3 sc, ch 6, skip 6 sts, 3 sc) repeat to shape legs and arms as a flat applique; work shaping so cookie looks gingerbread-shaped.
Round 8 :
Use white yarn to embroider 'icing' edges: surface sc along arms, legs and head outline. Add three small buttons by French knots with green yarn or by stitching tiny colored beads.
Info :
Gingerbread is worked mostly flat as an applique—stuff lightly behind the head only if you want extra dimension. Ensure icing embroidery contrasts neatly with tan base.
— Candy Cane (Make 1) :
Round 1 :
Ch 18, join with sl st to form a small ring, 1 sc in each ch around (18)
Round 2-6 :
1 sc in each st (18). Alternate stripes: work two rounds red, two rounds white, repeat to create candy stripes. For gradual curvature, reduce 1 st on round 5 to begin taper (17)
Round 7 :
Work 1 sc in each st while shaping: on last 6 sts form a curve by placing 2 sc in same st then sl st to next and continue to create hook; stuff lightly as you go (17)
Info :
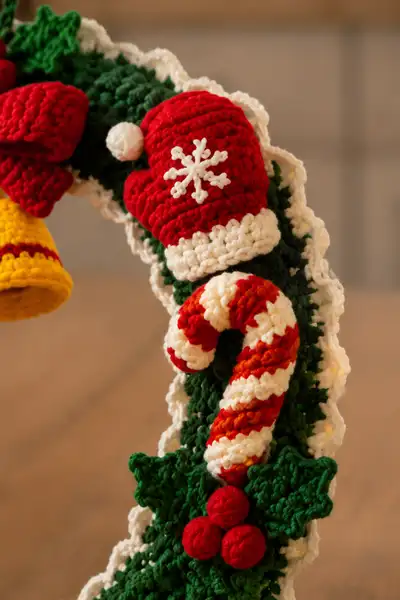
Change colors cleanly by finishing last loop of the previous stitch with the new color. Sew inactive ends into the body of the cane to hide them. Bend into candy-cane shape and tack to wreath so hook faces outward.
— Bow (Make 1) :
Round 1 :
With red yarn, ch 24, 1 sc in 2nd ch from hook and across (23)
Round 2-4 :
Turn, ch1, 1 sc in each st (23)
Round 5 :
Fasten off leaving long tail. Fold strip into bow shape and sew middle tightly with yarn to form bow loops. Wrap small length of yarn around center to form knot.
Info :
For a fuller bow, make two identical strips and stack them slightly offset before wrapping the center. Stitch securely to wreath top with multiple passes through the wreath tube to hold weight.
— Bells (Make 2) :
Round 1 :
mr, 6 sc in magic ring (6)
Round 3 :
(1 sc, inc) x 6 (18)
Round 4 :
1 sc in each st (18)
Round 5 :
(2 sc, dec) x 6 (12)
Round 6 :
1 sc in each st (12) - do not stuff, shape into bell by leaving an open base
Round 7 :
With yellow yarn, ch 6 and sl st to side of bell as a hanger loop; make small contrasting stripe by working reverse sc around base if desired. Fasten off and repeat for second bell.
Info :
Sew bells under the bow with center hangers facing forward. Use a few secure stitches through bell crown into the wreath tube to prevent swaying.
— Holly Leaves (Make 3) :
Round 1 :
With green yarn, ch 6, 1 sc in 2nd ch from hook, hdc in next, dc in next, tr in last ch, turn and work along opposite side: dc, hdc, sc (approx 12 sts total) - fasten off (leaf 1)
Round 2 :
Make a picot edge: join yarn to leaf edge, *(sc, ch3, sl st in 3rd ch) repeat along edges to create serrated look*
Round 3-6 :
Repeat for three leaves, varying size by ch 4 or 8 for small and large leaves. Block leaves with steam if necessary to hold shape.
Info :
Sew leaves in small clusters of three. Add three red berry balls (see berries section) at the base of each cluster. Position holly clusters evenly around the wreath where pictured or to your taste.
— Holly Berries (Make 9) :
Round 1 :
mr, 6 sc in magic ring (6)
Round 2 :
1 sc in each st (6) - fasten off leaving tail for sewing (6)
Info :
Make nine small berries and group in clusters of three. Sew through the center of three berries and into the wreath tube to create secure triads.
— Stocking (Make 1) :
Round 1 :
mr, 6 sc in magic ring (6)
Round 3 :
(1 sc, inc) x 6 (18)
Round 4-6 :
1 sc in each st (18)
Round 7 :
Work back and forth to form foot: sc in next 6 sts, ch 6, turn and work back along ch as sc for toe, join to continue in the round (18)
Round 8 :
Join white yarn and work 2 rounds of sc for cuff (18)
Round 9 :
Add stripe detail: with red yarn embroider a band near cuff or use surface sc. Fasten off and leave tail to attach to wreath.
Info :
Stocking is decorative and remains flat. Add tiny loop of yarn at cuff to hang ornament from wreath if desired.
— Mitten (Make 1) :
Round 1 :
Ch 6, join with sl st to form loop, 1 sc in each ch around (6)
Round 3 :
(1 sc, inc) x 6 (18)
Round 4-6 :
1 sc in each st (18) - change to white for cuff and work 2 rounds sc (18)
Round 7 :
With red yarn, work 2 rounds of sc, then shape thumb by ch 4 and sc across; finish and fasten off leaving tail for sewing (approx 18)
Info :
Add tiny white snowflake by surface embroidery on mitten front using 6-petal design: ch 4, sl st to form small loop, then stitch spokes with white yarn.
— Star (Make 1) :
Round 1 :
With yellow yarn, ch 2, 5 sc in first ch, join (5)
Round 2 :
*Ch 4, sl st in next st* repeat 5 times to form five points, fasten off and shape points with blunt needle if necessary
Info :
Make star slightly padded if you want a puffy ornament: after forming points, work an additional round of sc around, stuff lightly then close with mattress stitch.
— Striped Ornament Bauble (Make 1) :
Round 1 :
mr, 6 sc in magic ring (6)
Round 3 :
(1 sc, inc) x 6 (18)
Round 4 :
(2 sc, inc) x 6 (24)
Round 5-8 :
1 sc in each st (24) - change colors each round to create red, green, white stripes; carry colors inside or fasten off to avoid long floats
Round 9 :
(2 sc, dec) x 6 (18)
Round 10 :
(1 sc, dec) x 6 (12)
Round 11 :
6 dec (6) - stuff before final decreases, fasten off leaving tail for closing and attaching small painted or crocheted top cap (work ch 6 loop, sl st to edge)
Info :
Use thin gold embroidery wound around the ornament to mimic metal cap or stitch a small yellow ring at top to sew securely to wreath.
— Hanging Loop :
Round 1 :
Ch 20 (or desired length), sl st into same point to form loop; optionally fold a short length of craft wire inside before sl st to stabilize the hanging loop.
Info :
Sew loop to back of wreath at top center. Reinforce with extra stitches and a dab of fabric glue on the base if the piece will be hung outdoors or on a frequently used door.
— Assembly & Placement of Motifs :
Info :
Arrange motifs on wreath before sewing: Santa centered bottom, gingerbread left of Santa, ornament right of Santa, candy cane and mitten/stocking alternated up sides, bells and bow centered top. Use pins to mark placement and photograph for reference.
Round 1 :
Use long tails from motifs to baste through the wreath tube and secure by stitching around multiple times - ensure motifs lie flat and point outward. Sew through back of wreath tube as well to catch internal stuffing for extra hold.
Info :
Extra reinforcement: apply a small dab of craft glue underneath motifs before sewing for a no-slip hold. Weave ends through several stitches and trim close to surface for a neat finish.
This festive wreath pattern brings the magic of Christmas into crochet form with a collection of tiny, heartwarming ornaments that assemble into a delightful display. Each motif is small, satisfying and perfect for gifting or decorating your home. I adore how the textures and bright holiday colors combine to create a handcrafted heirloom you’ll want to display every year. 🧶🎁✨