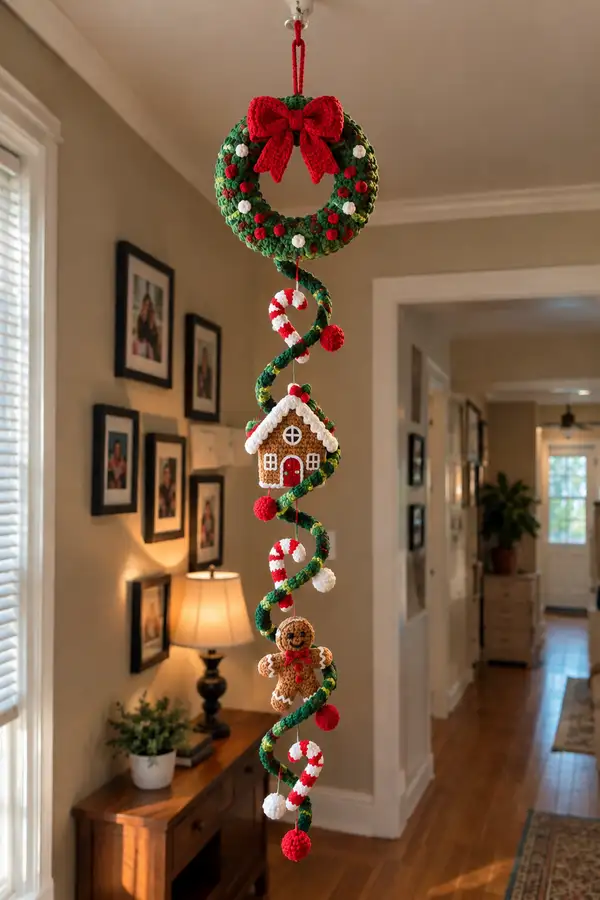
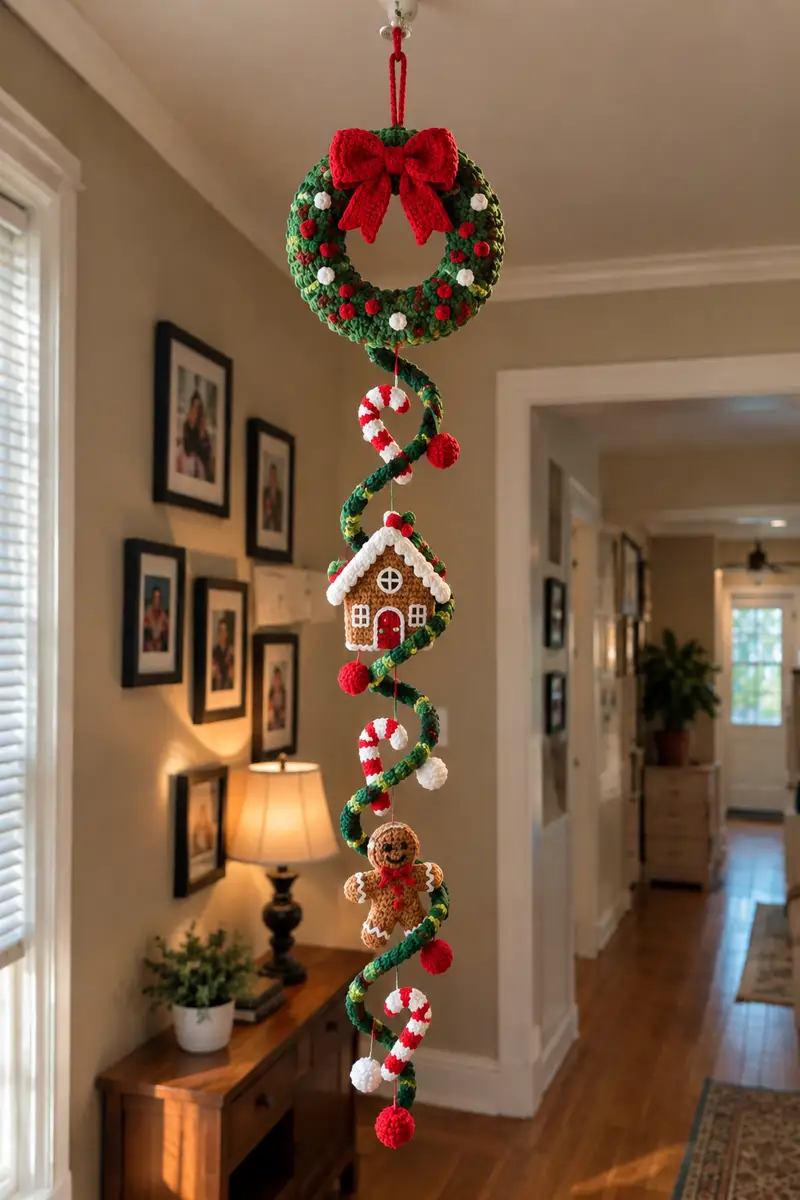
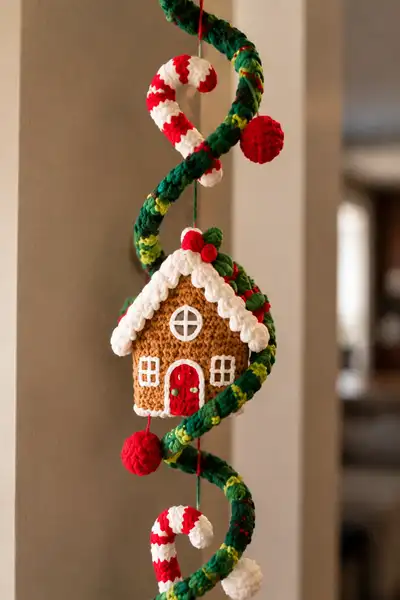
Create a charming hanging holiday mobile featuring a lush crochet wreath, spiraling garland, bright candy canes, a jolly gingerbread man and a tiny gingerbread house. This detailed, step-by-step pattern recreates the layered green wreath with red bow, twirled vine, striped cane accents, pom-poms and sweet house and cookie motifs. Perfect for hanging in a hall or doorway as a festive focal point.
Progress Tracker
0% Complete
— Wreath Tube (Make 1 long tube and join into ring) :
Info :
This wreath is worked as a stuffed tube that is later joined into a circular wreath. For a full, lush look, crochet a tube that is about 60-70 rounds long depending on gauge. You can adjust the circumference by changing the final stitch count in the initial increases. Use deep holiday green. Optional: add variegated or highlight stitches later for visual depth.
Round 3 :
(1 sc, inc) x 6 (18)
Round 4 :
(2 sc, inc) x 6 (24)
Round 5 :
(3 sc, inc) x 6 (30)
Round 6 :
(4 sc, inc) x 6 (36)
Round 7 :
(5 sc, inc) x 6 (42)
Round 8 :
(6 sc, inc) x 6 (48)
Info :
At this point you should be at 48 stitches. This is a comfortable circumference for a 2-3cm tube. If you want a thicker tube, continue one more increase round: (7 sc, inc) x 6 (54) — optional. For pictured wreath we will use 48 sts.
Round 9-12 :
1 sc in each st (48)
Info :
Begin stuffing the tube lightly as you go when you have about 10 rounds left to work. Use small amounts of fiberfill so the tube stays flexible and ribbons around the central core well.
Round 13-60 :
1 sc in each st (48) — repeat until tube reaches desired length (approx 60 rounds for pictured wreath loop). Count rounds as length indicator; adjust to fit your final ring size.
Info :
If you prefer a firmer wreath, insert a plastic ring or a wrapped cardboard ring inside the tube before closing. If using a ring, stitch the tube around the ring and slip stitch closed. If you made a free-standing tube, fasten off leaving long tail and whipstitch ends together aligning pattern to make a smooth seam. Secure with extra stitches to prevent gap.
Round 61 :
Fold ends together and whipstitch through both layers removing mr center; join seamlessly. Fasten off and weave tail through several rounds before trimming.
Info :
If joining a stuffed tube to itself, be sure to pack extra stuffing near the seam so the joined area preserves the round shape. Use ladder stitch or mattress stitch for an invisible join.
— Wreath Decorative Berries and Snow Puffs (Make approx 18-22 berries and 8 snow puffs) :
Round 4 :
Fasten off leaving tail for sewing; stuff slightly and close hole (6)
Info :
Use bright red for berries and white for snow puffs. Make about 18 small berries for the wreath and several snow puffs to scatter. Attach clusters with small whipstitches, grouping 2-3 berries per cluster for natural look.
— Bow (Make 1 large bow) :
Round 1 :
Ch 26, sc in 2nd ch from hook and across (25)
Round 2-6 :
Ch1, turn, 1 sc in each st across (25)
Info :
Work a rectangle and then gather center tightly with matching yarn to form a bow looped shape. Leave long tail for wrapping center. For tails cut two strips 18 ch each and sc back 18 rows or fold and stitch for tapered tails.
Round 7 :
Fasten off, fold rectangle in thirds and wrap center with long tail; stitch through center to secure. Tuck and sew ends under bow for finished look.
Info :
Attach the bow to the top of the wreath securely by sewing through several rounds of the wreath tube and bow base. Reinforce with extra stitches so bow does not sag when hanging.
— Spiral Garland Tube (Long twisted vine) :
Info :
The spiral garland is a long stuffed tube crocheted in a lush variegated green or alternating greens to give the twisted vine effect. Make this tube thinner than the wreath tube so it wraps neatly. We will make a tube with 30 sts circumference and 80 rounds for a long spiral. You can also insert a thin wire or cord as a core for stability.
Round 3 :
(1 sc, inc) x 6 (18)
Round 4 :
(2 sc, inc) x 6 (24)
Round 5 :
(3 sc, inc) x 6 (30)
Round 6-8 :
1 sc in each st (30)
Info :
Insert a thin cord or wire inside tube now if using. If using wire, fold ends and wrap with tape to avoid sharp edges. Carry core inside as you work to create stable spiral that will hold shape when wrapped around the central hanging cord.
Round 9-88 :
1 sc in each st (30) — continue until tube reaches desired length (approx 80 rounds or length that will wrap from wreath to bottom ornament positions). Change yarn color or slip in small surface stitches of lime/darker green every 6-10 rounds for variegation effect.
Info :
To create the twisted look, after finishing the tube, dampen lightly and twist around your core or central cord, hand-sewing spiral to hold shape every 4-6 cm with tiny stitches. This keeps a consistent spiral rather than a loose wrap.
Round 89 :
Fasten off and leave long tail for sewing to wreath and ornaments. If you used a cord, tie securely at both ends to prevent slippage.
— Candy Cane (Make 3 identical candy canes) :
Info :
Each candy cane is a small curved stuffed tube with alternating red and white stripes. Work a 12-14 rounds straight tube then shape the hook by decreasing and forming curve. Use 8-10mm diameter core such as pipe cleaner or thin cord if you want a firm cane.
Round 3 :
(1 sc, inc) x 6 (18)
Round 4-9 :
1 sc in each st (18) — work straight for 6 rounds to create straight shaft
Info :
Stripe pattern: alternate 2 rounds white, 2 rounds red across the shaft. Change colors at the end of a round; carry yarn inside if comfortable or fasten off and reattach each color for crisp stripes.
Round 10 :
(3 sc, dec) x 3 (15)
Round 11 :
(2 sc, dec) x 3 (12)
Round 12 :
(1 sc, dec) x 3 (9)
Round 13 :
9 sc (9) — work this round tightening to form curve base
Round 14 :
9 sc (9) — start curving by pushing hook inside and working in spiral to shape hook; you can wrap tube around a small core to set curve
Round 15 :
Fasten off, leave long tail for sewing; stuff lightly before closing. Block around a small dowel or form to set the candy cane curve and let dry.
Info :
Make three candy canes of slightly varied sizes to match photo—one near top, one near center, one near bottom. Attach with small stitches through spiral tube to central core. For sharper stripes use alternate 1 round red/1 round white for a candy stripe look.
— Pom-Poms (Make 6 small poms, 2 medium poms) :
Round 2 :
Inc in each st around (12)
Round 3 :
12 sc (12) — stuff slightly, close with 6 dec (6) and fasten off leaving tail for sewing
Info :
To create fluffy pom-poms you can alternatively make wrap-style pom-poms and trim; but small crocheted balls are shown and hold shape beautifully. Use red and white yarn for pictured accents. Attach via long tail tied through central cord for suspended look.
— Gingerbread House (Make 1) :
Info :
The gingerbread house is made from a front/back wall joined with side gussets and a separate roof. Work walls flat in rounds (or rows) and join to form a small stuffed house. House dimensions in pattern assume 30-35 rounds on sides and 18-22 rounds for roof for approx 6-8cm tall finished house.
Wall Round 1 :
Ch 12, sc in 2nd ch from hook and across (11)
Wall Round 2 :
Ch1, turn, 1 sc in each st across (11)
Wall Round 3 :
(1 sc in next 2 sts, inc) x 3, sc last 2 sts (14)
Wall Round 4 :
1 sc in each st (14)
Wall Round 5 :
(2 sc, inc) x 3, sc last 2 sts (17)
Wall Round 6-16 :
1 sc in each st (17) — continue until rectangle is approx 12 rows tall to form front wall height
Info :
Work 2 identical wall panels for front and back. For the roof slope, mark the center top of the rectangle and shape the triangular roof edge later by adding an alternating scallop in white for icing. Windows and door will be added by embroidering on the front panel after assembly or crocheting small appliques.
Side Gusset Round 1 :
Ch 4, sc in 2nd ch from hook and across (3)
Side Gusset Round 2-12 :
Ch1, turn, 1 sc in each st (3) — make two gussets long enough to connect front and back walls completely (approx 12 rounds)
Assembly Info :
Place front and back panels right sides facing, align gussets along sides and bottom, whipstitch or sc through all layers to form a shallow box. Leave top open to insert roof. Stuff lightly before closing bottom seams completely so house keeps shape without being overstuffed.
Roof Round 1 :
Ch 20, sc in 2nd ch from hook and across (19)
Roof Round 2-6 :
Ch1, turn, 1 sc in each st (19)
Roof Round 7 :
Attach white yarn and work scalloped icing: *skip next st, 5 dc in next st, skip next st, sl st in next st* repeat across to create scallop edge (approx 6 scallops)
Roof Round 8 :
Fold roof in half lengthwise and sc along inner short edge to close; fasten off leaving tail to sew roof atop house box
Front Door Applique :
Ch6, sc 5 across, ch1 turn and sc back 5 for two rows, fasten off leaving tail to sew centered at base of front wall. Embroider door trim with white yarn and add two green seed beads as door knobs.
Window Applique (Make 3) :
Ch5, join in round with sl st, then sc around 4-6 sts to make square or circle, embroider cross panes in white and sew in place.
Info :
Decorate the roof with little holly leaves (see Holly Leaves section) and tiny red berries (small 6-st berry motifs). Sew roof to top opening of house, then add icicles and piping using surface slip stitch or embroidery. Stuff minimally so house is flat and hangs evenly on central cord.
— Holly Leaves & Small Roses (Make 8-10 leaves and 4-6 tiny rosettes) :
Leaf Round 1 :
Ch6, in 2nd ch from hook: (sc, hdc, dc, hdc, sc) across (5) — fasten off, leave tail to sew. Pinch center and starch lightly to shape leaf ridge.
Rosette Round 1 :
Ch 8, sl st to join into ring, *sc, hdc, dc, hdc, sc* in ring and sl st to close. Fasten off leaving tail for sewing. Roll rosette and sew center to maintain shape if you prefer a 3D rose.
Info :
Sew holly leaves and rosettes on roof edges and wreath for coordinating look. Use lime green for leaf highlights and bright red rosettes as berries if desired.
— Gingerbread Man (Head & Body, Make 1) :
Info :
Gingerbread man is constructed in typical amigurumi style: head and body worked in continuous rounds then short separations for arms/legs attached later. Use warm tan yarn. Safety eyes optional (6mm) or embroider for child-safe toy. This section includes 30 rounds for head and 24 rounds for body to create a small cookie roughly 6-8cm tall.
Head Round 1 :
6 sc in mr (6)
Head Round 3 :
(1 sc, inc) x 6 (18)
Head Round 4 :
(2 sc, inc) x 6 (24)
Head Round 5 :
(3 sc, inc) x 6 (30)
Head Round 6 :
(4 sc, inc) x 6 (36)
Head Round 7 :
(5 sc, inc) x 6 (42)
Head Round 8-13 :
1 sc in each st (42) — maintain even rounds for head height
Info :
Place safety eyes between rounds 10-11 approximately 8-10 stitches apart depending on desired expression. Embroider mouth and icing details after stuffing. Begin stuffing the head firmly but leave some give to keep the cookie soft-looking.
Head Round 14 :
(5 sc, dec) x 6 (36)
Head Round 15 :
(4 sc, dec) x 6 (30)
Head Round 16 :
(3 sc, dec) x 6 (24)
Head Round 17 :
(2 sc, dec) x 6 (18)
Head Round 18 :
(1 sc, dec) x 6 (12)
Info :
Fasten off leaving long tail for attaching head to body. Finish stuffing and close the head using invisible decrease and weave tail through inside stitches to secure. Embroider cheeks or add small blush with fabric paint if desired.
— Gingerbread Body :
Body Round 1 :
6 sc in mr (6)
Body Round 3 :
(1 sc, inc) x 6 (18)
Body Round 4 :
(2 sc, inc) x 6 (24)
Body Round 5 :
1 sc in each st (24)
Body Round 6 :
(3 sc, inc) x 6 (30)
Body Round 7-10 :
1 sc in each st (30)
Info :
At round 10 you will attach arms. Mark the two front arm positions roughly 6-7 stitches in from each side so arms sit on torso front. Leave a gap of about 8-10 stitches between arm attachment points for natural look.
Body Round 11-14 :
1 sc in each st (30) — continue even rounds to shape torso length
Info :
Begin stuffing body moderately around round 12 and continue stuffing as you approach leg openings. Stuff firmly enough so the cookie hangs well from the central cord but still looks soft.
Body Round 15 :
(3 sc, dec) x 6 (24)
Body Round 16 :
(2 sc, dec) x 6 (18)
Body Round 17 :
(1 sc, dec) x 6 (12)
Info :
Leave two small openings for legs (see Legs section) if working separately; otherwise finish body, fasten off and leave long tail for assembly. Embroider icing lines and buttons using white and red yarn and attach two small green beads for shirt buttons if desired.
— Gingerbread Arms (Make 2) :
Round 3 :
1 sc in each st (12)
Round 4 :
(2 sc, dec) x 3 (9)
Round 5-10 :
1 sc in each st (9) — work straight to reach desired arm length (approx 6 rounds)
Round 11 :
Stuff hand end lightly and continue 1 sc in each st (9)
Round 12 :
Fasten off leaving long tail for sewing to body; sew arms into the marked positions on body using ladder stitch for invisible seam
Info :
Add small white icing ruffle cuffs: join white yarn to last round before arm opening and work 6 sc around cuff then 1 round of BLO sc or picot edges to create ruffle effect.
— Gingerbread Legs (Make 2) :
Round 3 :
(1 sc, inc) x 6 (18)
Round 4-8 :
1 sc in each st (18)
Round 9 :
(2 sc, dec) x 6 (12)
Round 10 :
1 sc in each st (12) — Shape foot base by slight flattening and stuffing firmly
Round 11 :
Fasten off, leave tail for sewing to body base; attach legs evenly spaced across bottom of torso. Add white icing around ankle using surface slip stitch for decorative ruffles.
Info :
When attaching legs, position them so the gingerbread man will hang upright. Sew several tight passes between leg top and body to be secure because hanging stress will tug at seams.
— Icing Details on Gingerbread (Embroidery) :
Round 1 :
Using white yarn and tapestry needle, embroider small curved smile under the eyes with backstitch. Make three small zigzag icing cuffs on each arm using chain stitch or surface sl st.
Round 2 :
Sew two small red yarn buttons down center of body and secure with small stitches; add green seed bead accents if desired and glue slightly to secure bead if necessary.
Info :
Keep embroidery small and neat; practice on scrap before adding to finished piece. Use matching thread thickness for clean lines.
— Gingerbread House Detailed Rounds Continue :
Info :
Now that walls, roof, and appliques are prepared, finish assembly by sewing roof, then adding white scallop piping, round window frame, and circular window cross.
Round 1 :
Sew roof to top edge of house using mattress stitch, ensuring scalloped icing faces outward and evenly centered over front and back. Fasten off and weave in tails inside house.
Round 2 :
Using white yarn and small stitch, add piping around base of house: sc around base edge to make clean white trim, approximately one round of white sc (count will match bottom perimeter).
Round 3 :
Add tiny berries and leaves to roof edge by sewing leaves and berries in clusters of 2-3, stitch them through roof fabric to secure. Fasten off tails neatly inside house.
Info :
Before final detailing, insert a small loop of yarn or cord at top of house roof ridge to hang on central cord. Reinforce by stitching through several layers of roof and house body to prevent pulling out.
— Small Decorative Balls & Final Embellishments :
Round 1 :
Make additional small red 6-st berries and white snowballs to suspend from spiral; work as 6 sc in mr, dec round, stuff and close for little spheres. Add a small tail for sewing to central cord.
Info :
Add surface French knots or small embroidered dots in yellow or lime on spiral tube to mimic little stitches of light or foliage. Use red spots for berries by embroidering nubs directly on spiral.
— Assembly & Hanging Core :
Info :
Central core: use a single strong cotton cord or upholstery thread running from top of wreath through spiral and down to bottom ornaments. Tie or knot at top loop for hanging. Sew each ornament to central cord at measured intervals so the spiral wraps neatly around them and they appear centered in spiral loops.
Round 1 :
Attach central cord to inside top of wreath, knot and secure by stitching through inner rounds of wreath. Ensure knot is hidden inside wreath tube. Leave cord long enough to run through entire length of spiral to bottom pom-pom.
Round 2 :
Sew spiral tube to wreath at top and bottom anchor points so it remains attached when hanging. Use small hidden stitches every 2-3cm to secure spiral in place and maintain consistent spacing from wreath ring.
Round 3 :
Thread candy canes, house, gingerbread man, and pom-poms on central cord and position them so spiral wraps around them. Use small whipstitches to tack the spiral to each ornament to hold position and avoid sliding.
Info :
Balance the mobile visually: heavier elements like gingerbread house should be centered closer to the wreath so weight distribution keeps decoration straight. Reinforce all attachments with at least 6-8 secure stitches and a drop of fabric glue inside seams for long-term wear if desired.
Round 4 :
Finish bottom: knot cord and attach a medium red pom-pom to hide knot. If you used a wire core, tuck and secure wire ends inside bottom pom to hide sharp edges. Trim all tails and weave ends inside shapes thoroughly.
Info :
Final blocking: lightly steam or dampen the wreath and spiral and shape into perfect curves. Let dry overnight hanging to set spiral shape. Inspect for loose ends and secure them well to ensure mobile is safe for hanging.
— Finishing Touches and Tips :
Info :
For child-safe versions avoid safety eyes and beads; embroider eyes and buttons instead. If you plan to gift or ship, wrap head and house seams in tissue first to avoid snagging. Photograph placement before permanently sewing to ensure you like arrangement.
Info :
To create extra sparkle, stitch a few tiny seed beads or use metallic thread to highlight scallops. If you want a smaller mobile, reduce tube rounds proportionally and adjust cord length accordingly.
This cheerful holiday mobile brings together classic crochet motifs — wreaths, candy canes, gingerbread characters — into a joyful hanging display. Each component is crafted with thoughtful shaping and charming details so every stitch contributes to the final magic. As you assemble the pieces, you'll see the scene come alive and create a lovely seasonal heirloom. 🎀🍪🧶 Enjoy making, gifting, and displaying this festive creation!