🧢 Beautiful ✨ Detailed πŸ’ Adorable

Field of Daisies Crochet Blanket Pattern

Field of Daisies Crochet Blanket Pattern
4.0β˜… Rating
12-15 Hours Time Needed
3.9K Made This
βœ‚οΈ

Beginner Friendly Level

Perfect for those just starting their crochet journey, with clear instructions and simple techniques

⏱️

Multi-Day Project

A rewarding 12+ hour journeyβ€”perfect for dedicated crafters who love detailed work.

πŸ€—

Soft Hug

Gentle, plush, and full of warmth, creating a sense of comfort and coziness wherever they find a home.

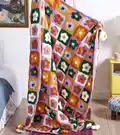
About This Field of Daisies Crochet Blanket Pattern

This Field of Daisies blanket is made from modular flower motifs joined to form a colorful throw. The pattern includes color layouts for six motif variations, step-by-step motif rounds, edging and corner flower pompoms for a playful finish. It's an ideal project to use up scraps or play with seasonal colorways.

Field of Daisies Crochet Blanket Pattern crochet pattern - detailed view of completed project

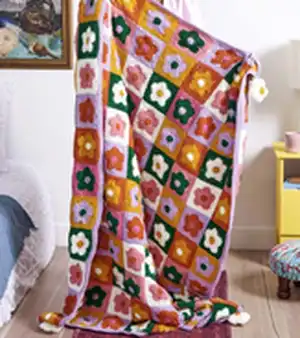
The modular motifs are quick to make and easy to assemble through the back loops for a seamless join. Detailed assembly diagram and finishing instructions are provided for consistent results.

Why You'll Love This Field of Daisies Crochet Blanket Pattern

I absolutely love this pattern because the repeating flower motifs are both soothing to crochet and endlessly satisfying to arrange into the final blanket. I enjoy how the color combinations pop against each other, creating a lively patchwork effect that brightens any room. The construction is modular so you can crochet motifs in small batches and easily join them later. The corner flower pompoms are a charming detail I always look forward to adding because they give the blanket personality and a handmade finish. Sharing this pattern has allowed me to experiment with colors and teach simple joining techniques to newer crocheters.

Field of Daisies Crochet Blanket Pattern step 1 - construction progress Field of Daisies Crochet Blanket Pattern step 2 - assembly progress Field of Daisies Crochet Blanket Pattern step 3 - details and accessories Field of Daisies Crochet Blanket Pattern step 4 - final assembly and finishing

Switch Things Up

I love how easy it is to customize the color palette for this blanket; try a monochrome theme or muted pastels for a softer look.

Want a bolder statement? Use high-contrast brights for the flower centers and background squares to make each motif pop.

I often change the yarn weight and hook size to create a larger, chunkier blanket; bulky yarn with a larger hook gives a cozy throw.

To make a mini version for a cushion or baby blanket, switch to sport weight yarn and a smaller hook for tiny motifs.

I sometimes embroider small details onto the flower centers to add texture and unique personality to each motif.

Swap the corner pompoms for tassels or small crocheted roses if you prefer a different finish at each corner.

I recommend laying out completed motifs on a large surface to audition color placement before joining to get a balanced overall design.

You can mix in solid-color motifs at intervals to create a repeating pattern or border focus within the blanket.

Try joining motifs with a contrasting color join for a graphic grid effect, or use an invisible join for a seamless patchwork look.

I also like adding a wider border in a single color to frame the blanket and give it a finished, professional look.

Common Mistakes & How to Fix Them

βœ— Skipping the color change join can create loose or messy joins; secure color changes by joining with slip stitch and weaving in tails immediately. βœ— Not counting stitches after each round leads to uneven motif edges; count your stitches at the end of each round to ensure corners and sides work out correctly. βœ— Pulling yarn too tight when making petals or clusters causes a distorted motif shape; maintain even, relaxed tension and adjust yarn tension as needed while working petals. βœ— Failing to stuff the flower pompoms lightly makes them collapse or look flat; stuff gently before finishing the last petal so the pompom has a rounded shape and seams close neatly.

Field of Daisies Crochet Blanket Pattern

Make a bright, floral-inspired crochet blanket featuring 120 colorful daisy motifs that join together into a cozy throw. This pattern guides you through motif color combinations, assembly, edging and cute corner flower pompoms so you can create a statement piece for your home. You will love the playful color placement and the satisfying modular construction that makes assembly straightforward.

Beginner Friendly 12-15 Hours

Materials Needed for Field of Daisies Crochet Blanket Pattern

β€” Main Fabric

  • 01
    Red Heart Super Saver (7 oz/198 g; 364 yds/333 m) main yarn
  • 02
    Contrast A Carrot (0256) - 2 balls or 545 yds/498.5 m
  • 03
    Contrast B Gold (0321) - 2 balls or 545 yds/498.5 m
  • 04
    Contrast C Paddy Green (0368) - 2 balls or 545 yds/498.5 m
  • 05
    Contrast D Pale Plum (0579) - 2 balls or 665 yds/608 m
  • 06
    Contrast E Soft White (0316) - 2 balls or 620 yds/567 m
  • 07
    Contrast F Light Raspberry (0774) - 2 balls or 545 yds/498.5 m

β€” Tools Required

  • 01
    Crochet hook size U.S. H/8 (5 mm) Susan Bates Silvalume or size needed to obtain gauge
  • 02
    Susan Bates yarn needle
  • 03
    Fiberfill stuffing for corner Flower Pompoms
  • 04
    Scissors

Progress Tracker

0% Complete

β€” Motifs :

Infos :

Motif 1: With A as Color 1, F as Color 2, and E as Color 3 - make 20 Motifs. Motif 2: With B as Color 1, E as Color 2, and C as Color 3 - make 20 Motifs. Motif 3: With C as Color 1, D as Color 2, and B as Color 3 - make 20 Motifs. Motif 4: With D as Color 1, C as Color 2, and F as Color 3 - make 20 Motifs. Motif 5: With E as Color 1, B as Color 2, and A as Color 3 - make 20 Motifs. Motif 6: With F as Color 1, A as Color 2, and D as Color 3 - make 20 Motifs.

Info :

See Diagram.

β€” Flower Motif :

Info :

With Color 1, ch 4. Join with sl st to first ch to form ring.

Round 1 :

Ch 3. 9 dc in ring. Join Color 2 with sl st to top of beg ch 3. Break Color 1. 10 dc.

Round 2 :

With Color 2, ch 3. 1 dc in first dc. *2 dc in next dc. Rep from* around. Join with sl st to beg of ch 3. 20 dc.

Round 3 :

Skip first dc. *(1 dc, 1 tr) in next dc. 3 tr in next dc. (1 tr, 1 dc) in next dc. Sl st in next dc. Rep from * around, ending by joining with sl st to top of ch-3. Fasten off.

Round 4 :

Join Color 3 with sl st to any centre tr of 3-tr group. Ch 1. 1 sc in same sp as sl st. *1 hdc in next tr. 1 dc in each of next 2 sts. 1 tr in same st as sl st from previous (3rd) rnd. 1 dc in each of next 2 sts. 1 hdc next tr. 1 sc in next tr. Rep from * around, omitting last sc and joining with sl st to first sc.

Round 5 :

Ch 1. 1 sc in same sp as sl st. *1 hdc in next st. 1 dc in next st. 2 dc in next st. (1 tr, ch 1, 1 tr) in next st (corner made). 2 dc in next st. 1 dc in next st. 1 hdc in next st. 1 sc in each of next 3 sts. Rep from * around, ending with 1 sc in each of last 2 sts. Join with sl st to first sc. Fasten off.

β€” Flower "POMPOMS" :

Infos :

FLOWER "POMPOMS" (make 4) Flowers (make 2 for each Pompom)

Info :

With B, ch 4. Join with sl st to first ch to form ring.

1st rnd :

Ch 3. 9 dc in ring. Join E with sl st to top of beg ch 3. Break B. 10 dc.

2nd rnd :

With Color 2, ch 3. 1 dc in first dc. *2 dc in next dc. Rep from* around. Join with sl st to beg of ch 3. 20 dc.

3rd rnd :

Skip first dc. *(1 dc, 1 tr) in next dc. 3 tr in next dc. (1 tr, 1 dc) in next dc. Sl st in next dc. Rep from * around, ending by joining with sl st to top of ch-3. Fasten off.

β€” Assembly :

Info :

Sew Motifs tog through back loops only as shown in Assembly diagram on page 3.

β€” Edging :

1st rnd :

(RS). Join D with sl st to any corner. Ch 2. Work 1 rnd of hdc evenly around all sides, working 3 hdc in each corner. Join with sl st to first hdc.

2nd rnd :

Ch 2. 1 hdc in each hdc around, working 3 hdc in each corner hdc. Join with sl st to first hdc. Fasten off.

β€” Flower Pompom Assembly :

Info :

With 2 Flowers held WS tog, join with sl st anywhere around edge.

1st rnd :

Working through both thicknesses and back loops only, sl st around Flowers, stuffing lightly before completing 5th petal. Fasten off.

Info :

Sew one Flower Pompom to each corner of Blanket.

Assembly Instructions

  • Sew Motifs together through back loops only following the Assembly Diagram on page 3 to create a neat seam and consistent grid.
  • Join motifs row by row aligning color pattern using slip stitch or whipstitch through back loops for stability and a flat join.
  • After joining all motifs, work the edging by joining Color D at any corner and working 1 rnd of hdc evenly around, placing 3 hdc in each corner.
  • Make 4 flower pompoms by sewing two flower motifs together, joining around edges through both thicknesses and back loops only, stuffing lightly before finishing.
  • Sew one finished Flower Pompom to each corner of the assembled blanket, securing with yarn and weaving in ends.

Important Notes

  • πŸ’‘Ch 2 at beg of rnd does not count as a stitch; follow note-specific stitch counts accordingly.
  • πŸ’‘Ch 3 at beg of rnd counts as a dc, so count the beginning ch-3 as the first double crochet when tallying stitches.
  • πŸ’‘Sew motifs together through back loops only to match the shown assembly diagram and create a defined joining seam.
  • πŸ’‘Fasten off and weave in ends as you complete motifs to keep your work tidy and make assembly easier.

This Field of Daisies blanket brings color and charm to any room with a playful floral grid and pompom corners. 🌼 The modular motifs are perfect for relaxing crochet sessions and make a beautiful gift for friends and family. 🧢 Happy crocheting and enjoy your bright, handmade throw! ✨

You ask,

we answer.

FAQs

What size will the finished piece be?

The finished blanket measures approximately 57" x 68" (145 x 173 cm) when using the recommended yarn and hook size.

Can I use different yarn weights for this pattern?

Yes, you can use different yarn weights, but this will affect the final size and gauge; use an appropriate hook for your yarn and check gauge to adjust motif count as needed.

Do I need prior crochet experience for this pattern?

This pattern is rated Beginner Friendly and uses basic stitches like dc, hdc and tr, so basic crochet knowledge is recommended.

How long does this project typically take to complete?

This is a multi-day project and typically takes 12-15 hours depending on speed and how many motifs you make at a time.