đŸ§¶ Beautiful ✹ Detailed 💝 Adorable

Guacamole Vest Pattern

Guacamole Vest Pattern
4.6★ Rating
5-7 Hours Time Needed
1.5K Made This
✂

Intermediate Level

Ideal for those with basic crochet experience, featuring slightly more advanced stitches and techniques to expand your skills.

⏱

Weekend Treat

Takes 5-7 hours, making it an enjoyable project to finish over a couple of days.

👕

Casual Chic

Relaxed style with a modern twist, perfect for everyday wear while maintaining that handcrafted uniqueness.

About This Guacamole Vest Pattern

This pattern creates a chunky cable Guacamole Vest worked flat with separate front and back panels. It features cable twists and a ribbed collar, designed to be worked with chunky yarn for a cozy finish. The pattern includes charts, shaping instructions for shoulders and armholes, and step-by-step finishing directions.

Guacamole Vest Pattern crochet pattern - detailed view of completed project

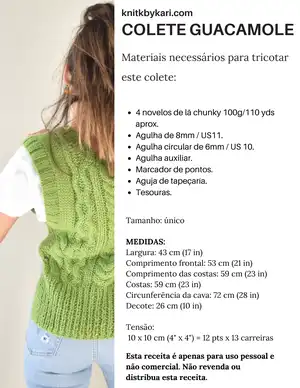
A single-size pattern with detailed measurements and gauge to help you achieve the intended fit. Includes instructions for assembling shoulders, picking up stitches for the armholes and collar, and sewing the side seams.

Why You'll Love This Guacamole Vest Pattern

I absolutely love this pattern because the cables create a beautiful texture that elevates a simple vest into a statement piece. I enjoy how quickly the chunky yarn knits up while still producing intricate-looking details. The design is versatile — it works well layered over tees or shirts for everyday wear. As a maker, I love that the pattern includes clear charted instructions and practical finishing steps that make assembly straightforward and satisfying.

Guacamole Vest Pattern step 1 - construction progress Guacamole Vest Pattern step 2 - assembly progress Guacamole Vest Pattern step 3 - details and accessories Guacamole Vest Pattern step 4 - final assembly and finishing

Switch Things Up

I love to customize this vest by changing the cable size and spacing to create different looks.

You can swap the chunky yarn for a slightly lighter weight and smaller needles to make a more delicate version of the vest.

I often adjust the length by adding or removing repeated chart rows to make the vest longer or cropped to suit my style.

Try adding pockets by picking up stitches and knitting small pouches before sewing the side seams for a functional twist.

I sometimes replace the ribbed collar with a rolled collar or a shawl collar for a different neckline profile.

For a pop of color, knit the collar, armhole edges, or side seams in a contrasting shade to highlight the structure.

If you want a more fitted silhouette, decrease a few stitches on the side panels following a consistent shaping plan across front and back.

I also like to experiment with button bands on the front edges to convert this pullover-style vest into a cardigan-style closure.

Adding decorative embroidery or sewn-on patches over the cable panels creates a personalized, artistic touch.

Finally, blocking gently after finishing can dramatically improve drape; I always try a light steam block to set the cables and even out the stitches.

Common Mistakes & How to Fix Them

✗ Skipping the stitch-count check after casting on can cause misaligned cable motifs; count your stitches after casting on and before starting the chart to ensure alignment. ✗ Not turning your work correctly when knitting flat will reverse the stitch-side orientation; remember to turn your work every row when instructed to maintain the correct RS/WS. ✗ Failing to place the marker when instructed for the collar will make it hard to identify the beginning of the round; place the marker as directed to simplify picking up and seaming later. ✗ Binding off armhole stitches incorrectly can change the fit of the armhole edge; follow the bind-off instructions and tension carefully, then try on before finishing seams.

Guacamole Vest Pattern

Make a cozy, cable-textured Guacamole Vest with this clear, well-structured knitting pattern. You will work flat, following charts for the front and back, then finish with a neat collar and armhole edges. This pattern is ideal if you enjoy textured cables and a relaxed, chunky fit.

Intermediate 5-7 Hours

Materials Needed for Guacamole Vest Pattern

— Main Fabric

  • 01
    Chunky weight yarn, approximately 100g/110 yds per skein - 4 skeins (approximate total 400g)
  • 02
    Color: green (as shown) - adjust quantity if changing size or gauge

— Tools Required

  • 01
    Knitting needles size 8mm / US 11 (straight needles)
  • 02
    Circular needles size 6mm / US 10 (for collar and armhole pickup)
  • 03
    Auxiliary needle / cable needle
  • 04
    Stitch markers
  • 05
    Tapestry needle
  • 06
    Scissors

Progress Tracker

0% Complete

— Techniques :

Infos :

1. Colocar pontos na agulha 2. Arremate/ tirar os pontos 3. Arremate de pontos no meio de uma carreira 4. Ponto meia (pm) 5. Ponto tricĂŽ (pt) 6. Diminuiçao 7. Frente do trabalho- o lado em que vocĂȘ estĂĄ trabalhando. Aquele que vocĂȘ pode ver nesse momento. 8. Parte de trĂĄs do trabalho- Refere-se ao lado oposto ao que estĂĄ Ă  sua frente, ou seja, aquele que vocĂȘ nĂŁo pode ver nesse momento. 9. LD- Lado direito 10. LA- Lado avesso. 11. *a* - faça/repita conforme indicado entre os asteriscos 12. Torção para a direita de 3 pontos (LD) - tira 1 ponto da agulha esquerda para a agulha auxiliar e deixe por trĂĄs do trabalho, 2 pontos meia da agulha esquerda, trabalhe 1 ponto meia da agulha auxiliar. 13. Torção para a direita de 3 pontos (LA) - tira 2 pontos da agulha esquerda para a agulha auxiliar e deixe por trĂĄs do trabalho, trabalhe 1 ponto tricĂŽ da agulha esquerda, trabalhe 2 pontos tricĂŽ da agulha auxiliar. 14. Torção para a esquerda de 3 pontos (LD) - tira 2 pontos da agulha esquerda para a agulha auxiliar e deixe na frente do trabalho, trabalhe 1 ponto meia da agulha esquerda, trabalhe 2 pontos meia da agulha auxiliar. 15. Torção para a esquerda de 3 pontos (LA) - tira 1 ponto da agulha esquerda para a agulha auxiliar e deixe na frente do trabalho, trabalhe 2 pontos tricĂŽ da agulha esquerda, trabalhe 1 ponto tricĂŽ da agulha auxiliar. 16. Torção para a direita de 4 pontos (LD) - tira 2 pontos da agulha esquerda para a agulha auxiliar e deixe por trĂĄs do trabalho, trabalhe 2 pontos meia da agulha esquerda, trabalhe 2 pontos meia da agulha auxiliar. 17. Torção para a esquerda de 4 pontos (LD) - tira 2 pontos da agulha esquerda para a agulha auxiliar e deixe na frente do trabalho, trabalhe 2 pontos meia da agulha esquerda, trabalhe 2 pontos meia da agulha auxiliar. 18. Torção para a direita de 6 pontos (LD) - tirar 3 pontos da agulha esquerda para a agulha auxiliar e deixe por trĂĄs do trabalho, trabalhe 3 pontos meia da agulha esquerda, trabalhe 3 pontos meia da agulha auxiliar. 19. Torção para a esquerda de 6 pontos (LD) - tirar 3 pontos da agulha esquerda para a agulha auxiliar e deixe na frente do trabalho, trabalhe 3 pontos meia da agulha esquerda, trabalhe 3 pontos meia da agulha auxiliar.

— How to Read This Pattern :

Info :

VocĂȘ tem que trabalhar esta receita em Plano e vocĂȘ deve tricotar a frente e as costas separadamente. Quando vocĂȘ trabalha em Plano: Trabalhe todas as carreiras impares no LA e leia o grĂĄfico da esquerda para a direita. Trabalhe todas as carreiras pares no LD e leia o grĂĄfico da direita para a esquerda. Quando vocĂȘ trabalha em plano, vocĂȘ deve virar o trabalho quando acabar a carreira e continuar trabalhando do outro lado. Se vocĂȘ estiver trabalhando do LD a prĂłxima carreira serĂĄ no LA e vice-versa.

— Front :

Round 0 :

Carreira 0: coloque 60 pontos nas agulhas e siga o grĂĄfico (pĂĄgina 9).

Round 46 :

Carreira 46: de agora em diante vocĂȘ tem que trabalhar um ombro de cada vez

Round 87 :

Carreira 87: Arremate os 10 pontos.

Round Info :

Depois de terminar o ombro direito, pegue outro fio e continue com o ombro esquerdo pelo LD do trabalho (carreira 46).

— Back :

Round 0 :

Carreira 0: montar 60 pontos nas agulhas e siga o grĂĄfico (pĂĄgina 10).

Round 81 :

Carreira 81: Arremate 20 pontos no meio da carreira conforme indicado no grĂĄfico. VocĂȘ terĂĄ 13 pontos de cada lado.

Round 82 :

Carreira 82: de agora em diante vocĂȘ sĂł trabalharĂĄ com um ombro de cada vez.

Round 91 :

Carreira 91: arremate os 9 pontos.

Round Info :

Depois de terminar o ombro esquerdo, pegue outro fio e continue com o ombro direito pelo LD do seu trabalho (carreira 82).

— Sew the Shoulders :

Info :

Coloque o frente e as costas frente a frente; com uma agulha de tapeçaria e um pedaço suficientemente comprido do mesmo fio, costure um ombro pegando um ponto das costas e outro da frente até completar todos os pontos do ombro. Faça o mesmo com o outro ombro.

— Armhole (Cava) :

Round 0 :

Carreira 0: Começando pela frente, pegue 98 pontos em volta da cava: 49 da frente e 49 do verso.

Round 1 :

Carreira 1: 2 pontos meia *2 pontos tricÎ, 2 pontos meia*; repita de * a * até o fim da carreira.

Rounds 2-7 :

Carreira 2-7: continue trabalhando em ponto barra. Trabalhe os pontos como eles estĂŁo.

Round 8 :

Carreira 8: arremate todos os pontos (ponto barra).

— Collar (Gola) :

Info :

Começando do meio da gola, pegue 40 pontos atĂ© a costura dos ombros, 43 pontos das costas e 40 pontos do outro lado da frente. VocĂȘ terĂĄ 123 pontos. VocĂȘ deve trabalhar em Plano, entĂŁo gire o seu trabalho para iniciar essa carreira. VocĂȘ estarĂĄ trabalhando no LA. VocĂȘ deve girar seu trabalho toda vez que iniciar uma nova carreira.

Round 1 :

Carreira 1: 2pt juntos (2ptJ), *2pm, 2pt*. Repita de * a * até sobrar 2 pontos. 2pmJ.

Round 2 :

Carreira 2: 2ptJ, trabalhe em todos os pontos conforme estão até que restem 2 pontos. 2pmJ.

Rounds 3-7 :

Carreiras 3 a 7: Repita a carreira nÂș 2.

Round 8 :

Carreira 8: 2ptJ e coloque um marcador nesse ponto (depois vocĂȘ precisarĂĄ costurar a costura do decote, assim serĂĄ mais fĂĄcil identificar o primeiro ponto). Arrematar os pontos seguintes seguindo o padrĂŁo atĂ© que restem 2 pontos. VocĂȘ terĂĄ 1 ponto na agulha direita e 2 pontos na agulha esquerda, faca 2ptJ e feche esse ponto passando o ponto que vocĂȘ tinha na agulha direita sobre o Ășltimo que tricotou.

— Sew Collar, Armholes and Sides :

Item Name (P1) :

Com uma agulha de tapeçaria e um pedaço comprido do mesmo fio, costure a cava.

Item Name (P2) :

Costure o decote escondendo o ponto de borda.

Item Name (P3) :

Costure as costuras laterais, juntando os 20 pontos indicados no grĂĄfico com uma linha vermelha.

Item Name (P4) :

Faça um nó e esconda os fios sobrantes.

— Finishing :

Info :

E Ă© isso! Espero que tenha gostado de tricotar este colete. Por favor me envie fotos, eu adoraria ver seu projeto finalizado.

Assembly Instructions

  • Sew the shoulders: place front and back right sides together and, using a tapestry needle and a long strand of the same yarn, sew each shoulder by picking up one stitch from the back and one from the front until the shoulder is complete.
  • Pick up stitches for the armholes: starting from the front, pick up 98 stitches around the armhole (49 from front and 49 from back) and work the armhole rib as instructed, then bind off.
  • Make the collar: pick up 40 stitches from the middle of the collar to shoulder seam on one side, 43 stitches across the back and 40 stitches on the other front side (total 123), work the collar rows flat, place marker as instructed and bind off following the pattern.
  • Sew the collar and hide edge stitches: seam the collar, hiding the cast-on edge and use the marker to identify the first stitch for the neckline seam.
  • Sew side seams: join the side seams by matching the 20 stitches indicated in the chart with a red line and sew them together neatly.
  • Weave in ends and tie off any remaining yarn, then block lightly if desired for final shaping.

Important Notes

  • 💡You must work the pattern flat (plano) and knit front and back separately as instructed to match the charted shaping.
  • 💡Turn your work at the end of each row while working flat so that odd rows are read from left to right and even rows from right to left.
  • 💡Place the marker at the collar after the indicated decrease row to make it easier to identify the first stitch when sewing the neckline.
  • 💡When picking up stitches for the armhole and collar, pick up evenly and follow the exact stitch counts to avoid distortion of the edges.

This Guacamole Vest pattern is a cozy, cable-rich design worked in chunky yarn for a quick and stylish result. It features clear charts and step-by-step finishing instructions to help you through each stage. Perfect for layering in cooler months or gifting to a friend. đŸ§¶đŸ§”

You ask,

we answer.

FAQs

What size will the finished piece be?

The pattern is one size: Width 43 cm (17 in); Front length 53 cm (21 in); Back length 59 cm (23 in); Armhole circumference 72 cm (28 in); Neckline 26 cm (10 in).

What gauge should I get?

Tension/gauge: 10 x 10 cm (4" x 4") = 12 stitches x 13 rows using the recommended chunky yarn and the needles specified.

Can I use a different yarn weight?

Yes, but changing yarn weight will affect final size and gauge; you must swatch and adjust needle size to match the specified tension or recalculate stitch counts.

Do I need to know how to read charts?

Basic chart-reading skills are helpful since the front and back are worked following charts; the written instructions also guide the key shaping and finishing steps.

How long does this project usually take?

Most knitters complete this pattern in 5-7 hours, though time will vary with experience, speed, and whether you knit the cables comfortably.