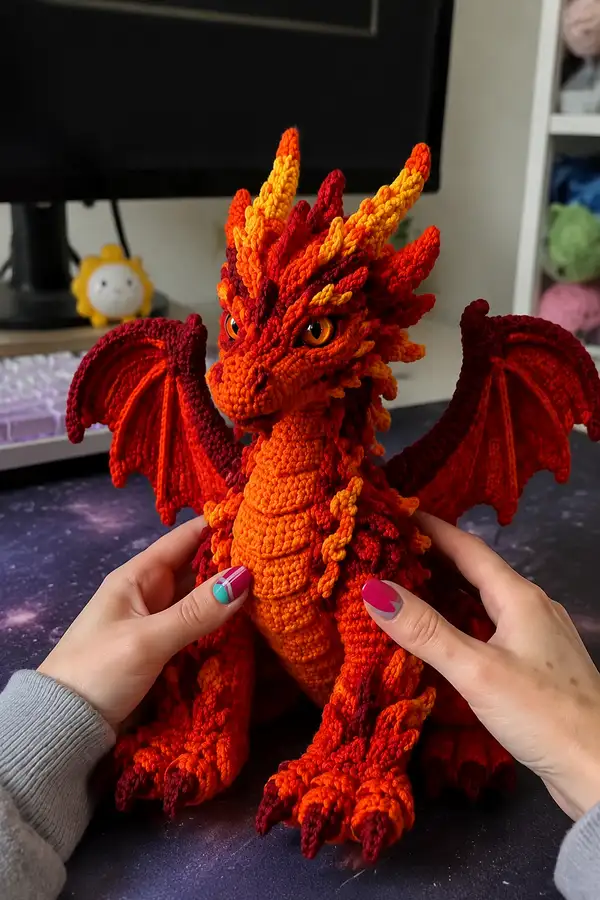
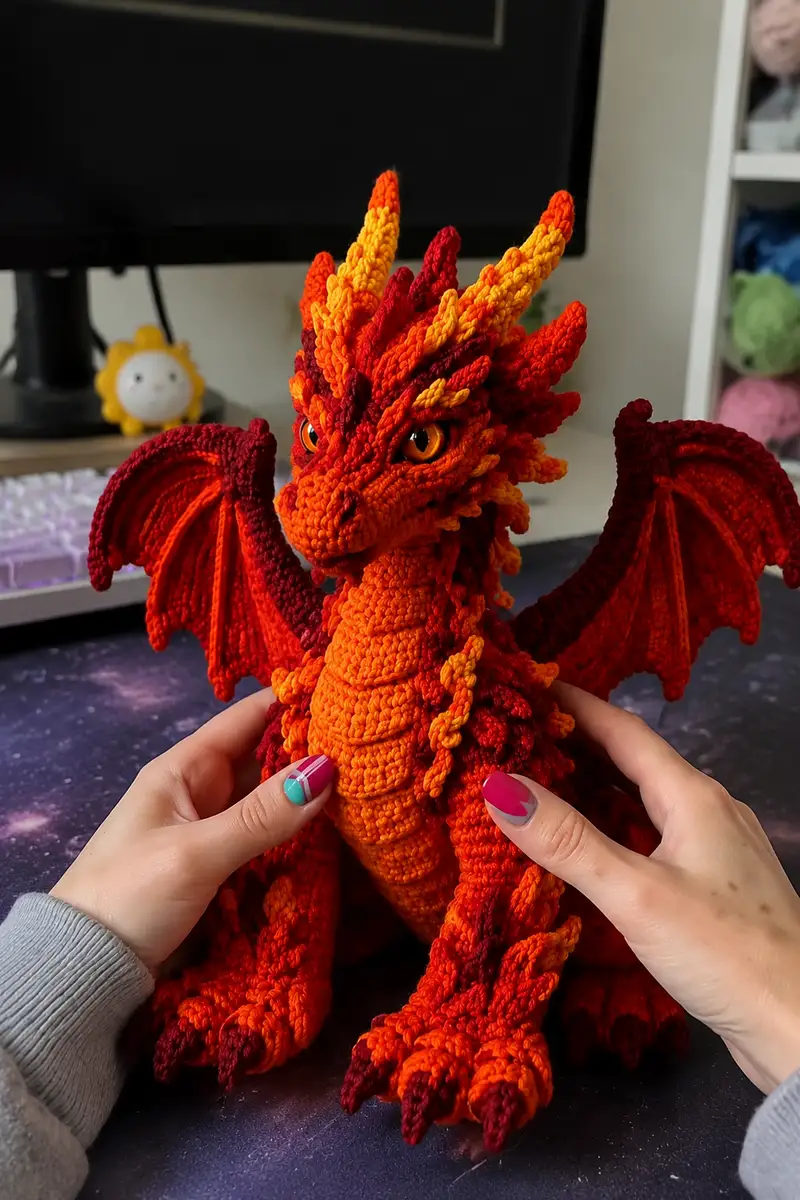
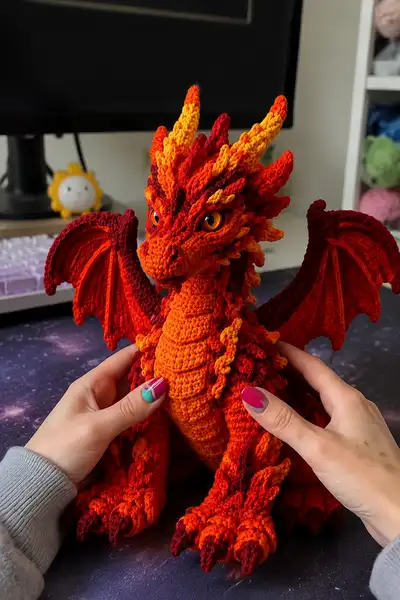
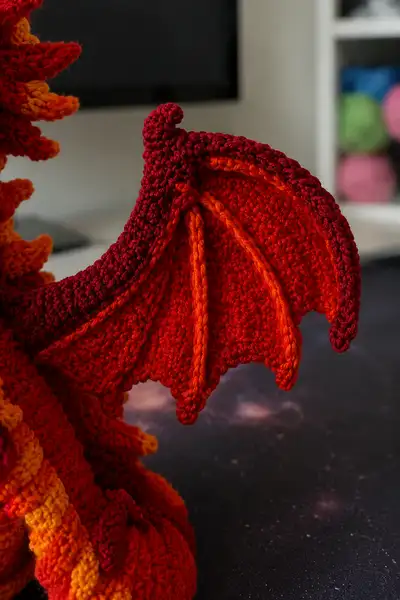
Bring a fierce, fiery friend to life with this detailed dragon amigurumi pattern. This sculpted dragon features layered scales, dramatic flame-colored crests, articulated wings with defined ribs, and deep amber safety eyes. Worked in warm gradient reds, oranges, and golden yellow for a molten, volcanic look. Advanced shaping and textured stitchwork create a lifelike poseable plush that stands proudly on its clawed feet.
Progress Tracker
0% Complete
— Head & Neck :
Round 1 :
6 sc in magic ring (6)
Round 3 :
(1 sc, inc) x 6 (18)
Round 4 :
(2 sc, inc) x 6 (24)
Round 5 :
(3 sc, inc) x 6 (30)
Round 6 :
(4 sc, inc) x 6 (36)
Round 7 :
(5 sc, inc) x 6 (42)
Round 8 :
(6 sc, inc) x 6 (48)
Round 9 :
(7 sc, inc) x 6 (54)
Info :
At this stage head circumference is 54 sts. Work in continuous rounds. Place a stitch marker in first stitch of each round and move it up. Start with main orange color; you may use the deep red to create a darker brow later if desired.
Rounds 10-12 :
1 sc in each st (54)
Info :
Place safety eyes between rounds 12 and 13. Position them about 10-12 sts apart (count across front of head) to achieve the fierce look pictured. Insert eyes and secure washers before stuffing. If using embroidered eyes, mark positions now.
Round 13 :
1 sc in each st (54)
Round 14 :
(7 sc, dec) x 6 (48)
Info :
Start lightly stuffing head from the bottom now - use small amounts at a time so you can sculpt snout. Stuff more firmly around the brow and cheeks for structure.
Round 15 :
(6 sc, dec) x 6 (42)
Round 16 :
(5 sc, dec) x 6 (36)
Round 17 :
(4 sc, dec) x 6 (30)
Info :
To sculpt the snout: on the next 6 rounds work short shaping rows that create a pronounced muzzle. Use invisible decreases for a smooth seam and adjust stuffing to maintain a tapered snout.
Round 18 :
1 sc in next 6, (2 sc, dec) x 6 (24)
Round 19 :
1 sc in next 6, (1 sc, dec) x 6 (18)
Round 20 :
(1 sc, dec) x 6 (12)
Info :
Begin to create nostril shaping by working 2-3 surface slip stitches or small embroidered nostril marks at the lower front of the snout now. Use darker burgundy for nostril shading if desired.
Round 21 :
1 sc in each st (12) — do not close; continue shaping around the snout base
Round 22 :
1 sc in each st (12)
Round 23 :
1 sc in next 2, inc, 1 sc in next 2, inc, rep to end (14)
Round 24 :
(1 sc, inc) x 7 (21)
Round 25 :
1 sc in each st (21)
Info :
We are now forming the neck base. Continue stuffing head to desired firmness — head should be firm to hold shape but not rock-hard. Leave long tail for sewing to the body later.
Round 26 :
(3 sc, inc) x 5 + 1 sc extra = (3 sc, inc) x5 then 1 sc (26)
Round 27 :
(4 sc, inc) x 5 + 1 sc extra = (4 sc, inc) x5 then 1 sc (31)
Round 28 :
1 sc in each st (31)
Round 29 :
(5 sc, inc) x 5 + 1 sc = (5 sc, inc) x5 then 1 sc (36)
Round 30 :
1 sc in each st (36)
Round 31 :
1 sc in next 6, dec, 1 sc in next 6, dec, rep to end (30)
Round 32 :
1 sc in each st (30)
Round 33 :
(3 sc, dec) x 6 (24)
Round 34 :
1 sc in each st (24) — finish neck tip, fasten off leaving long tail for sewing
Info :
Sew head to body after body rounds are completed. If you plan to insert a wire for poseable neck, do so before final stuffing of neck; insert thin wire so it reaches down into body. Use caution with wire ends and wrap in yarn.
— Body :
Round 1 :
6 sc in magic ring (6)
Round 3 :
(1 sc, inc) x 6 (18)
Round 4 :
(2 sc, inc) x 6 (24)
Round 5 :
(3 sc, inc) x 6 (30)
Round 6 :
(4 sc, inc) x 6 (36)
Round 7 :
(5 sc, inc) x 6 (42)
Round 8 :
(6 sc, inc) x 6 (48)
Info :
Body is slightly larger than head. For a sturdy base, work body with 3.5mm hook and slightly tighter tension. If adding a belly plate (scales), you will work those as separate rows later. Continue in main color for now.
Round 9 :
(7 sc, inc) x 6 (54)
Round 10 :
(8 sc, inc) x 6 (60)
Round 11-16 :
1 sc in each st (60)
Info :
If working color changes for underbelly or belly plating, change to deep red on Round 17 to set off the orange. Carry unused color on inside or weave in ends. You may also work belly plates separately and sew on.
Round 17 :
1 sc in each st BLO (60)
Round 18 :
1 sc in each st (60)
Round 19 :
1 sc in each st (60)
Info :
Begin stuffing the body moderately from the bottom; leave space at top to attach head and insert neck wiring if desired. Stuff firmly but allow the torso some give for sitting posture.
Round 20 :
(8 sc, dec) x 6 (54)
Round 21 :
(7 sc, dec) x 6 (48)
Round 22 :
(6 sc, dec) x 6 (42)
Round 23 :
1 sc in each st (42)
Round 24 :
(4 sc, dec) x 6 (36)
Round 25 :
(3 sc, dec) x 6 (30)
Round 26 :
(2 sc, dec) x 6 (24)
Round 27 :
(1 sc, dec) x 6 (18)
Round 28 :
1 sc in each st (18)
Round 29 :
(1 sc, inc) x 6 (24)
Round 30 :
1 sc in each st (24)
Round 31 :
(2 sc, inc) x 6 (30)
Round 32 :
1 sc in each st (30)
Round 33 :
(3 sc, inc) x 6 (36)
Round 34 :
1 sc in each st (36)
Round 35 :
1 sc in each st (36)
Info :
The neck opening (rounds 29-35) create a recessed socket for the head. When sewing the head, align the neck rows and sew with the long tail from the head to the top of the body, using whipstitch through both pieces.
Round 36 :
(4 sc, dec) x 6 (30)
Round 37 :
(3 sc, dec) x 6 (24)
Round 38 :
(2 sc, dec) x 6 (18)
Round 39 :
(1 sc, dec) x 6 (12)
Round 40 :
6 dec (6) — fasten off leaving long tail for closing bottom if you prefer to close; many crocheters leave the bottom open to sew legs directly into position
Info :
For a stable sitting base, sew legs symmetrically into the bottom opening rather than closing the bottom first. Close gaps after legs sewn. Keep stuffing moderate in the lower torso to keep the dragon stable when seated.
— Belly Plates (Make 8-10) :
Info :
These are the layered belly plates that run down the dragon’s front. They are worked flat as small crescents and sewn overlapping down center front. Use a slightly brighter orange or yellow to highlight edges. Make 8–10 plates depending on body length.
Round 1 :
Ch 6, 1 sc in 2nd ch from hook and in next 3 ch, 3 sc in last ch, now continue along opposite side of chain 1 sc in next 3 ch, 2 sc in final ch (12) — join with sl st to first st to form a flat oval
Round 2 :
Ch 1, (1 sc, inc) across curve to increase width: (1 sc, inc) x 6 (18)
Round 3 :
1 sc in each st (18)
Round 4 :
Work 1 sc in next 2, hdc, dc in center 4 sts to create ridged central scale, hdc, 1 sc in next 2 (18)
Round 5 :
Fasten off leaving tail and sew plates overlapping down center front from chest to belly. Sew the top plate at rounds 16-18 of the neck and continue down to the body; secure firmly with hidden stitches.
Info :
Overlap plates like shingles, with lower edge of one covering top edge of the next. This gives the dragon a natural plated underbelly look. Use pins to position before sewing.
— Front Legs / Arms (Make 2) :
Round 1 :
6 sc in magic ring (6)
Round 3 :
(1 sc, inc) x 6 (18)
Round 4 :
(2 sc, inc) x 6 (24)
Info :
These form the clawed paw. Work tighter here for a compact foot. You can change to darker yarn on Round 5 to create claw tips later.
Round 5 :
1 sc in each st (24)
Round 6 :
(3 sc, inc) x 6 (30)
Round 7 :
1 sc in each st (30)
Round 8 :
(4 sc, inc) x 6 (36)
Round 9 :
1 sc in each st (36)
Info :
Form toes by creating small scallops across the front edge. Mark the front center and divide the circumference into 3 toe sections: approx 12 sts per toe for this size.
Round 10 :
Work across first 12 sts: (3 sc, dec) x 3 — shape toe 1 (9). Next 12 sts: (3 sc, dec) x 3 — toe 2 (9). Last 12 sts: (3 sc, dec) x 3 — toe 3 (9). Overall 27 sts remain; join to continue as one limb.
Round 11 :
1 sc in each st (27)
Round 12 :
1 sc in next 3, inc, 1 sc in next 6, inc, 1 sc in next 3, rep to end (33)
Round 13 :
1 sc in each st (33)
Round 14 :
(4 sc, inc) x 6 - adjust to 36 sts (36)
Round 15 :
1 sc in each st (36)
Round 16 :
(5 sc, dec) x 6 (30)
Round 17 :
1 sc in each st (30) — stuff foot firmly now, especially toes and pad
Round 18 :
(4 sc, dec) x 6 (24)
Round 19 :
(3 sc, dec) x 6 (18)
Round 20 :
1 sc in each st (18) — leave long tail for sewing; lightly stuff remainder of the arm so it curves when attached
Info :
Sew arms into body at rounds 20-24 on either side for a natural seated pose. Use pins to arrange slight forward curve. If you want poseable arms, insert floral wire and then stuff around it before final closing stitches.
— Back Legs (Make 2) :
Round 1 :
6 sc in magic ring (6)
Round 3 :
(1 sc, inc) x 6 (18)
Round 4 :
(2 sc, inc) x 6 (24)
Round 5 :
(3 sc, inc) x 6 (30)
Round 6 :
(4 sc, inc) x 6 (36)
Round 7 :
(5 sc, inc) x 6 (42)
Round 8 :
1 sc in each st (42)
Round 9 :
1 sc in next 6, (2 sc, dec) x 6, 1 sc in next 6 (36)
Round 10 :
1 sc in each st (36)
Round 11 :
(3 sc, dec) x 6 (30)
Round 12 :
1 sc in each st (30)
Round 13 :
(2 sc, dec) x 6 (24)
Round 14 :
1 sc in each st (24)
Round 15 :
(1 sc, dec) x 6 (18)
Round 16 :
1 sc in each st (18)
Round 17 :
(1 sc, inc) x 6 (24)
Round 18 :
1 sc in each st (24)
Round 19 :
1 sc in next 3, inc, 1 sc in next 6, inc, 1 sc in next 3, rep to end (30)
Round 20 :
1 sc in each st (30)
Round 21 :
(4 sc, inc) x 6 (36)
Round 22 :
1 sc in each st (36)
Round 23 :
(5 sc, dec) x 6 (30)
Round 24 :
1 sc in each st (30) — stuff foot firmly and shape heel so foot sits flat
Round 25 :
(3 sc, dec) x 6 (24)
Round 26 :
(2 sc, dec) x 6 (18)
Round 27 :
1 sc in each st (18)
Round 28 :
Fasten off leaving long tail for sewing. Sew legs to bottom of body at rounds 1-4, spacing them evenly for a stable seated position.
Info :
When positioning legs, ensure claws point slightly forward and knees are splayed for balance. Reinforce attachment with extra stitches around the seam to support weight.
— Tail :
Round 1 :
6 sc in magic ring (6)
Round 3 :
(1 sc, inc) x 6 (18)
Round 4 :
(2 sc, inc) x 6 (24)
Rounds 5-8 :
1 sc in each st (24)
Round 9 :
(2 sc, dec) x 6 (18)
Round 10 :
1 sc in each st (18)
Round 11 :
(1 sc, dec) x 6 (12)
Round 12 :
1 sc in each st (12)
Rounds 13-18 :
1 sc in each st (12) — taper gently by alternating decs every 4th round until desired tail length and thickness achieved (aim for 14-18 cm final tail)
Round 19 :
(1 sc, dec) x 4 + 4 sc (8)
Round 20 :
Fasten off leaving long tail for sewing. Add small spikes along top of tail by sewing small spike motifs (see Spike motif section). Stuff tail moderately so it is flexible but not floppy.
Info :
Attach tail to back lower body at rounds 36-40 to create a natural sweep behind the dragon. Reinforce with multiple threads to secure weight of tail and any attached spikes.
— Spike Motif / Crest Spikes (Make 20-30 — varied sizes) :
Info :
These flame-like spikes are made in small motifs in three colors: yellow, bright orange, and deep red. Make multiple sizes; attach along head crest, neck, back and tail. Mix colors to mimic flame gradient. Make 20–30 pieces total, varying size.
Small Spike Round 1 :
6 sc in magic ring (6)
Small Spike Round 2 :
inc x6 (12)
Small Spike Round 3 :
(1 sc, inc) x 6 (18)
Small Spike Round 4 :
1 sc in next 4 sts, dc in next 5 sts (create a small pointed ridge), 1 sc in last sts (18)
Small Spike Round 5 :
1 sc around base to strengthen (18) — fasten off leaving tail for sewing
Large Spike Round 1 :
6 sc in magic ring (6)
Large Spike Round 2 :
6 inc (12)
Large Spike Round 3 :
(1 sc, inc) x 6 (18)
Large Spike Round 4 :
(2 sc, inc) x 6 (24)
Large Spike Round 5 :
1 sc in each st (24)
Large Spike Round 6 :
Along one side, 1 sc in next 6, hdc, dc, tr, dc, hdc, 1 sc in remaining 6 (24) — creates a taller flame face
Large Spike Round 7 :
1 sc in each st around base to finish (24) — fasten off leaving long tail to sew spikes in desired pattern
Info :
Sew larger spikes along central crest (top of head down neck), smaller spikes along sides and tail. Use pins to arrange color gradient: yellow at tips, orange mid, deep red near base.
— Horns (Make 2) :
Round 1 :
6 sc in magic ring (6)
Round 2 :
(1 sc, inc) x 3 (9)
Round 3 :
1 sc in each st (9)
Round 4 :
(2 sc, inc) x 3 (12)
Round 5 :
1 sc in each st (12)
Round 6 :
(3 sc, inc) x 3 (15)
Round 7 :
1 sc in each st (15) — start gentle taper in next rounds
Round 8 :
(3 sc, dec) x 3 (12)
Round 9 :
1 sc in each st (12)
Round 10 :
(2 sc, dec) x 3 (9)
Round 11 :
(1 sc, dec) x 3 (6) — fasten off leaving long tail for sewing. Stuff lightly. Curve horns slightly by sewing base to head at a forward angle.
Info :
Sew horns into head at roughly rounds 8-9 on the crown, flanking the central crest. Use deep red or burgundy for the horn base, blending into orange if desired.
— Wings (Make 2 panels + ribs) :
Info :
Each wing is worked flat in rounds/rows to create the bat-like membrane, then edged and reinforced with i-cord ribs for structure. Wing tip and edge are darker maroon, main membrane fiery orange.
Wing Panel Row 1 :
Ch 20, 1 sc in 2nd ch from hook and each across to end (19)
Wing Panel Row 2 :
Ch 1, turn, 1 sc in each st across (19)
Wing Panel Row 3 :
Ch 1, turn, (1 sc, inc) at edges to create slight flare; place increases at 4 evenly spaced points to create three finger valleys — increase by 4 sts total (23)
Wing Panel Row 4-10 :
Work even rows of sc across (23) until panel reaches desired height (approx 8–10 rows); shape scalloped bottom edge by placing decs and increases on alternating rows to create natural membrane contour
Wing Panel Row 11 :
Fasten off and repeat for second wing
Wing Edge :
Join deep red yarn to wing outer edge and work sc evenly around entire panel; for pointed tips, work (3 sc, hdc, dc, hdc, 3 sc) into tip chain points to form scallops
Info :
Make wing ribs by creating three i-cord tubes that will be sewn on the membrane to create the bat-like finger bones. I-cord method: using a 3.0mm hook and the bright orange, ch 30, work back down chain in sc in BLO to form a stiff cord. Make three ribs per wing.
Wing Rib 1 :
Ch 30, row 1: starting in 2nd ch from hook sl st in each ch back to beginning, do 3 rounds to firm up cord — fasten off leaving long tail for sewing
Wing Rib 2 & 3 :
Make two more ribs (ch lengths may be slightly shorter: 26 and 22 ch) so ribs fan out evenly across the wing
Info :
Position ribs on the underside of the wing membrane and sew through both cord and panel with strong yarn. Sew base of ribs to wing shoulder edge and curve ribs slightly outward for open-wing pose. Optionally insert thin wire into i-cord before closing to make wings poseable — wrap wire ends and hide inside the cord.
Wing Finishing :
After ribs are sewn, edge wing with a round of picot or small scallops in deep red for definition. Attach wing to body at sides between rounds 20-28, aligning seam to allow natural shoulder fold. Sew securely with strong thread.
— Wing Membrane Reinforcement (Optional — makes wings hold pose) :
Round 1 :
Create a narrow seam-stiffening row by sewing 2 rows of sc along the inside edge of wing within 1–2 mm to create a stiffer border (work in deep red).
Info :
If inserting wire into i-cord ribs, test pose before final attachment to the body. Secure wire ends by folding and wrapping with yarn to prevent any sharp tips from escaping.
— Finishing Details — Brow & Eye Surround :
Info :
Create a brow ridge to give expression by working a short row of surface slip stitches (or 1–2 rounds of sc in contrasting color) above the eyes. Use darker burgundy to deepen the expression. Sew small scales around eye socket to blend.
Round 1 :
With deep red, work 1 row of surface sc along the bridge of the nose and above eyes to create an overhang (use strand at rounds 10–13 of the head). Fasten off and weave ends.
Info :
Add glass or 12mm amber safety eyes before stuffing head completely. If using sewn eyelids, stitch a small arc of sc around top of eye and pull slightly to create a squinting, fierce look.
— Assembly & Final Sculpting :
Info :
Before sewing pieces together, lay out all components and pin in place. This step ensures symmetry and makes final stitching faster. Use photos as reference for spike placement and wing angle.
Step 1 :
Attach head to body by aligning neck rounds (head rounds 26-34 to body rounds 29-36). Pin first to check symmetry, then sew with long tail from head using invisible whipstitch. Reinforce with extra passes through the neck ring until head feels secure.
Step 2 :
Sew arms to sides at body rounds 18-22 so they sit slightly forward. Stuff arms to shape and use ladder stitch for an invisible seam if desired.
Step 3 :
Attach back legs to bottom opening at body rounds 1-4. Use strong thread and sew through multiple rounds to keep legs stable. Position feet so claws touch the surface and the dragon sits balanced.
Step 4 :
Sew tail to lower back center at body rounds 34-38. Angle slightly to one side for dynamic pose and attach additional spikes along tail top, starting with larger close to base and smaller toward tip.
Step 5 :
Sew crest spikes along head and neck starting at the crown and moving down the neck to the shoulder; use a staggered pattern on either side of the central crest for a natural flame effect.
Step 6 :
Attach wings to body at shoulder area between rounds 20-28; make sure the wing root aligns with the shoulder seam and sew through several stitches across the root for stability. Reinforce with a few stitches into the body to avoid drooping.
Info :
After all pieces are attached, go back and add small embroidered details: nostrils, small scale lines on the snout, and extra ridge lines on cheeks. These small accents bring the face to life.
Step 7 :
Weave in all ends by threading yarn needle with tails and passing through several inside stitches before trimming. For extra neatness, use matching color thread or yarn to blend joins.
Info :
Use steam blocking lightly if you need to relax any i-cord ribs or membranes; avoid putting wire near heat. Sculpt scales and spikes by pinning in place and lightly steaming then pressing with fingers to set shape.
This fiery dragon amigurumi combines sculpted shaping, layered scales and dramatic wing architecture to create a show-stopping handmade companion! The detailed crest, plated belly and articulated wings come together to form a fierce yet cuddly character with a molten palette. Each stitch adds texture and personality, and the step-by-step approach will guide you to a satisfying finished piece. 🐉🔥 Share your creation and enjoy the glow of handmade magic! ✨