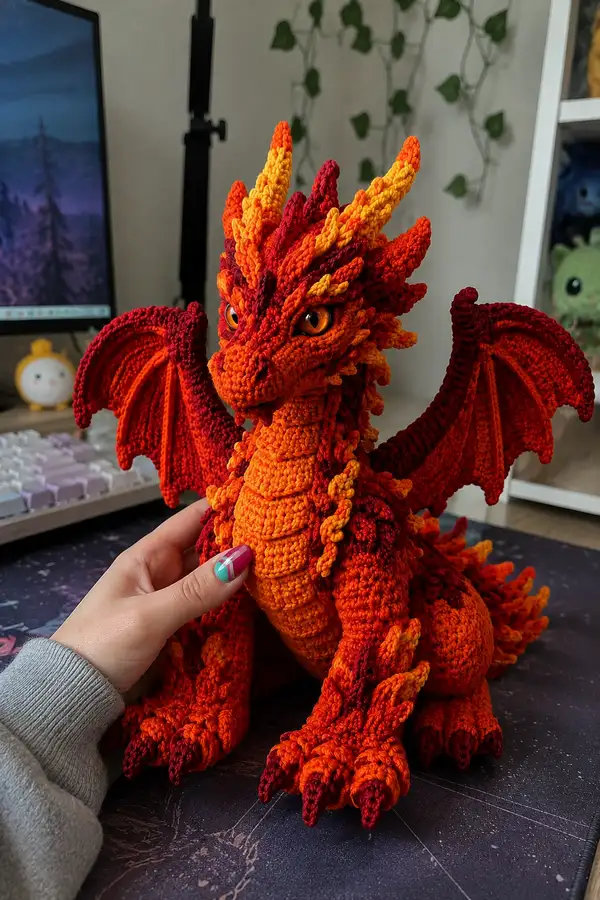
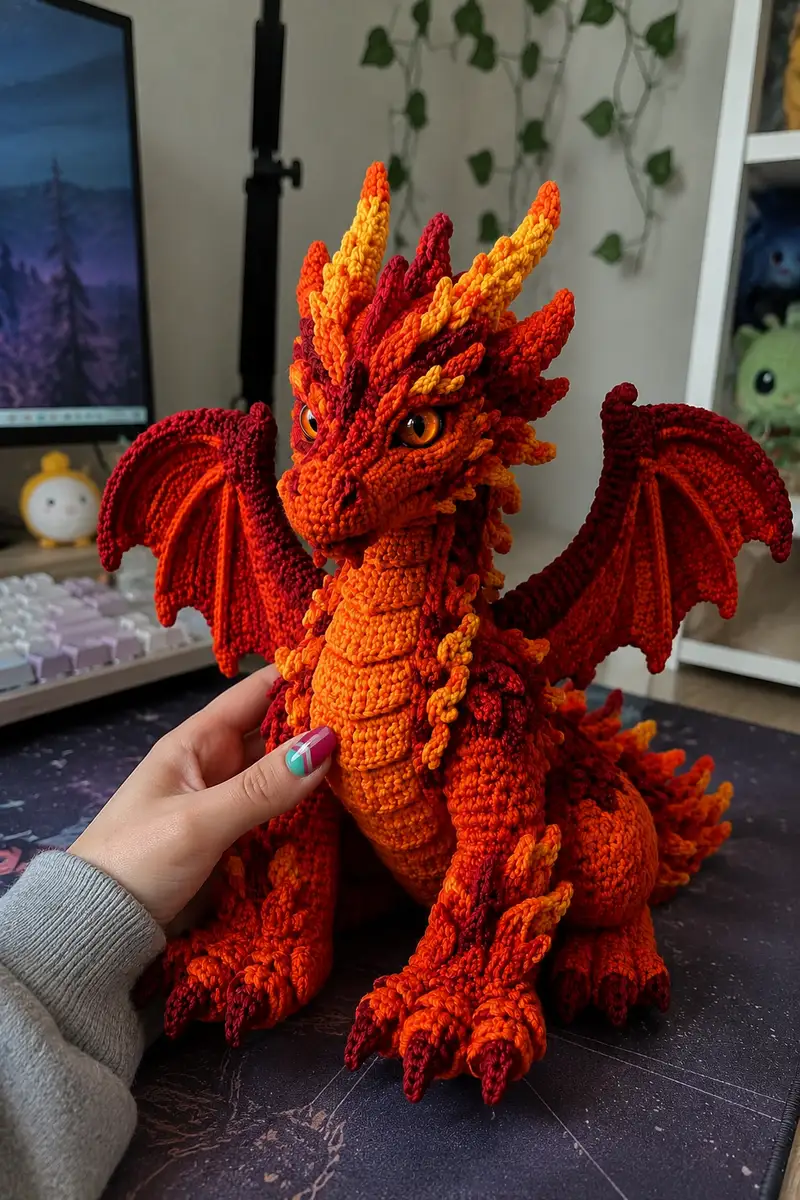
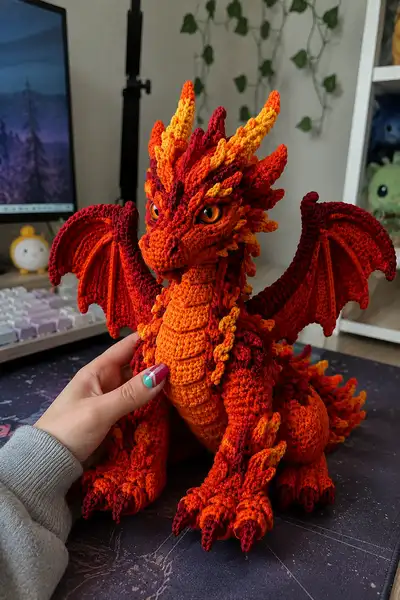
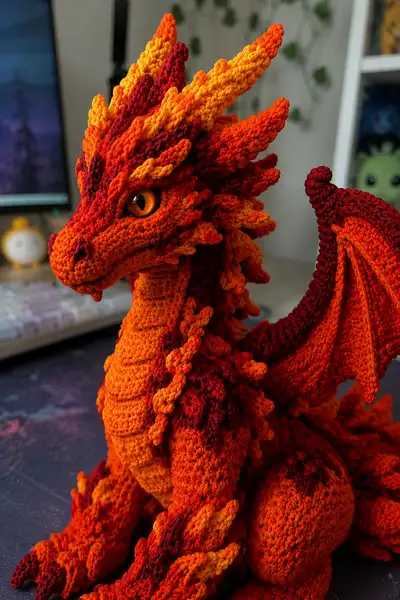
Bring this dramatic, flame-toned dragon to life with a richly textured amigurumi pattern. The finished dragon features layered scale ridges, articulated wings, long expressive neck and flame-like crest spikes in vivid yellow, orange and deep red. Detailed shaping, ridgework and color transitions give this plush a lifelike, sculpted look perfect for display or gifting.
Progress Tracker
0% Complete
— Head :
Round 1 :
6 sc in magic ring (6)
Round 3 :
(1 sc, inc) x 6 (18)
Round 4 :
(2 sc, inc) x 6 (24)
Round 5 :
(3 sc, inc) x 6 (30)
Round 6 :
(4 sc, inc) x 6 (36)
Round 7 :
(5 sc, inc) x 6 (42)
Round 8 :
(6 sc, inc) x 6 (48)
Round 9-13 :
1 sc in each st (48)
Info :
Place safety eyes between rounds 11-12, approximately 10-12 stitches apart depending on your desired expression. Use pins to test placement before inserting washers. Mark top of head with a stitch marker to keep orientation consistent.
Round 14 :
(6 sc, dec) x 6 (42)
Round 15 :
(5 sc, dec) x 6 (36)
Round 16 :
(4 sc, dec) x 6 (30)
Info :
Begin stuffing the head firmly but not overly tight. Stuff around the eye area thoroughly to prevent eyes from sinking. Add small amounts of stuffing frequently for even shaping.
Round 17 :
(3 sc, dec) x 6 (24)
Round 18 :
(2 sc, dec) x 6 (18)
Round 19 :
(1 sc, dec) x 6 (12)
Info :
Fasten off leaving a 20-25 cm tail for sewing to neck. Weave tail through remaining 6 sts and pull closed. Do not sew closed completely yet if you plan to align head and neck in one piece; leave enough tail to attach securely later.
— Muzzle Sculpting and Nose :
(These rounds are worked by surface shaping attached to front of head for long snout)
Round 1 :
Join yarn at center-front (between eyes). Ch1, 6 sc in a short oval (work into front loops of head stitches to sculpt) (6)
Round 2 :
Inc around evenly (12)
Round 3 :
(1 sc, inc) x 6 (18)
Info :
Work the muzzle in front loops and surface stitches to attach directly to head. Use a slightly smaller hook for tighter sculpting if needed. Stuff the muzzle lightly as you go; it should be firm enough to hold shape but not rigid.
Round 4 :
(2 sc, inc) x 6 (24)
Round 5 :
1 sc in each st around (24) - flatten and position muzzle lengthwise down from between eyes
Round 6 :
Working decreases toward tip: (2 sc, dec) x 6 (18)
Round 7 :
(1 sc, dec) x 6 (12)
Info :
Fasten off and leave long tail. Sew the muzzle tip closed. Use yarn embroidery to add nostril dots (small French knots or surface crochet) in deep red or brown, placing them symmetrically just above the tip of the muzzle.
— Head Crest & Flame Spikes (make crest pieces and attach) :
Create layered elongated spike shapes. Make multiple pieces in yellow, orange and deep red to layer like flames.
Spike (make 12 small, 6 medium, 4 large) Round 1 :
6 sc in magic ring (6)
Round 3 :
(1 sc, inc) x 6 (18)
Round 4 :
(2 sc, inc) x 6 (24)
Round 5 :
1 sc in each st (24) for small spike; for medium continue Round 6: (3 sc, inc) x 6 (30); Round 7: 1 sc each (30); for large continue Round 8: (4 sc, inc) x 6 (36); Round 9: 1 sc each (36)
Info :
For a tapered flame look, after reaching desired circumference work 2-4 rounds of (1 sc, dec) sequences to thin the tip, then finish with 6 sc and close. Make spikes in yellow for tips, orange for mid layers, deep red for base layers to mimic fire.
Spike Finish :
Dec rounds as needed to taper to 6 sts, stuff lightly, fasten off leaving a long tail for sewing. Arrange and pin spikes on head crest from back toward crown, layering large red pieces at base, medium orange over them, and yellow tips on top. Sew securely with hidden stitches to head base.
Info :
Use photos to guide placement. Slightly curve spikes by folding and securing with a couple of inside stitches to give directional flow. Make additional small teardrop scales (8-12) using rounds 1-4 for cheek and brow texture; attach around the eye and jawline.
— Neck and Upper Chest :
Round 1 :
With yarn joined at base of head, 6 sc in magic ring (6)
Round 3 :
(1 sc, inc) x 6 (18)
Round 4 :
(2 sc, inc) x 6 (24)
Round 5 :
(3 sc, inc) x 6 (30)
Round 6-8 :
1 sc in each st (30)
Info :
Work these rounds in continuous spiral to form a slightly elongated neck. Add subtle texture by alternating one round in BLO to create a ridge that will sit under the throat scales. If you want a poseable neck, insert a length of thin floral wire through the center after Round 8 before continuing; bend and protect wire ends by folding them back on themselves and covering with small balls of stuffing.
Round 9 :
(4 sc, inc) x 6 (36)
Round 10-14 :
1 sc in each st (36)
Info :
Begin attaching small scale loops along sides of neck every 4th stitch: make a 3-5 loop picot (ch3, sl st in base) or short spike (see crest spike small pattern) and secure. These create the layered scale mane seen along the neck sides.
Round 15 :
(4 sc, dec) x 6 (30)
Round 16 :
(3 sc, dec) x 6 (24)
Info :
Stuff neck moderately. Neck should be firm enough to hold shape but flexible. Continue stuffing as you reduce. Leave top opening for sewing to body if working separately.
Round 17 :
(2 sc, dec) x 6 (18)
Round 18 :
(1 sc, dec) x 6 (12)
Round 19 :
6 dec (6). Fasten off leaving tail for joining to body (neck closed) or keep open to sew into body cavity later.
— Body :
Round 1 :
6 sc in magic ring (6)
Round 3 :
(1 sc, inc) x 6 (18)
Round 4 :
(2 sc, inc) x 6 (24)
Round 5 :
(3 sc, inc) x 6 (30)
Round 6 :
(4 sc, inc) x 6 (36)
Round 7 :
(5 sc, inc) x 6 (42)
Round 8 :
(6 sc, inc) x 6 (48)
Round 9-13 :
1 sc in each st (48)
Info :
At this stage you can change to a slightly darker red for back ridges and spots. Carry unused yarn inside body if you plan stripes to avoid many tails. Work several rounds in BLO where you want a ridge for clothing or armor. The body will be joined to the neck and hips, so leave a generous tail when finishing.
Round 14 :
(6 sc, dec) x 6 (42)
Round 15 :
(5 sc, dec) x 6 (36)
Round 16 :
1 sc in each st (36)
Round 17 :
1 sc in each st BLO (36) - create a belly ridge line by working two rounds in BLO for the belly plates later
Round 18 :
(2 sc, inc) x 12 (48) - slight flare at chest for attachment to neck
Info :
Begin stuffing the body firmly from the bottom up. The body should be solid but not rock-hard; aim for a slightly softer feel than the head. Insert stuffing gradually and use small pieces to shape rounded belly and hips.
Round 19-23 :
1 sc in each st (48)
Round 24 :
(6 sc, dec) x 6 (42)
Round 25 :
(5 sc, dec) x 6 (36)
Round 26 :
(4 sc, dec) x 6 (30)
Round 27 :
(3 sc, dec) x 6 (24)
Round 28 :
(2 sc, dec) x 6 (18)
Round 29 :
(1 sc, dec) x 6 (12)
Round 30 :
6 dec (6). Fasten off leaving a long tail for sewing to base or feet joint if you prefer to finish bottom after legs attached.
Info :
If you plan to sew legs on separately, leave the bottom opening and attach legs before closing. Align neck opening to the head/neck assembly and sew with mattress stitch for invisible seam. For a stronger joint, overlap neck base with top of body opening by a round or two when sewing.
— Belly Plates / Chest Scales :
Plate Strip (make 8-10 strips to cover chest) Round 1 :
Ch12, sc in 2nd ch from hook and across (11)
Round 2 :
Ch1, turn, sc in each st (11)
Round 3 :
Ch1, turn, BLO sc across to create a ridge (11)
Round 4 :
Ch1, turn, sc across (11). Fasten off leaving tail for sewing.
Info :
Sew these plates horizontally across the chest from top to bottom, overlapping slightly. Curve plates by shifting stitch placement and pulling slightly while sewing; this gives the layered look seen on the neck chest in the photo.
— Front Legs / Forelimbs (Make 2) :
Round 1 :
6 sc in magic ring (6) - base of paw
Round 3 :
(1 sc, inc) x 6 (18)
Round 4 :
(2 sc, inc) x 6 (24)
Round 5 :
1 sc in each st (24)
Info :
Begin shaping toes by creating three small toe bumps at front of paw. Mark the front center stitch and count 4 stitches to each side to position toes symmetrically.
Toe (make 3, worked across front) Round 1 :
3 sc in one stitch for rounded toe bump, slip stitch back into base to anchor. Repeat for each toe. After toes are made, continue round in remaining stitches to complete paw circumference (24)
Round 6-9 :
1 sc in each st (24) for lower paw and wrist
Round 10 :
(3 sc, inc) x 6 (30)
Round 11-14 :
1 sc in each st (30) - work in BLO on round 12 to create a subtle ridge near elbow
Info :
For the flame-like ridges along the forearm, at rounds 12-14 every 6th stitch make a small spike (using Spike small pattern rounds 1-4) and crochet it directly into the side stitch. This will form the clustered flame scales along forearms.
Round 15 :
(4 sc, dec) x 6 (24)
Round 16 :
(3 sc, dec) x 6 (18)
Round 17 :
(2 sc, dec) x 6 (12)
Round 18 :
6 dec (6). Fasten off leaving long tail for sewing. Stuff paw firmly, arm lightly except paw should be dense for stability.
Info :
Sew arms to the body at rounds 18-22 of the body for a natural seated pose. Use long mattress stitch passes around the joining area to secure. Add a couple of interior stitches into the torso to anchor the limb and help it bear weight.
— Hind Legs / Hips (Make 2) :
Round 1 :
6 sc in magic ring (6)
Round 3 :
(1 sc, inc) x 6 (18)
Round 4 :
(2 sc, inc) x 6 (24)
Round 5 :
(3 sc, inc) x 6 (30)
Round 6-9 :
1 sc in each st (30) - shape foot and ankle
Round 10 :
(3 sc, inc) x 6 (36)
Round 11-14 :
1 sc in each st (36)
Info :
Create toes similarly to front paws: mark and form 4 toe bumps across the front with 3 sc clusters. Make the claws from deep red yarn by working small cone shapes (see claw pattern) and sew onto toes.
Round 15 :
(4 sc, dec) x 6 (30)
Round 16 :
(3 sc, dec) x 6 (24)
Round 17 :
(2 sc, dec) x 6 (18)
Round 18 :
(1 sc, dec) x 6 (12)
Round 19 :
6 dec (6). Fasten off leaving tail for sewing. Stuff the foot firmly and the leg lightly for natural weight balance.
Info :
Sew hind legs to the lower sides/back of the body at the widest round (body rounds 9-13) so the dragon can sit upright. Position toes slightly turned outward for stability.
— Wing Structure (Make 2) :
Wing Rib Base Round 1 :
Ch25, sc in 2nd ch from hook and across (24) - this forms the top bone ridge of the wing
Round 2 :
Ch1, turn, sc across (24)
Round 3 :
Ch1, turn, BLO sc across (24) - creates defined ridge for attachment to membrane
Info :
For a stronger wing, work two rows of sc and then optionally insert a narrow strip of plastic canvas or flexible wire along the inside of this rib before enclosing. This helps keep wings open and posed.
Wing Membrane Round 1 :
Join yarn at one end of rib, ch1 and work 2 sc into base stitch and continue forming a semicircular shell: (2 sc, inc) along to increase curvature until you reach about 110-140 stitches total depending on desired wingspan (work until membrane feels proportionate to body). Use increases spaced regularly to keep curve smooth.
Round 2-3 :
1 sc in each st (maintain stitch count) - work in continuous rounds to create a double-layered membrane feel
Round 4 :
Work a decorative rib: *ch2, skip 1 st, sl st* across or use hdc to create striations in the membrane for the wing 'veins'
Info :
Edge the wing in deep red by switching colors: before final round change yarn to deep red and work one round of sc around edge to create the darker rim. Work final round in deep red in FLO to create slightly scalloped finish.
Wing Join :
Sew the wing rib base to body between body rounds 10-14 aligning the top of the rib with the top of shoulder. Sew through into arm seam interior for extra strength. Repeat for second wing and mirror placement for symmetry.
— Claws (Make 14 small claws for toes and wing tips) :
Round 1 :
3 sc in magic ring (3)
Round 2 :
1 sc in each st (3)
Round 3 :
1 sc in each st (3), pull into tiny cone shape by gathering and fastening off leaving tail for sewing
Info :
Sew claws to toe tips and wing tips with the deep red color. Make sure claws point outward and slightly down for natural stance.
— Tail :
Round 1 :
6 sc in magic ring (6)
Round 3 :
(1 sc, inc) x 6 (18)
Round 4 :
(2 sc, inc) x 6 (24)
Round 5-9 :
1 sc in each st (24) - start building length
Info :
Add clustered spikes along the top of the tail every 4th stitch using small spike pieces (create 12-16 small spikes using spike rounds 1-4). Attach as you go so spikes stay aligned down the top ridge.
Round 10 :
(3 sc, dec) x 6 (18)
Round 11-15 :
1 sc in each st (18) extending tail length - continue alternate deep red spots by switching color for 2-4 stitches then switching back
Round 16 :
(2 sc, dec) x 6 (12)
Round 17 :
(1 sc, dec) x 6 (6)
Round 18 :
6 dec (0) - do not fasten off; instead close tip and secure internal wire if you want tail posed
Info :
Weave deep red and yellow highlights toward the tip sporadically for a natural flame gradient. For extra structure, insert thin bendable wire inside tail before final stuffing to allow posing without sagging.
— Back Scales & Decorative Spots :
Scale Loop (make 30-40) Round 1 :
Ch6, sl st in 2nd ch from hook and across to make flat teardrop (5). Fasten off leaving tail.
Info :
Sew these around the spine and shoulders in staggered rows to create the cluster scales and ridges seen on the photo. Use a mix of orange and deep red for variety and hand-placed randomness; overlap slightly for depth.
— Wing Finishing Ridges :
Round 1 :
With deep red yarn, work sc 1 round around wing edges (even count) to create thick border
Round 2 :
Work FLO sc around to give scalloped edge (same stitch count) - optional picot in corners for curl
Info :
To create the veined look, use contrasting shade (slightly darker orange) and work surface slip stitches radiating from rib toward edge. Lightly block wings by pinning them flat and misting with water if using cotton yarn.
— Small Decorative Frills & Cheek Scales :
Frill Round 1 :
Ch8, sc back along chain to create a short frill (7)
Round 2 :
Fold frill and sl st into base for layered look. Make 12-16 and sew around cheeks and jawline.
Info :
These small frills soften the face and give the layered look of overlapping scales. Alternate colors to add depth; use brighter yellow near the face and deeper red toward the body.
— Assembly Notes (pre-sew checks and tips) :
Info :
Before sewing anything permanently, layout all pieces on a flat surface. Pin head/neck to body and check angle; pin wings and limbs in place and photograph from several angles to confirm symmetry. Use a blunt needle to thread tails through body and tie internal anchor knots where strength is needed.
Info :
When sewing, use mattress or whip stitch through several rounds to distribute tension. For weight balance, add a small flat bag of poly pellets or a few tablespoons of dried beans in the base of the body (encased in a small plastic bag) before closing the bottom; this helps the dragon sit steadily.
Final Touches :
Use embroidery floss or thin yarn to add tiny nostril details and fine eyebrow lines. Add a few strokes of white embroidery inside the eye area for highlight if using painted or glued eyes. Weave in all tails and trim close. Optionally spray with fabric stiffener lightly on wings to help hold pose.
Info :
Allow finished piece to rest for several hours so any glue (if used) dries and stuffing settles before final display. If desired, gently steam and reshape wings and spikes for refined silhouette.
This fiery dragon is a true labor of love, combining sculpted shaping and layered detail to create an eye-catching centerpiece. Each carefully crocheted spike, ridge and plate builds a creature full of personality and texture. Take your time assembling and enjoy the satisfying process as the dragon comes alive under your hands. 🐉🔥 Every finished dragon will be uniquely yours — share proud photos and display boldly! 🧶