🧢 Beautiful ✨ Detailed πŸ’ Adorable

Fish Granny Square Crochet Pattern

Fish Granny Square Crochet Pattern
4.4β˜… Rating
2-3 Hours Time Needed
2.1K Made This
βœ‚οΈ

Intermediate Level

Ideal for those with basic crochet experience, featuring slightly more advanced stitches and techniques to expand your skills.

⏱️

Bite-Sized Project

Finishes in 2-4 hoursβ€”perfect for an afternoon of creative relaxation.

🏑

Cozy Accent

A warm touch for your space that transforms ordinary corners into inviting nooks filled with handmade charm.

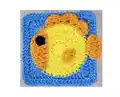
About This Fish Granny Square Crochet Pattern

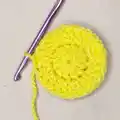
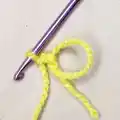
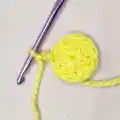
This pattern creates a delightful fish motif worked into a granny-style square, perfect for blankets or decorative accents. You will crochet a circular base, switch colors, and make small appliques for the fins, tail, and eye. The pattern includes clear round-by-round instructions and helpful finishing techniques to get neat edges.

Fish Granny Square Crochet Pattern crochet pattern - detailed view of completed project

Photographs and explanation of the invisible stitch method are provided to give a professional finish. All components are stitched onto the square using the yarn tails for a secure attachment.

Why You'll Love This Fish Granny Square Crochet Pattern

I absolutely love this pattern because it turns a simple granny square into a playful fish motif with minimal extra pieces. I enjoy the balance between working in rounds and adding small appliques β€” it keeps the project engaging without being overwhelming. The invisible stitch and color-change methods give a clean, finished look that I find very satisfying. Making a set of squares in different colors is one of my favorite ways to customize blankets or decorative panels.

Fish Granny Square Crochet Pattern step 1 - construction progress Fish Granny Square Crochet Pattern step 2 - assembly progress Fish Granny Square Crochet Pattern step 3 - details and accessories Fish Granny Square Crochet Pattern step 4 - final assembly and finishing

Switch Things Up

I love using different color palettes to change the mood of this Fish Granny Square; swap yellow for coral and blue for aqua for a tropical feel.

I often adjust size by changing yarn weight and hook sizeβ€”use DK yarn and a 3.5 mm hook for a slightly smaller square or worsted weight and a 5 mm hook for a chunkier version.

I add embroidery details like a small mouth or scales with contrasting yarn to give extra personality to the fish.

I sometimes replace the crocheted eye with a safety eye for a more toy-like finish, or embroider a stitched eye for sturdiness on blankets.

I like to make a set of squares in alternating colors and join them into a playful baby blanket pattern for themed gifts.

I recommend experimenting with textured stitches for the background rounds, such as popping in a round of hdc or fpdc to create subtle ridges around the fish.

I also enjoy mixing in metallic or sparkle yarn for a single round to give the square a shimmery highlight that mimics fish scales.

I sometimes make mini versions by using fingering yarn and a 2.5 mm hook to turn this into a keychain or small ornament.

I suggest trying different placements for the fins and tail to create varied expressions and silhouettes across a blanket or cushion panel.

I encourage you to combine appliquesβ€”a coral, a small shell, or another fishβ€”to build a whole undersea theme with coordinated squares.

Common Mistakes & How to Fix Them

βœ— Not tightening the magic ring can leave a hole in the center; pull the tail to close the MR securely before joining or slipping into the first stitch. βœ— Skipping the invisible stitch step after Round 4 can leave a bulky join; follow the invisible stitch instructions to create a smooth, neat edge and weave in the tail. βœ— Forgetting to change color correctly at the last dc of Round 4 can create a visible knot; either change color in the last dc or finish with the invisible stitch and attach new yarn as instructed. βœ— Neglecting to leave long tails on small appliques makes stitching them into position difficult; leave a generous tail and use it to secure each piece with neat whipstitches.

Fish Granny Square Crochet Pattern

Create a charming Fish Granny Square to add a playful touch to blankets, cushions, or decor. This pattern guides you through a circular base, color change, and simple appliqued fins, tail, and eye. Clear step-by-step rounds and photos make the process enjoyable and easy to follow. Perfect for adding personality to your handmade projects.

Intermediate 2-3 Hours

Materials Needed for Fish Granny Square Crochet Pattern

β€” Main Fabric

  • 01
    Lightweight acrylic yarn - Yellow
  • 02
    Lightweight acrylic yarn - Blue
  • 03
    Lightweight acrylic yarn - Black
  • 04
    Lightweight acrylic yarn - Orange

β€” Tools Required

  • 01
    Crochet hook size 4.00 mm
  • 02
    Yarn needle
  • 03
    Scissors

Progress Tracker

0% Complete

β€” Square :

Info :

Using the yellow yarn

Round 1 :

MR, ch2, 12dc inside MR (12)

Info :

Tighten the MR by pulling on the tail and then sl st in the 1st dc (skip the ch2).

Round 2 :

ch2, *dc inc* all around (24)

Round 3 :

ch2, *dc, dc inc* all around (36)

Round 4 :

ch2, *2dc, dc inc* all around (48)

Info :

Invisible stitch: after you are done with Round 4, cut the yarn, leave a long tail, and pull it all the way through. With your needle, go into the 2nd dc from the back to the front through both loops, and then go through the center of the last dc towards the back. Pull the tail tight enough to create a stitch on top of the 1st dc and then weave in the excess yarn to secure it.

Info :

Color Change: at the end of Round 4, you will need to do a color change. Method 1: change color at the last dc of Round 4. Method 2: after Round 4, finish off with an invisible stitch and then attach the new color.

Info :

Insert your hook into any stitch and attach the new yarn by pulling it through the stitch.

Round 5 :

ch1, *3sc, 2hdc, 2dc, [2tc + ch2 + 2tc] in the same stitch, 2dc, 2hdc* all around (68)

Info :

Sl st in the first sc that you did at the beginning of Round 5.

Info :

The invisible stitch provides a cleaner finish. However both methods work great, so use the one that works best for you.

Round 6 :

ch2, *dc* all around and [2dc + ch2 + 2dc] in the ch2 space (84)

β€” Top Fin :

Row 1 :

sl knot, ch14, sc in the 2nd ch away from the hook, [skip a st, 5dc in the same st, skip a st, sc]x3 (19)

Info :

Finish off and leave a long tail for stitching.

Info :

At the end of the round, finish off and weave in any excess yarn. You can finish off using the invisible stitch method or sl st in the 1st dc and then yarn over and pull the yarn all the way through.

β€” Side Fin :

Round 1 :

MR, ch3 (counts as a dc), 4dc in MR (5)

Info :

Tighten the MR. Finish off and leave a long tail for stitching.

β€” Tail :

Round 1 :

MR, ch3 (counts as a dc), 5dc in MR (6)

Info :

Tighten the MR.

Round 2 :

ch3 (counts as a dc), turn, dc in the same st, 4dc, dc inc (8)

β€” Face :

Round 1 :

MR, ch3 (counts as a dc), 5dc in MR (6)

Info :

Tighten the MR.

Round 2 :

ch3 (counts as a dc), turn, dc in the same st, 4dc, dc inc (8)

Round 3 :

ch3, turn, dc in the same st, 6dc, dc inc (10)

Info :

Finish off and leave a long tail for stitching.

β€” Eye :

Round 1 :

MR, ch1, 5sc in MR (5)

Info :

Tighten the MR. Finish off and leave a long tail for stitching.

β€” Assembly :

Info :

Place the face components on the square. Use the tails for stitching.

Info :

Align the elements to the circular base similar to the photo below, stitch them, and weave in the ends.

Assembly Instructions

  • Place the face components on the square using the photo as a guide and use the tails to stitch each piece securely into place.
  • Align the top fin along the curved upper edge of the circular base and whipstitch it down following the photo placement for symmetry.
  • Position the side fin and tail on the sides of the circle where shown in the reference image, then stitch them flat against the base using the long tails.
  • Sew the black eye to the head area, ensuring it sits neatly on the orange face piece, then weave in all ends to finish.

Important Notes

  • πŸ’‘The () at the end of each round indicates the total number of stitches that should be completed for that round.
  • πŸ’‘When working through the rounds, work through the entire stitch (both loops) unless otherwise stated for a consistent texture.
  • πŸ’‘The ch1 or ch2 at the beginning of each round do not count as stitches unless the pattern explicitly states otherwise.

Make waves with this sunny Fish Granny Square β€” a playful motif perfect for blankets, cushions, and beachy decor. Add fins, a tiny tail, and a stitched eye for charming personality. Share your colorful creations and brighten someones day with handmade cheer! 🐟🧢

You ask,

we answer.

FAQs

What size will the finished square be?

The square is approximately 11 cm x 11 cm when using lightweight acrylic yarn and a 4.00 mm hook as recommended.

Can I change the yarn weight or hook size?

Yes, you can use different yarn weights or hook sizes, but this will change the final size; smaller hooks create smaller squares, larger hooks make bigger squares.

Do I need experience to make the fish granny square?

This pattern is rated intermediate and requires familiarity with double crochet, increases, magic rings, and simple appliqued pieces.

How long will this project take?

Most crocheters finish this pattern in about 2-3 hours, depending on speed and familiarity with the stitches used.