🧢 Beautiful ✨ Detailed πŸ’ Adorable

Flower Garden Throw Pillow Pattern

Flower Garden Throw Pillow Pattern
4.7β˜… Rating
5-7 Hours Time Needed
2.6K Made This
βœ‚οΈ

Intermediate Level

Ideal for those with basic crochet experience, featuring slightly more advanced stitches and techniques to expand your skills.

⏱️

Weekend Treat

Takes 5-7 hours, making it an enjoyable project to finish over a couple of days.

🏑

Cozy Accent

A warm touch for your space that transforms ordinary corners into inviting nooks filled with handmade charm.

About This Flower Garden Throw Pillow Pattern

This pattern creates a floral granny-square throw pillow cover featuring nine textured flower squares arranged in a 3x3 grid. It uses cluster stitches and popcorn petal motifs to give a vintage, dimensional look. The pattern includes instructions for the front panel, two back panels, edging, and final finishing.

Flower Garden Throw Pillow Pattern crochet pattern - detailed view of completed project

Perfect for intermediate crocheters, this project combines decorative stitches with clear assembly steps. The finished cover is designed to fit a 16" square pillow form and looks great when slightly stretched.

Why You'll Love This Flower Garden Throw Pillow Pattern

I absolutely love this pattern because it blends classic stitch work with playful floral texture to create a pillow with real vintage appeal. I enjoy the tactile nature of the popcorn petals and treble clustersβ€”the flowers literally pop off the surface. Sewing the nine squares together into a 3x3 grid is satisfying and gives immediate visual progress. I also love that the back construction creates a neat envelope-style finish that makes the pillow easy to remove and wash. This design is a great way for me to reuse small amounts of yarn while making something cheerful for the home.

Flower Garden Throw Pillow Pattern step 1 - construction progress Flower Garden Throw Pillow Pattern step 2 - assembly progress Flower Garden Throw Pillow Pattern step 3 - details and accessories Flower Garden Throw Pillow Pattern step 4 - final assembly and finishing

Switch Things Up

I love how easily this pillow can be customized by swapping the flower and background colors for a totally different look.

Use pastel shades to create a soft, shabby-chic pillow perfect for nurseries or bedside chairs.

Choose bold, contrasting colors for a modern, graphic statement piece that pops on a neutral sofa.

Make a larger pillow by using thicker yarn and a larger hook, then adjust the number of squares to fit your desired dimensions.

Create a mini keychain or ornament by making a single small square with fingering weight yarn and a tiny hook.

I often substitute a soft acrylic blend for easier care if the pillow will be used frequently in a family room.

Try adding a crocheted border in a mosaic or filet style to change the edging look without altering the squares.

Embellish the centers with buttons, wooden beads, or an embroidered French knot for extra texture.

Work the back panels in stripes or color blocks for a fun reversible effect when the pillow is removed.

For a plump, sculpted look use a slightly larger pillow form than the cover size; for a tight, tailored finish use the exact recommended size.

I sometimes add a removable zipper in the back seam instead of slip stitching to make the cover washable and easy to remove.

Experiment with different fiber contentsβ€”cotton for crisp stitch definition, wool for warmth, or blends for easy care and durability.

Common Mistakes & How to Fix Them

βœ— Skipping working over the beginning yarn tail during Round 1 can leave a large center hole; work over the tail throughout Rnd 1 so you can tighten the center later. βœ— Miscounting stitches in the ch-2 corner spaces will distort the square shape; mark corners and count each ch-2 space and cluster carefully as you go. βœ— Not blocking or lightly steaming the finished squares can make assembly uneven; block or steam-block squares to align edges before sewing them together. βœ— Forgetting that turning chains on the back panels do not count as stitches will cause size mismatches; always treat ch-2 as turning chains and count actual stitches across rows. βœ— Sewing panels without pinning and checking overlap first can result in crooked seams; pin the back panels with the recommended overlap and use stitch markers to divide sides into equal sections.

Flower Garden Throw Pillow Pattern

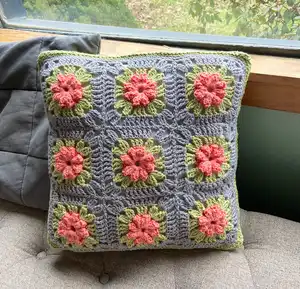
Make a charming Flower Garden Throw Pillow using vintage-inspired granny square motifs and modern construction. This pattern guides you through creating nine floral granny squares, assembling a front panel, knitting up back panels, and finishing with a neat edging for a 16" pillow form. Perfect for adding handmade color and texture to your living space.

Intermediate 5-7 Hours

Materials Needed for Flower Garden Throw Pillow Pattern

β€” Main Fabric

  • 01
    Worsted weight yarn (CYCA #4), preferably a dishcloth cotton or similar (or wool or acrylic as desired)
  • 02
    Color 1 (C1) Bright Coral β€” approximately 110 yards (sample: We Crochet Dishie Conch #25411, 1 ball)
  • 03
    Color 2 (C2) Light Sage Green β€” approximately 370 yards (sample: We Crochet Dishie Honeydew #25410, 2 balls)
  • 04
    Color 3 (C3) Silvery-Gray β€” approximately 115 yards (sample: We Crochet Dishie Silver #25789, 1 ball)

β€” Tools Required

  • 01
    US G/6 (4.00 mm) crochet hook (or size needed to obtain gauge)
  • 02
    Yarn needle for weaving and sewing
  • 03
    Removable stitch markers
  • 04
    One 16" [41 cm] square pillow form
  • 05
    Optional: square pillow case in a color that blends with C3, or light weight cotton fabric to sew a case
  • 06
    Scissors
  • 07
    Pins for assembly
  • 08
    Blocking tools (pins and mat) and steam iron for blocking if desired

Progress Tracker

0% Complete

β€” Notes :

Info :

First, 9 granny squares are created and then stitched together to form the front of pillow. Next a border around all 4 sides of front is worked, then the piece is set aside. Two rectangles are worked for the back piece. These pieces are pinned together, overlapping each other at the center, and a border is worked around all 4 sides. Front and Back pieces are slip stitched together.

Info :

Work over the beginning yarn tail throughout Rnd 1 of the Flower-Granny Square. Later you can use this yarn tail, to tighten the center hole of the square.

Info :

Turning chains in the back pieces do not count as a stitch.

Info :

Be sure to watch the video tutorial on the Creative Crochet Corner for tips.

β€” Special Stitches :

Info :

Popcorn Petal (PP): Ch 1, work 5 Tr into indicated st, remove hook from working lp, insert hook from RS to WS through chain st just before first Tr, replace working lp on hook and draw through st (1 PP made).

Info :

Beginning 3-Treble crochet cluster (beg 3-Tr cl): Ch 3 (beginning ch counts as the first leg of cluster), *yo twice, insert hook into designated sp, yo and pull up lp, [yo and pull through two lps on hook] twice, repeat from * once more (3 lps on hook), yo and pull through all 3 lps on hook (1 beg 3-tr cl made).

Info :

3-Treble crochet cluster (3-tr cl): *Yo twice, insert hook into designated sp, yo and pull up lp, [yo and pull through two lps on hook] twice, repeat from * twice more (4 lps on hook), yo and pull through all 4 lps on hook (one 3-Tr cl made).

β€” Abbreviations :

Infos :

Beg 3-Tr cl = beginning 3 Treble crochet cluster (see notes). 3-Tr cl = 3 Treble crochet cluster (see notes). Ch = chain. DC = double crochet. Inc = increase(d). Lp(s) = loop(s). PP = Popcorn Petal (see notes). RS = Right Side. SC = single crochet. Sl st = slip stitch. Sp(s) = space(s). St(s) = stitch(es). Tr = treble crochet. WS = Wrong side. YO = yarn over.

β€” Flower-Granny Square :

Info :

With C1, ch 6, sl st in first ch to form a lp

Round 1 :

Ch 3 (does not count as a st), [PP, Tr] 8 times into lp, join with sl st to top of first Tr of rnd. Fasten Off. (Note: the first Tr of rnd is the Tr between the first PP and the second PP). 8 PP with 8 Tr between each PP.

Round 2 :

Note: in this rnd, all sts are worked into the Tr between the PP. Begin with slipknot of C2 on hook, insert hook into any Tr from first rnd, yo and pull up lp, continue to pull lp through lp on hook to join C2 to work. Beg 3-Tr cl, ch 3, 3-Tr cl in same Tr, [ch 2, 3 Tr in next Tr, ch 2, (3-Tr cl, ch 3, 3-Tr cl) in next Tr] 3 times, ch 2, 3 Tr in next Tr, ch 1, join with sl st to top of beg 3-Tr cl. Fasten off. Eight 3-tr cl, 7 ch-2 sps, one ch-1 sp, 4 ch-3 sps, 12 Tr

Round 3 :

Begin with slipknot of C3 on hook, insert hook into any ch-3 sp at corner, yo and pull up lp, continue to pull lp through lp on hook to join C3 to work. Beg 3-Tr cl, ch 3, 3-Tr cl in same ch-3 sp, [ch 2, 2 Tr in next ch-2 sp, 1 Tr into each of the next 3 Tr, 2 Tr in next ch-2 sp, ch 2, (3-Tr cl, ch 3, 3-Tr cl) in next ch-3 sp] 3 times, ch 2, 2 Tr in next ch-2 sp, 1 Tr into each of the next 3 Tr, 2 Tr in next ch-2 sp, ch 1, join with sl st to top of beg 3-Tr cl. Fasten off, leaving long tail for sewing. Eight 3-tr cl, four ch-3 sps, 7 ch-2 sps, 1 ch-1 sp, 28 Tr.

Info :

Weave in all ends except for ending yarn tail. Block all pieces if desired. Arrange all squares in a 3 x 3 square and sew all pieces together using preferred seaming technique (I used a whipstitch) to create Front Panel. Weave in all ends..

β€” Front Edging :

Round 1 :

Begin with slipknot of C3 on hook, beginning with any ch-3 sp at corner, *[2 SC into ch-3 sp, SC into top of 3-Tr cl, 2 SC in next ch-2 sp, SC into each of the next 7 sts, 2 SC into next ch-2 sp, SC into top of 3-Tr cl, 2 SC into next ch-3 sp at corner] 3 times, rotate work to continue along next side. Repeat from *, beginning with the 2 SC worked into the same ch-3 sp (the same corner) that you ended with previous to rotating work. Continue in this pattern all the way around the edge of Front piece, join with sl st in first sc made. 51 sts along each of the 4 sides of Front Panel, for a total of 204 sts around edge.

Round 2 :

Ch 1 (does not count as a st), [2 SC in next st, SC in each of next 49 sts, 2 SC into next st] 4 times, join with sl st in first sc made.. Fasten off. 8 sts inc, 212 sts.

Round 3 :

Place a slipknot of C2 on hook. Beginning with the first st of last rnd, [2 SC in next st, SC in each of next 51 sts, 2 SC into next st] 4 times, join with sl st in first sc made. Fasten off. 8 sts inc, 220 sts. There are now 55 sts across each edge.
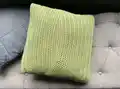
β€” Back Panels (make 2) :

Info :

With C2, ch 53.

Row 1 :

Beginning with the third st from hook and working into the bottom of the ch, DC in each ch across. 51 DC.

Rows 2-20 :

Ch 2 (does not count as a stitch now and throughout), turn, DC in each st. Mark Row 20 as RS. Fasten off weave in ends. Repeat again for second panel, but this time do not fasten off.

Back assembly :

Place both pieces of Back on the table with RS facing up. Overlap the foundation edges of both rectangle pieces so that the piece on top hides the first 10 Rows that were worked on the piece lying on the bottom. Pin along the side edges to keep the pieces overlapped while you work a border of single crochet sts around edge of panels. Treat these two pieces as though they were one piece. Place 3 st markers along each side edge to divide the edges into 4 equal sections. This can be done by folding the side edge in half and placing a marker, and then folding each of the two resulting sections in half to find the center of each of these as well. Be sure to watch the live event as this is a bit tricky to explain, but very easy to understand if you see someone do it. Rotate piece in order to stitch along the next side edge (continuing with working loop). When you get to the section where there are two layers (where the pieces overlap) work through both layers held together as one, removing pins as the layers are stitched together. *SC across edges as follows, make 14 SC in first section between markers, 14 SC in second section, 13 SC in third section, and 14 SC in last section, rotate to work stitches along next edge as follows: [SC into each of the next 9 sts, 2 SC in next st] 4 times, SC into each of the next 11 sts. Rotate to continue working the next two sides as established beginning with *. Do not fasten off. 220 sts. There are now 55 sts across each edge

β€” Finishing :

Info :

Place WS of Front panel directly behind Back panel. Sl st around edge through both layers held together to seam Front to Back, Weave in ends, place pillow inside case, and steam block if necessary.

Assembly Instructions

  • Arrange the nine Flower-Granny Squares in a 3 x 3 layout and sew all squares together using your preferred seaming technique (the designer used a whipstitch) to create the Front Panel.
  • Work the front edging around all four sides of the Front Panel as instructed (Rnd 1-3), then fasten off and weave in ends before proceeding to the Back Panels.
  • Make two Back Panels as directed and overlap the foundation edges so that the top piece hides the first 10 rows of the bottom piece; pin and then work a single crochet border around both layers to join them, working through both layers where they overlap.
  • Place the WS of Front Panel directly behind the assembled Back Panel and slip stitch around the edge through both layers to seam Front to Back; do not forget to remove pins and keep the overlap even while seaming.
  • Weave in all remaining ends, insert the 16" square pillow form, and steam block the pillow if desired to give neat edges and an even finish.

Important Notes

  • πŸ’‘Work over the beginning yarn tail during Round 1 of the Flower-Granny Square so you can pull it to tighten the center hole later.
  • πŸ’‘Turning chains on the Back Panels do not count as a stitch; always count actual stitches across the row for correct sizing.
  • πŸ’‘Pin and mark the Back Panels carefully when overlapping so the sections line up and you can place the single crochet border evenly.
  • πŸ’‘Block or steam-block squares before assembly for the best edge alignment and a professional finish.

This Flower Garden Throw Pillow pattern blends vintage flower motifs with modern construction to brighten any room. The textured popcorn petals and treble clusters create a lovely dimensional surface that feels handmade and timeless. Make it for yourself or as a thoughtful giftβ€”this pillow will bring warmth and charm to sofas and beds alike. 🧢🧡✨

You ask,

we answer.

FAQs

What size will the finished piece be?

The finished pillow cover measures 15" [38 cm] x 15" [38 cm] unstretched and is designed to fit a 16" [41 cm] square pillow form; it looks best when stretched to fit.

Can I use different yarn weights for this pattern?

Yes, you can use different yarn weights but this will change the final size; adjust your hook size to match the yarn and check gauge so the nine squares assemble to the correct measurements.

Do I need prior crochet experience for this pattern?

This pattern is rated intermediate and uses clusters, popcorn petals, and treble stitches, so basic knowledge of crochet stitches and working in rounds is recommended.

How long does this project typically take to complete?

Most crocheters complete this project in 5-7 hours, depending on experience and how much time you spend on blocking and assembly.