🧢 Beautiful ✨ Detailed πŸ’ Adorable

Rustic Lamp Pattern

Rustic Lamp Pattern
4.5β˜… Rating
5-7 Hours Time Needed
1.2K Made This
βœ‚οΈ

Intermediate Level

Ideal for those with basic crochet experience, featuring slightly more advanced stitches and techniques to expand your skills.

⏱️

Weekend Treat

Takes 5-7 hours, making it an enjoyable project to finish over a couple of days.

🏑

Cozy Accent

A warm touch for your space that transforms ordinary corners into inviting nooks filled with handmade charm.

About This Rustic Lamp Pattern

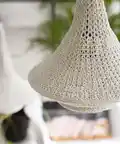
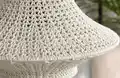
This pattern guides you to crochet a rustic hanging lamp cover using the rope stitch worked in rounds over metal rings. The design creates a soft, natural look ideal for living rooms or sheltered outdoor spaces. You will learn how to attach the work to metal rings and finish it professionally, including wiring and assembly tips.

Rustic Lamp Pattern crochet pattern - detailed view of completed project

The pattern uses Katia Capri yarn and a 3 mm hook, and it includes step-by-step round instructions for the entire lamp. Helpful finishing notes and electrical guidance are provided to complete and hang your lamp safely.

Why You'll Love This Rustic Lamp Pattern

I absolutely love this pattern because it transforms simple crochet stitches into a dramatic, sculptural lamp that brings warmth to any room. I enjoy the texture the rope stitch creates β€” it looks intricate but is relaxing to work. The process of crocheting around metal rings is satisfying and gives the piece structure while remaining soft. I also love that this project is functional: it teaches basic electrical assembly so you finish with a ready-to-hang lamp I am proud to display.

Rustic Lamp Pattern step 1 - construction progress Rustic Lamp Pattern step 2 - assembly progress Rustic Lamp Pattern step 3 - details and accessories Rustic Lamp Pattern step 4 - final assembly and finishing

Switch Things Up

I love how easy it is to customize this lamp with different colorways; try natural sand for a neutral look or deep blues for a bold statement.

You can make the lamp larger or smaller by changing the metal ring diameters; a bigger ring gives a wider shade and a smaller ring creates a compact pendant.

Swap the recommended yarn for a slightly thinner or thicker weight to alter drape and texture, and pair it with an appropriate hook size.

I sometimes add a fabric lining to soften the light and hide the inside hardware if I want a cleaner interior finish.

Try tying decorative tassels or a simple crocheted trim to the lower edge for an extra boho touch that complements the rustic style.

For a more structured look, lightly spray the finished shade with fabric stiffener so it holds its shape when hung.

If you want a mini keychain or ornament version, use thinner yarn and a smaller ring and reduce the number of rounds proportionally.

I recommend experimenting with LED bulbs of different color temperatures to change the mood of the light from warm to cool.

Consider grouping several lamps at different heights to create a dynamic installation over a dining table or in a sunroom.

For a nautical vibe, use natural rope-colored yarn and add small metal or wooden beads threaded onto the hanging cord for added detail.

Common Mistakes & How to Fix Them

βœ— Skipping the try-out hook test can lead to a mismatched gauge and poor fit on the metal rings; test your hook and adjust size before starting. βœ— Waiting to weave in ends until after assembly makes them hard to reach and can cause frustration; weave in ends immediately with a wool needle as recommended. βœ— Not securing the yarn tightly around the metal rings may cause the cover to sag when hung; pull the yarn firmly and tie it off securely around the rings. βœ— Forgetting to work around the chain spaces in earlier rounds will distort the rope stitch pattern; follow the instruction to work around the ch of the previous round exactly.

Rustic Lamp Pattern

Create a beautiful rustic hanging lamp for your living room or outdoor space with this detailed crochet pattern. You will work a decorative rope stitch over metal rings to build a sculptural lampshade that diffuses warm light. The pattern includes full round-by-round instructions, materials, and electrical assembly guidance so you can finish and hang your lamp with confidence. Perfect for makers who enjoy functional home decor projects.

Intermediate 5-7 Hours

Materials Needed for Rustic Lamp Pattern

β€” Main Fabric

  • 01
    Katia Capri yarn - 3 balls, Sand (82134)

β€” Tools Required

  • 01
    3 mm crochet hook
  • 02
    Metal ring Ø 30 cm (1 piece)
  • 03
    Metal ring Ø 15 cm (1 piece)
  • 04
    Wool needle with large eye
  • 05
    Scissors
  • 06
    Safety screwdriver
  • 07
    Wire stripper (or a sharp knife)
  • 08
    Black electrical cord, length of your choice
  • 09
    Flat plug, black
  • 10
    Lamp fitting, black
  • 11
    Strain relief, black
  • 12
    E27 lamp, 600 lumens
  • 13
    Fabric stiffener spray (optional for finishing)

Progress Tracker

0% Complete

β€” Lamp :

Info :

Try out the size of the crochet hook first and use a different size if necessary. You crochet with the rope stitch, like this: make 1 dc, 1 ch, 1 dc around 1 ch = base stitch. See also the pattern on the next page.

Info :

End each round with 1 sl st in the 1st stitch of the round.

Rnd 1 :

crochet 40 ch, join with 1 sl st in 1st ch.

Rnd 2 :

1 ch, 40 sc, join with 1 sl st in 1st sc.

Rnd 3 :

3 ch, 1 dc in 1st sc, 1 ch, 1 dc in 1st sc, rep (1 dc, 1 ch, 1 dc in 4th sc), join.

Rnd 4 :

rep Rnd 3, but work around the ch of the previous round and join.

Rnds 5-12 :

as Rnd 4.

Rnd 13 :

as Rnd 4, but crochet 2 ch instead of 1.

Rnd 14 :

as Rnd 13.

Rnd 15 :

3 ch, rep (1 dc, 3 ch, 1 dc around the 2 ch), join with 1 sl st.

Rnd 16 :

3 ch, rep (1 dc, 1 ch, 1 dc, 1 ch, 1 dc around the 3 ch), join with 1 sl st.

Rnd 17 :

3 ch, 1 dc, 1 ch, 1 dc around each ch, join.

Rnds 18-20 :

as Rnd 17.

Rnd 21 :

as Rnd 13.

Rnds 22-24 :

as Rnd 21.

Rnd 25 :

as Rnd 21, but crochet 3 ch instead of 2 ch between the dc now.

Rnd 26 :

as Rnd 16.

Rnds 27-33 :

as Rnd 17.

Rnd 34 :

3 ch, rep (1 dc, 1 ch, 1 dc around 1 ch, 1 ch, 1 dc, 1 ch), end with 1 sl st.

Rnds 35-37 :

as Rnd 17.

Rnds 38-41 :

as Rnds 34-36.

Rnd 42 :

Take the metal ring of 30 cm Ø and crochet in 1 ch: 1 sc on each stitch of the previous round (= 1 sc in 1 dc, 1 sc around the ch, 1 sc in 1 dc). Insert the hook into the stitch of the previous round, the yarn goes over the ring. Pull the yarn through the loop (like an sc) with the hook. Join with 1 sl st in the 1st ch.

Rnd 43 :

as Rnd 3.

Rnds 44-50 :

as Rnd 17. Dec from here.

Rnd 51 :

3 ch, rep (1 dc, 1 ch, 1 dc, crochet in the next ch: 1 dc, 1 ch, 1 dc, make 1 dc in the next ch). Join with 1 sl st.

Rnd 52 :

3 ch, rep (1 dc, 1 ch, 1 dc in 1 ch, crochet in the next ch: 1 dc, 1 ch, 1 dc, skip 1 dc). Join with 1 sl st.

Rnds 53-55 :

as Rnd 17.

Rnd 56 :

take the 15 cm Ø metal ring and work as Rnd 42.

Rnd 57 :

1 ch, 1 sc on 1 sc, join with 1 sl st. Fasten off the last thread and use the wool needle to carefully weave it through a few stitches on the inside. Break the yarn.

Info :

TIP! Immediately weave in all the ends with the wool needle. You can barely reach them later.

β€” Finishing :

Info :

Reinforce the work with fabric stiffener spray, this step is optional.

β€” Electrical Parts :

Info :

Attach the plug to one end of the cord and the strain relief with fitting to the other end. Insert the plug from the inside through the narrow part of the lamp cover. Pull the cord as far as you like and determine the height of the bulb in the lamp. Cut a long strand of the yarn and tightly pull the narrow part upward. Use the yarn to tightly tie and wrap the lamp you made to secure it at about 28 cm from the fitting. Keep in mind that the work will slightly sag when it hangs. Wind the cord around a stick or hang several lamps from the ceiling at different heights. Finally, screw in the light bulb.

Assembly Instructions

  • Attach the plug to one end of the cord and attach the strain relief with fitting to the other end, following the electrical fitting instructions included with your hardware.
  • Insert the plug from the inside of the lamp cover and pull the cord through the narrow part to determine the bulb height, then secure the narrow part with a long strand of yarn tied tightly about 28 cm from the fitting.
  • Place the 30 cm metal ring at the designated previous round (Rnd 42) and crochet around the ring to secure the cover; repeat with the 15 cm ring at Rnd 56.
  • Wind the electrical cord neatly and either hide it inside the narrow section or wrap it around a stick for decorative hanging; ensure the lamp hangs evenly before final tightening.
  • Screw in the E27 bulb after all fittings are secured and use the wool needle to weave in and hide remaining ends on the inside of the lamp.

Important Notes

  • πŸ’‘Immediately weave in all ends with the wool needle before final assembly because they will be hard to reach later.
  • πŸ’‘Reinforce the lampshade with fabric stiffener spray if you want a firmer shape, but this step is optional based on desired drape.
  • πŸ’‘When securing the cord and tying the narrow section, pull the yarn tightly and test the hanging height because the cover may sag slightly once hung.

This rustic lamp pattern brings handmade charm and soft ambient light to any room. It combines a textured rope stitch with simple construction over metal rings for a timeless look. Hang one or a cluster for a cozy, natural statement in your home. 🧢✨

You ask,

we answer.

FAQs

What size will the finished piece be?

The finished lamp cover fits a 30 cm outer ring and a 15 cm inner ring as used in the pattern; final height depends on how many rounds you work and your tension.

Can I use different yarn weights for this pattern?

Yes, you can use different yarn weights, but this will affect the final size and drape; adjust the hook size accordingly to maintain stitch definition for the rope stitch.

Do I need prior crochet experience for this pattern?

This pattern is rated intermediate and assumes familiarity with chains, single crochet, double crochet, slip stitches, and working in rounds.

How do I attach the crochet to the metal rings?

Crochet sc stitches directly over the metal ring as described in Rnd 42 and Rnd 56: insert the hook into the previous round stitch, bring the yarn over the ring, pull through and complete an sc, joining rounds with slip stitch.

Is there electrical wiring guidance included?

Yes, the pattern includes instructions for attaching the plug, strain relief, and lamp fitting, plus tips on pulling the cord through and securing the lamp; follow all local electrical safety standards.