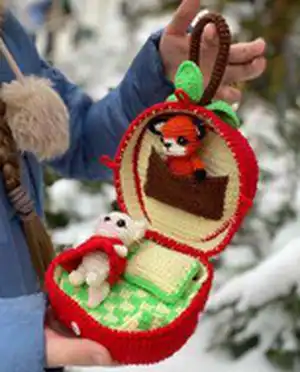
Make an enchanting set of tiny foxes that tuck into a crocheted apple bag — a delightful amigurumi project with detailed steps and clear photos. You will create two adorable foxes (red and white), a cozy apple case, and tiny accessories including a pillow and blanket. The pattern offers colorwork (jacquard technique), small-piece assembly, and clear finishing instructions so you can make a charming gift or keepsake.
Progress Tracker
0% Complete
— RED FOX :
Arms (make 2) :
With Black yarn. 1. 6sc in MR. Place row marker here. 2. 6sc. 3. Change color to orange. 6sc. 4.-6. 6sc (3 rounds). Stuff the arms with fiberfill. Fasten off, cut the yarn, weave in the yarn ends.
Legs (make 2) :
With Black yarn. 1. 6sc in MR. Place row marker here. 2. 6inc (12). 3. 3sc, 3dec, 3sc (9). 4. Change color to orange. (1sc, dec) *3 (6). 5.-9. 6sc (5 rounds). Stuff the legs with fiberfill. Fasten off, cut the yarn, weave in the yarn ends.
Ears (make 2) :
Crochet 2 pieces in White and 2 pieces in Orange color. Work in rows. 1. ch5, Start from the second chain on the hook: 4sc, turn (4). 2. ch1, dec, 2sc, turn (3). 3. ch1, dec, 1sc, turn (2). 4. ch1, dec (1). Cut the yarn. Place Orange and White pieces wrong sides together, with Black yarn crochet though both pieces: 5sc along one side, inc in the corner, 5sc along other side. Leave a long tail for sewing.
Tail :
With White yarn. 1. 6sc in MR. Place row marker here. 2. 6sc. 3. (1sc, inc) *3 (9). 4. (2sc, inc) *3 (12). 5. Attention! Crochet in Jacquard colour changing technique from Rnd 5. Change colour to orange yarn (these stitches are highlighted in red) (1sc, 1sc) *6 (12). 6. Continue with Orange yarn. 12sc. Stuff the tail with fiberfill. 7. 12sc. 8. (2sc, dec) *3 (9). 9. (1sc, dec) *3 (6). 10. 6sc. Leave long tail for sewing.
Body (red) :
With Orange yarn. 1. 6sc in MR. Place row marker here. 2. 6inc (12). 3. (1sc, inc) *6 (18). 4. (2sc, inc) *6 (24). 5.-8. 24sc (4 rounds). 9. (2sc, dec) *6 (18). 10. 18sc. 11. (1sc, dec) *6 (12). 12. 12sc. Stuff the body with fiberfill.
Head (red) :
13. 12inc (24). 14. (3sc, inc) *6 (30). 15. Attention! Crochet in Jacquard colour changing technique from Rnd 15 to 18. Change colour to White yarn (these stitches are highlighted in red). 5sc, 10sc, 15sc (30). 16. 5sc, 10sc, 15sc (30). 17. 6sc, 8sc, 16sc (30). 18. 8sc, 4sc, 18sc (30). 19.-21. Continue with Orange yarn. 30sc (3 rounds). Insert the eyes between rounds 18-19 at a distance of 8-10sc. 22. (3sc, dec) *6 (24). Stuff the head with fiberfill. 23. (2sc, dec) *6 (18). 24. (1sc, dec) *6 (12). 25. 6dec (6). Fasten off, cut the yarn, weave in the ends.
Info :
Tighten cheeks following the pictures in the PDF and sew the ears to the head as shown in the photos. Use long needle and thread to position and attach ears securely.
— RED FOX ASSEMBLY :
Attach ears and facial details :
Tighten cheeks by passing a needle through the head as shown in photos to shape the face. Sew the ears to the head, positioning symmetrically according to photo reference. Embroider or crochet upper eyelids and add small details with black yarn as desired.
Attach limbs and tail :
Fasten the legs and arms with a thread mount. Attach the legs and arms using a long needle and thread following the photo reference. Sew the tail to the body. Embroider upper eyelids, mouth and nose with black thread.
— WHITE FOX :
Arms (make 2) :
With White yarn. 1. 6sc in MR. Place row marker here. 2.-6. 6sc (5 rounds). Stuff the arms with fiberfill. Fasten off, cut the yarn, weave in the yarn ends.
Legs (make 2) :
With White yarn. 1. 6sc in MR. Place row marker here. 2. 6inc (12). 3. 3sc, 3dec, 3sc (9). 4. (1sc, dec) *3 (6). 5.-9. 6sc (5 rounds). Stuff the legs with fiberfill. Fasten off, cut the yarn, weave in the yarn ends.
Ears (make 2) :
Crochet 2 pieces in White and 2 pieces in Pink color. Work in rows. 1. Ch5. Start from the second chain on the hook: 4sc, turn (4). 2. Ch1, dec, 2sc, turn (3). 3. Ch1, dec, 1sc, turn (2). 4. Ch1, dec (1). Cut the yarn on the pink pieces. Do not cut the White yarn. Place white and pink pieces wrong sides together, with White yarn crochet though both pieces: 5sc along one side, inc in the corner, 5sc along other side. Leave a long tail for sewing.
Tail :
With Pink yarn. 1. 6sc in MR. Place row marker here. 2. 6sc. 3. (1sc, inc) *3 (9). 4. (2sc, inc) *3 (12). 5. Attention! Crochet in Jacquard colour changing technique from Rnd 5. Change colour to White yarn (these stitches are highlighted in red) (1sc, 1sc) *6 (12). 6. Continue with White yarn. 12sc. Stuff the tail with fiberfill. 7. 12sc. 8. (2sc, dec) *3 (9). 9. (1sc, dec) *3 (6). 10. 6sc. Leave a long tail for sewing.
Body (white) :
With White yarn. 1. 6sc in MR. Place row marker here. 2. 6inc (12). 3. (1sc, inc) *6 (18). 4. (2sc, inc) *6 (24). 5.-8. 24sc (4 rounds). 9. (2sc, dec) *6 (18). 10. 18sc. 11. (1sc, dec) *6 (12). 12. 12sc. Stuff the body with fiberfill.
Head (white) :
13. 12inc (24). 14. (3sc, inc) *6 (30). 15. Attention! Crochet in Jacquard colour changing technique from Rnd 15 to 18. Change colour to Pink yarn (these stitches are highlighted in red). 5sc, 10sc, 15sc (30). 16. 5sc, 10sc, 15sc (30). 17. 6sc, 8sc, 16sc (30). 18. 8sc, 4sc, 18sc (30). 19.-21. Continue with White yarn. 30sc (3 rounds). Insert the eyes between rounds 18-19 at a distance of 8-10sc. 22. (3sc, dec) *6 (24). Stuff the head with fiberfill. 23. (2sc, dec) *6 (18). 24. (1sc, dec) *6 (12). 25. 6dec (6). Fasten off, cut the yarn, weave in the ends.
— DRESS :
Dress :
With Red yarn. Work in rows. 1. Chain 19. From the second chain on the hook: 18sc, turn (18). 2. ch1, 3sc, ch4, (skip 4 sc, start from the next stitch), 4sc, ch4, (skip 4 sc, start from the next stitch), 3sc, turn (18). 3. ch2, 18dc-inc, turn (36). 4. ch2, 36dc, turn (36). 5. ch2, (dc-inc, sc) *18. Cut the yarn. Make a fastener on the dress (sew a button on one side, make a button loop on the other). Put the dress on the fox.
— PILLOW :
Pillow :
Crochet 2 pieces in Yellow color. 1. Chain 15. Start in the second chain from the hook: 14sc, turn (14). 2.-11. Ch1, 14sc, turn (10 rows). Cut the yarn. Place both yellow pieces together using Green yarn crochet through both pieces: 14sc, inc in the corner, 11sc, inc in the corner, 14sc, inc in the corner, 11sc, inc in the corner. Stuff the pillow with fiberfill. Fasten off, cut the yarn, weave in the yarn ends.
— BLANKET :
Blanket :
With Yellow yarn. Work in rows. 1. Ch 31. Start in the second chain from the hook: 30sc, turn (30). 2. Attention! Crochet in jacquard technique from Row 2 to 11. Add Green yarn (these stitches are highlighted in red). 3. ch2, (3dc, 3dc) *5, turn (30). 4. ch2, (3dc, 3dc) *5, turn (30). 5. ch2, (3dc, 3dc) *5, turn (30). 6. ch2, (3dc, 3dc) *5, turn (30). 7. ch2, (3dc, 3dc) *5, turn (30). 8. ch2, (3dc, 3dc) *5, turn (30). 9. ch2, (3dc, 3dc) *5, turn (30). 10. ch2, (3dc, 3dc) *5, turn (30). 11. ch2, (3dc, 3dc) *5, turn (30). 12. Continue with Yellow yarn. ch1, 30sc. Fasten off, cut the yarns, weave in the ends.
— BAG-APPLE (SIDE PARTS & CONNECT) :
Side Parts (make 2) :
Crochet 2 pieces in Red and 2 pieces in Yellow color. Work in rows. 1. Chain 7. From the second chain on the hook: 6sc, turn (6). 2.-96. Ch1, 6sc, turn (95 rows). Fold in half and make 5sl st through both sides. Cut the yellow yarn, weave in ends. Do not cut the Red yarn.
Connect the pieces (side assembly) :
Place one Yellow side piece inside the other Red side piece. Connect the two pieces together by using Red yarn and single crochet, (96sc). Repeat process on other side using Red yarn and reverse single crochet (96 reverse sc). Cut the yarn.
— APPLE-BASE (make 2) :
Apple-Base :
Crochet 2 pieces in Red and 2 pieces in Yellow color. Work in rows. 1. Chain 13. From the second chain on the hook: 12sc, turn (12). 2. ch1, inc, 10sc, inc, turn (14). 3. ch1, inc, 12sc, inc, turn (16). 4. ch1, inc, 14sc, inc, turn (18). 5. ch1, 18sc, turn (18). 6. ch1, inc, 16sc, inc, turn (20). 7.-8. ch1, 20sc, turn (2 rows). 9. ch1, inc, 18sc, inc, turn (22). 10.-11. ch1, 22sc, turn (2 rows). 12. ch1, inc, 20sc, inc, turn (24). 13. ch1, 24sc, turn (24). 14. ch1, inc, 22sc, inc, turn (26). 15. ch1, 26sc, turn (26). 16. ch1, inc, 24sc, inc, turn (28). 17.-28. ch1, 28sc, turn (12 rows). 29. ch1, dec, 24, dec, turn (26). 30. ch1, dec, 22, dec, turn (24). 31. ch1, dec, 20, dec, turn (22). 32. ch1, dec, 18, dec, turn (20). 33. ch1, dec, 16, dec, turn (18). Cut the yellow yarn, weave in ends. Do not cut the Red yarn.
Connect the pieces (apple assembly) :
Place two "Apple-Base" together, using single crochet with red yarn around crochet: 96sc. Fasten off, cut the yarn, weave in the ends. Repeat process with the last two hearts. Then attach the apple base to the side part with Red yarn and reverse single crochet (96 reverse sc). Fasten off, cut the yarn, weave in the ends.
— POCKET :
Pocket :
With Brown yarn. Work in rows. 1. Chain 23. Start from the second chain on the hook: 22sc, turn (22). 2.-14. ch1, 22sc, turn (13 rows). Leave long tail for sewing. Sew the pocket to one half apple-base as shown in the photos.
This charming Foxes in the Apple Bag set is full of tiny details and cozy personality. It makes a perfect handmade gift or a collectible for your shelf. Follow the clear step-by-step photos and instructions to create a miniature world you can carry in your hands. 🧶🍎