🧶 Beautiful ✨ Detailed 💝 Adorable

Fried Egg Amigurumi Pattern

Fried Egg Amigurumi Pattern
4.3★ Rating
1-2 Hours Time Needed
2.7K Made This
✂️

Beginner Friendly Level

Perfect for those just starting their crochet journey, with clear instructions and simple techniques

⏱️

Quick Make

Complete in under 2 hours—lightning fast fun for instant gratification and quick gifts.

🧸

Cute Companion

An adorable friend to cherish, handcrafted with love to bring comfort and joy for years to come.

About This Fried Egg Amigurumi Pattern

This pattern creates a cute fried egg amigurumi composed of two parts: a flat egg white and a rounded, stuffed yolk. Both pieces start with a magic ring and are crocheted in a spiral for a smooth, seamless finish. The yolk is lightly stuffed to give a realistic, raised look before being sewn to the white.

Fried Egg Amigurumi Pattern crochet pattern - detailed view of completed project

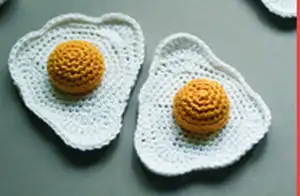
The finished piece measures approximately 4 inches and is quick to make, perfect as a small gift or kitchen decoration. The pattern is written in US crochet terms and includes full round-by-round instructions.

Why You'll Love This Fried Egg Amigurumi Pattern

I absolutely love this pattern because it turns a simple idea into a delightful little object that makes people smile. I enjoy how fast it is to make — you can finish one in about an hour or two and immediately see the result. The construction is straightforward but gives a polished look, especially when the yolk is stuffed just right. I also love that it uses basic stitches, so it is accessible yet satisfying to complete.

Fried Egg Amigurumi Pattern step 1 - construction progress Fried Egg Amigurumi Pattern step 2 - assembly progress Fried Egg Amigurumi Pattern step 3 - details and accessories Fried Egg Amigurumi Pattern step 4 - final assembly and finishing

Switch Things Up

I love changing colors to give each fried egg a unique look; try pastel yolks or speckled yarn for quirky results.

You can make the egg larger or smaller by changing your yarn weight and hook size — bulky yarn with a bigger hook makes a chunky friend.

I sometimes embroider a smile or tiny freckles on the yolk to turn it into a character with personality.

For a keychain, use thinner yarn, a smaller hook, and add a keyring before sewing the pieces together.

Consider making a matching set with a crocheted bacon strip or toast slice to create a breakfast collection.

If you want it to be more posable, add a small piece of wire inside the white edge to give slight shaping control.

I often sew the yolk slightly off-center for a more playful, handmade look instead of perfectly centered placement.

Add felt or small embroidered details to the white for decorative patterns or to personalize gifts with initials.

Try stuffing the yolk more or less to change the profile — a firmer stuffing makes a pronounced dome, while less stuffing keeps it flatter.

I recommend experimenting with different seam techniques; an invisible mattress stitch gives the neatest finish when attaching the yolk.

Common Mistakes & How to Fix Them

✗ Skipping the magic ring and chaining instead can leave a hole in the center; use a proper magic ring to start tightly and close the center. ✗ Forgetting to crochet in a spiral causes visible seams and step joins; work continuously in spiral without slip stitching between rounds. ✗ Not stuffing the yolk before final sewing will make sewing difficult and may flatten the yolk; stuff the yolk gradually and secure before closing the seam. ✗ Miscounting increases during shaping leads to uneven edges on the egg white; count your stitches at the end of each round to confirm stitch totals.

Fried Egg Amigurumi Pattern

Make a charming fried egg amigurumi with this easy-to-follow pattern. Youll crochet two simple pieces — the white and a stuffed yolk — then sew them together for a playful kitchen-inspired toy. The pattern is written in US terms, quick to work up, and perfect for gifting or playful decor. Finished size is approximately 4 inches.

Beginner Friendly 1-2 Hours

Materials Needed for Fried Egg Amigurumi Pattern

— Main Fabric

  • 01
    DMC Natura Just Cotton in white (1 - Ibiza)
  • 02
    DMC Natura Just Cotton in yellow (16 - Tournesol)
  • 03
    Cotton yarn suitable for 3 mm hook (exact amounts depend on finished quantity; small amigurumi uses minimal yarn)

— Tools Required

  • 01
    Crochet hook size 3 mm
  • 02
    Toy stuffing / polyester fiberfill
  • 03
    2 stitch markers
  • 04
    Scissors
  • 05
    Yarn needle for sewing and weaving in ends

Progress Tracker

0% Complete

— Pattern :

Info :

Note: This cute fried egg is made of two parts, which are sewn together. The yolk is additionally stuffed with some toy filling, for more realistic look. Both pieces require starting with a magic ring and crocheting in a spiral (without joining the separate rounds with a slip stitch). The finished piece measures approximately 4 inches and it takes about 1.5 hours to make. The pattern is written in US terms. Gauge: 2" = 12 sts x 13 rows in sc

— Egg white :

Round 1 :

6sc in MR (6)

Round 2 :

inc x 6 (12)

Round 3 :

(sc, inc) x 6 (18)

Round 4 :

(2sc, inc) x 6 (24)

Round 5 :

(3sc, inc) x 6 (30)

Round 6 :

(4sc, inc) x 6 (36)

Round 7 :

(5sc, inc) x 6 (42)

Round 8 :

(6sc, inc) x 6 (48)

Round 9 :

4sc, 2hdc, 3dc inc, hdc, 3sc, 3hdc, 4sc, hdc, dc, dc inc, dc, hdc, 1sc, hdc, dc inc, dc, dc inc, hdc, 7sc (54)

Round 10 :

3sc, 3hdc, dc, 3dc inc, dc, hdc, 28sc, hdc, dc, 3dc inc, dc, 3hdc, 5sc (60)

Round 11 :

5 sl st, 11 sc, 1 sl st, 5 sc, 2 sl st, 4 sc, inc, 3 sc, 3 sl st, 8 sc, hdc, dc, 3dc inc, dc, hdc, 3 sc, 5 sl st (64)

Info :

Fo and weave in the ends.

— Yolk :

Round 1 :

6sc in MR (6)

Round 2 :

inc x 6 (12)

Round 3 :

(sc, inc) x 6 (18)

Round 4 :

(2sc, inc) x 6 (24)

Round 5-7 :

sc around (24)

Round 8 :

sl st around (24)

Info :

Fo and weave in the ends.

— Assembly :

Info :

Choose the right spot for the yolk and sew it to the egg white. Ideally do it with your white yarn, using some hidden seam. Stuff it just before finishing the seam. Well done! You have just made your perfect fried egg :) What are you going to cook crochet next?

Assembly Instructions

  • Choose the right spot for the yolk on the egg white and position it centered or slightly offset depending on the look you prefer.
  • Sew the yolk to the egg white using your white yarn with a hidden seam so the stitches are not visible on the white surface.
  • Stuff the yolk lightly with toy filling just before finishing the seam to keep the rounded shape realistic and secure the stuffing inside.
  • Weave in all ends neatly and check the seam for any gaps, tightening stitches as needed to ensure the yolk is firmly attached.

Important Notes

  • 💡Use stitch markers to keep track of the beginning of rounds when crocheting in a spiral without joining.
  • 💡Stuff the yolk moderately and gradually to achieve a natural rounded shape without overfilling.
  • 💡Weave in ends neatly and hide the joining seam when sewing the yolk to the white for the cleanest finish.
  • 💡This pattern is written in US terms; check abbreviations if you are used to different terminology.

This delightful Fried Egg Amigurumi is a quick and satisfying make that adds a bit of whimsy to your day. Perfect as a small gift, playful decor, or a charming photo prop. Try making a set with different yolk placements for extra fun! 🧶🍳

You ask,

we answer.

FAQs

What size will the finished piece be?

The finished amigurumi measures approximately 4 inches across when using the recommended cotton yarn and a 3 mm hook.

Can I use different yarn weights for this pattern?

Yes, you can use different yarn weights but the final size will change; pair a larger hook with bulkier yarn for a bigger egg, or thinner yarn for a tiny version.

Do I need prior crochet experience for this pattern?

This pattern is beginner friendly, so basic knowledge of single crochet, increases, and working in a magic ring is enough to complete it.

How long does this project typically take to complete?

Most crocheters complete this project in about 1 to 2 hours, though time may vary based on experience and finishing details.