🧢 Beautiful ✨ Detailed πŸ’ Adorable

Sophie the Bunny Amigurumi Pattern

Sophie the Bunny Amigurumi Pattern
4.5β˜… Rating
5-7 Hours Time Needed
1.3K Made This
βœ‚οΈ

Intermediate Level

Ideal for those with basic crochet experience, featuring slightly more advanced stitches and techniques to expand your skills.

⏱️

Weekend Treat

Takes 5-7 hours, making it an enjoyable project to finish over a couple of days.

🧸

Cute Companion

An adorable friend to cherish, handcrafted with love to bring comfort and joy for years to come.

About This Sophie the Bunny Amigurumi Pattern

This pattern creates Sophie, a charming amigurumi bunny with long floppy ears, a ruffled skirt, and a cute headband. The instructions include every round and clear assembly guidance so you can reproduce the doll exactly. Youll work mostly in single crochet with simple increases and decreases for shaping.

Sophie the Bunny Amigurumi Pattern crochet pattern - detailed view of completed project

Perfect for gifting or display, Sophie is designed to be customizable with your favorite yarn colors. The pattern includes face feature placement and skirt assembly tips for a polished finish.

Why You'll Love This Sophie the Bunny Amigurumi Pattern

I absolutely love this pattern because Sophie has a sweet personality and lots of small details that bring her to life. I enjoyed designing the ruffled skirt and the tiny headband because they add charming character with just a few extra rounds. Crocheting Sophie was soothing and satisfyingβ€”the shaping is straightforward but rewarding as you see the bunny take form. I think youll love finishing the little face details and giving Sophie her final expression.

Sophie the Bunny Amigurumi Pattern step 1 - construction progress Sophie the Bunny Amigurumi Pattern step 2 - assembly progress Sophie the Bunny Amigurumi Pattern step 3 - details and accessories Sophie the Bunny Amigurumi Pattern step 4 - final assembly and finishing

Switch Things Up

I love customizing Sophie by changing the color palette; try soft pastels for a vintage look or bold brights for a playful style.

I often swap the skirt color or make the skirt longer by adding extra rounds for a dress effect.

To make Sophie smaller or larger change the yarn weight and hook size; sport or fingering yarn with a smaller hook makes a tiny keychain friend.

I sometimes add embroidery on the skirt or tiny crocheted flowers to decorate the headband for a personalized touch.

I recommend trying safety eyes in different sizes to change expression; larger eyes make a cuter, more childlike face.

For a seasonal twist, pick autumnal or holiday colors and add small accessories like a scarf or tiny crochet pumpkin.

I also like using variegated yarn for the skirt to add subtle color changes without switching skeins.

If you want posable limbs, consider inserting thin wire into the arms and legs before stuffing to give Sophie more pose options.

Try different yarn textures like cotton for a firm, neat finish or acrylic for soft, plush results depending on the intended use.

Finally, swap the headband for a tiny hat or crown to create a whole collection of themed Sophies for gifts or decor.

Common Mistakes & How to Fix Them

βœ— Skipping the eye placement guideline can cause uneven facial features; insert the safety eyes between rows 10-11 and space them 9 stitches apart as instructed to keep symmetry. βœ— Changing colors without securing yarn ends may lead to loose joins; fasten off and weave in tails neatly or use an invisible join method to keep edges tidy. βœ— Not counting stitches after increases or decreases leads to uneven shaping; count your stitches after each round especially during shaping rounds to ensure correct stitch counts. βœ— Failing to stuff evenly makes the body lumpy and misshapen; stuff gradually while crocheting and add small amounts at a time to achieve a smooth form.

Sophie the Bunny Amigurumi Pattern

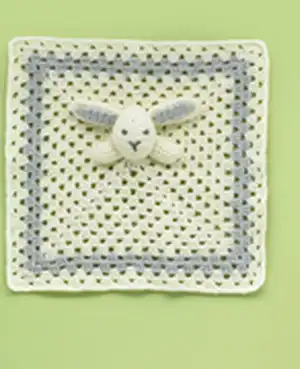
Make a sweet Sophie the Bunny with this detailed amigurumi pattern that guides you through every round, stitch, and assembly step. Youll create a cuddly bunny with long ears, a ruffled skirt, and a cute headband using simple techniques. This pattern is written clearly so you can follow along and customize colors for a personal touch. Perfect as a handmade gift or a charming addition to your toy collection.

Intermediate 5-7 Hours

Materials Needed for Sophie the Bunny Amigurumi Pattern

β€” Main Fabric

  • 01
    Light grey yarn (main body color) - approx 100g
  • 02
    Pink yarn (dress/skirt) - approx 50g
  • 03
    Light yellow yarn (headband) - approx 20g
  • 04
    White yarn (snout and foot tips) - approx 10-20g
  • 05
    Light beige yarn (leg color change) - approx 20g

β€” Tools Required

  • 01
    Crochet hook size 2.5-3.5mm (choose based on your tension)
  • 02
    Safety eyes (black) - 2 pieces (about 8mm recommended)
  • 03
    Scissors
  • 04
    Yarn needle for sewing
  • 05
    Stitch markers
  • 06
    Polyester stuffing
  • 07
    Pins for assembly

Progress Tracker

0% Complete

β€” Head + Body :

Info :

Use light grey yarn.

Round 1 :

Rd.1 - magic ring with 6 SC [6]

Round 2 :

Rd.2 INC in each stitch [12]

Round 3 :

Rd. 3 - SC in the first stitch, INC,, repeat around [18]

Round 4 :

Rd. 4 - SC in the first 2 stitches, INC,, repeat around [24]

Info :

Change to light grey

Round 5 :

Rd. 5 - SC in the first 3 stitches,INC,, repeat around [30]

Round 6 :

Rd.6 – SC around [30]

Round 7 :

Rd.7– SC in the first 4 stitches, INC,, repeat around [36]

Round 8 :

Rd.8 – SC around [36]

Round 9 :

Rd.9– SC in the first 5 stitches, INC,, repeat around [42]

Round 10-14 :

Rd.10-14 – SC around [42]

Round 15 :

Rd. 15 – SC in the first 5 stiches, DEC, repeat around [36]

Round 16 :

Rd.16 – SC in the first 4 stitches, DEC, repeat around [30]

Round 17 :

Rd. 17 – SC in the first 3 stitches, DEC, repeat around [24]

Info :

Insert eyes between 10-11 row, 9 stitches apart

Round 18 :

Rd.18 – SC in the first 2 stitches, DEC, repeat around [18]

Round 19 :

Rd.19 – SC in the first stitch, DEC, repeat around [12]

Info :

Change to pink

Round 21 :

Rd.21 - SC, INC, repeat around [18]

Round 22 :

Rd.22 – SC x2, INC, repeat around [24]

Round 23 :

Rd.23 – SC x7, INC, repeat around [27]

Round 24 :

Rd.24 – SC x8, INC, repeat around [30]

Round 25 :

Rd.25 – SC x9, INC, repeat around [33]

Round 26 :

Rd.26 – SC x10, INC, repeat around [36]

Round 27-32 :

Rd.27-32 – SC around [36]

Round 33 :

Rd.33 – SC x4, DEC, repeat around [30]

Round 34 :

Rd.34 – SC x3, DEC, repeat around [24]

Round 35 :

Rd.35 – SC x2, DEC, repeat around [18]

Round 36 :

Rd.36 – SC, DEC, repeat around [12]

Round 37 :

Rd.37 – DEC around [6]

Info :

fasten off and hide the tail

Info :

Now You’re working on a skirt. Attach pink yarn to a third pink row counting from the bottom, as shown in the picture

β€” Skirt :

Round 1 :

Rd.1 – SC around [36]

Round 2 :

Rd.2 – SC, INC , repeat around [53]

Round 3 :

Rd.3 – INC around [106]

Round 4-5 :

Rd.4-5 – SC around [106]

β€” Legs :

Info :

Start with white yarn

Info :

Chain 3, start in the second chain from the hook.

Info :

You’ll be working in spirals around the chain

Round 1 :

Rd.1 – INC in the first stitch, 4 SC in the next stitch, INC [8]

Round 2 :

Rd.2 INC in each stitch[16]

Round 3-4 :

Rd.3-4 - SC around [16]

Round 5 :

Rd.5 - SC x6, DEC x 2, SC x6 [14]

Round 6 :

Rd.6 – SC x5,DEC,SC x5 [12]

Round 7 :

Rd.7 – SC x4, DEC x2, SC x4 [10]

Round 8 :

Rd.8 – SC around [10]

Info :

Change to light beige

Round 9-18 :

Rd.9-18- SC around [10]

β€” Ears :

Info :

Use light grey yarn.

Round 1 :

Rd.1 - magic ring with 6 SC [6]

Round 2 :

Rd.2 INC in each stitch [12]

Round 3 :

Rd. 3 - SC in the first stitch, INC,, repeat around [18]

Round 4-10 :

Rd. 4-10 – SC around [18]

Round 11 :

Rd.11 – SC x7, DEC, repeat around [16]

Round 12-13 :

Rd.12-13 – SC around [16]

Round 14 :

Rd.14 – SC x6, DEC, repeat around [14]

Round 15-16 :

Rd.15-16 – SC around [14]

Round 17 :

Rd.17 – SC x5, DEC, repeat around [12]

Round 18-22 :

Rd.18-22 – SC around [12]

Info :

end with a slip stitch

β€” Arms :

Round 1 :

Rd.1 - magic ring with 6 SC [6]

Round 2 :

Rd.2 – SC x2, INC, repeat around [8]

Round 3 :

Rd.3 – SC x3, INC, repeat around [10]

Round 4 :

Rd.4 – SC around [10]

Round 5 :

Rd.5 – SC x3, DEC, repeat around [8]

Round 6-8 :

Rd.6-8 – SC around [8]

Info :

Change to light grey

Round 9-14 :

Rd.9-14 – SC around [8]

β€” Headband :

Info :

Use light yellow

Info :

Chain 62, start in the second chain from the hook,

Info :

You'll be working in spiral around the chain

Round 1 :

Rd.1 – SC, DC x4, SC x51, DC x4,

Info :

slip stitch, now You’re woking at the other side of the chain

Info :

DC x4, SC x51, DC x4, slip stitch

β€” Face Features :

Info :

Create a little blush o the cheeks with 2 stitches wide pink line.

Info :

Crochet snout

Info :

Use white yarn.

Round 1 :

Rd.1 - magic ring with 6 SC [6]

Round 2 :

Rd.2 INC in each stitch [12]

Info :

Sew it between th eyes, one row below them

Info :

Sew the face features in the snout with 1 stitch wide black vertical and horizontal line

Info :

Add brows and lashes as shown at the picture

Info :

Make sure the brows are a little diagonally placed

Info :

Add a little white lines under the eyes for a more realsitic look

β€” Assembling Body :

Info :

Sew legs to the body - right under the last pink row 12 stitches apart

Info :

Sew the arms right above the legs, under the first pink row, 3 stitches apart from the eye

Info :

Sew ears to the head - two rows above the eye, 7 stitches apart

Info :

Place headband around the head, under the ears

Assembly Instructions

  • Sew legs to the body - right under the last pink row 12 stitches apart.
  • Sew the arms right above the legs, under the first pink row, positioning them 3 stitches apart from the eye for a balanced look.
  • Sew ears to the head - attach two rows above the eye and space the ears 7 stitches apart for symmetry.
  • Place headband around the head, tucking it under the ears and securing it so it sits snugly.

Important Notes

  • πŸ’‘Insert safety eyes between rows 10 and 11 and space them 9 stitches apart to achieve the correct facial placement.
  • πŸ’‘Weave in and hide yarn tails after fastening off to keep seams neat and avoid unraveling during play.
  • πŸ’‘Pin parts in place before sewing to check symmetry and alignment for a professional finish.

Sophie the Bunny is a sweet project that brings gentle charm to your handmade collection. This pattern balances simple shaping with delightful details like the ruffled skirt and headband. Make one as a gift or a keepsake to brighten any shelf or nursery. 🧢🧡

You ask,

we answer.

FAQs

What size will the finished piece be?

The finished amigurumi measures approximately 20-25 cm tall depending on your yarn and hook tension.

Can I use different yarn weights for this pattern?

Yes, you can use different yarn weights, but the final size will change; choose an appropriate hook for the yarn you select and adjust stuffing accordingly.

Do I need prior crochet experience for this pattern?

This pattern is rated intermediate, so familiarity with single crochet, increases, decreases, and working in the round is recommended.

How long does this project typically take to complete?

Most crocheters complete this project in 5-7 hours, though time may vary based on experience and how quickly you work.