๐Ÿงถ Beautiful โœจ Detailed ๐Ÿ’ Adorable

Fruit Stacking Toy Amigurumi Pattern

Fruit Stacking Toy Amigurumi Pattern
4.8โ˜… Rating
5-7 Hours Time Needed
1.9K Made This
โœ‚๏ธ

Intermediate Level

Ideal for those with basic crochet experience, featuring slightly more advanced stitches and techniques to expand your skills.

โฑ๏ธ

Weekend Treat

Takes 5-7 hours, making it an enjoyable project to finish over a couple of days.

๐ŸŽ

Tiny Treasure

Small, sweet, and gift-worthy creations that fit perfectly in the palm of your hand with detailed charm.

About This Fruit Stacking Toy Amigurumi Pattern

This pattern creates a colorful Fruit Stacking Toy composed of a base and six stackable fruit rings. Each element uses simple shaping, color changes and decorative embroidery to capture fruit details. The instructions include jacquard striping techniques and shell stitches for the pineapple crown to give each piece character.

Fruit Stacking Toy Amigurumi Pattern crochet pattern - detailed view of completed project

Clear round-by-round instructions and photo guides help you complete each element step by step. The finished toy measures about 22 cm high with a largest ring diameter of approximately 11.5 cm.

Why You'll Love This Fruit Stacking Toy Amigurumi Pattern

I absolutely love this pattern because it combines playful colorwork with tactile shapes that are perfect for little hands. I enjoy the mix of simple amigurumi rounds and more decorative techniques like jacquard striping and shell stitches. The design is versatile so I can mix yarn colors to create new fruit combinations every time. Sewing the elements together and adding embroidered seeds is the most rewarding part for me because it brings the whole toy to life.

Fruit Stacking Toy Amigurumi Pattern step 1 - construction progress Fruit Stacking Toy Amigurumi Pattern step 2 - assembly progress Fruit Stacking Toy Amigurumi Pattern step 3 - details and accessories Fruit Stacking Toy Amigurumi Pattern step 4 - final assembly and finishing

Switch Things Up

I love customizing the colors in this pattern to create playful variations; try pastel shades for a soft nursery set or bright neon tones for a modern look.

I often change yarn weight and hook size to make minis for keychains or larger chunky versions for cuddly play โ€” just remember to adjust rounds proportionally.

I add tiny crocheted accessories like a tiny leaf hat for the strawberry or a felt bow for the apple to personalize gifts.

I experiment with embroidered faces or button eyes for characterful rings, but always secure any small parts firmly if the toy is for young children.

I sometimes swap the pineapple shells for a simpler bobble stitch to vary texture without changing the base structure.

I recommend trying ombre or variegated yarn for the inner rings to create subtle color transitions without extra color changes.

I also enjoy creating a coordinated set by using a single accent color across all rings to tie the palette together.

I sometimes stitch the rings together at three small interior points to make a non-removable stack for very young children โ€” do this only if you want a permanently attached set.

I like to add a soft wooden stacking peg instead of a fabric post for a mixed-media look; make sure it is smooth and child-safe if used by toddlers.

I encourage you to test tension on a small swatch before starting complex jacquard rounds so your stripes and motifs line up cleanly in the final piece.

Common Mistakes & How to Fix Them

โœ— Skipping the jacquard thread change technique can leave loose floats and messy edges; always change the thread at the last loop of the single crochet and lay the non-working yarn under the stitch. โœ— Crocheting Alize Cotton Baby sections too loosely makes shells and motifs gappy; tighten your tension for these rounds and check gauge before continuing. โœ— Forgetting to stuff gradually results in lumps or collapsing rings; stuff a little at a time as you close the central hole to maintain even shape. โœ— Not securing color yarn ends can cause unraveling during play; leave long ends where instructed and weave or sew them securely into the work when finishing. โœ— Neglecting to sew shells or gaps at assembly can leave holes; if you see large gaps between shells, tack them with 1-2 stitches to close before final sewing.

Fruit Stacking Toy Amigurumi Pattern

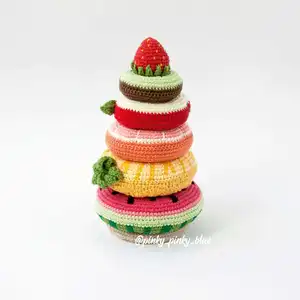
Create a charming stackable fruit toy with this detailed crochet pattern. Youll make a base and six colorful fruit rings including watermelon, pineapple, grapefruit, orange and apple. The pattern guides you through color changes, jacquard stripes and decorative details so your finished toy looks polished and playful. Perfect as a handmade gift or nursery toy.

Intermediate 5-7 Hours

Materials Needed for Fruit Stacking Toy Amigurumi Pattern

โ€” Main Fabric

  • 01
    Yarn Art Jeans (55% cotton, 45% acrylic; 160m/50g) - colors used: 03, 11, 23, 26, 35, 40, 52, 53, 69, 78, 86, 87, 88, 90 (multiple small amounts per color)
  • 02
    Alize Cotton Baby (50% cotton, 50% acrylic; 270g/100m or 170m/50g depending on batch) - colors 113 and 145 (used for inner rounds and shells)
  • 03
    Gazzal Jeans (58% cotton, 42% acrylic; 170m/50g) - color 1136 (used to join beginning chains for some rings)
  • 04
    Synthetic fiberfill for stuffing (small amount per ring)
  • 05
    3 mm cellulose sponge (for cleaning) - small piece
  • 06
    Optional: small amounts of black yarn for embroidered seeds and brown yarn for apple stitching

โ€” Tools Required

  • 01
    Crochet hook size 2.25 mm (main hook used)
  • 02
    Crochet hook size 2.0 mm (a little bit smaller for tighter rounds/details)
  • 03
    Big-eyed needle for sewing and embroidery
  • 04
    Scissors
  • 05
    Stitch markers
  • 06
    Polyester stuffing / fiberfill
  • 07
    3 mm cellulose sponge (for cleaning, optional)
  • 08
    15 cm manicure wood stick (for shaping/assistance when stuffing)

Progress Tracker

0% Complete

โ€” General Information :

Info :

The height of the assembled toy is 22 cm. The diameter of the largest ring is 11.5 cm. Consists of a base and 6 elements.

Info :

You will need Yarn Art Jeans (55% cotton 45% acrylic,160m/50g) colors 03,11,26,23,35,40,52,53,69,78,86,87,88,90. Alize Cotton Baby (50% cotton, 50% acrylic) colors 113,145. Gazzal Jeans 1136. Synthetic fiberfill, 3 mm cellulose sponge, 15 cm manicure wood stick. Hooks 2.25 mm and 2.0 mm. Big eyed needle, scissors.

Info :

Stitch key: AR โ€“ Adjustable Ring (Magic Ring). ch โ€“ chain. sc โ€“ single crochet. htr - half treble crochet. dc - double crochet. sl st โ€“ slip stitch. inc โ€“ increase. dec โ€“ decrease. ()*n โ€“ repeat combination in brackets n times.

Info :

Jacquard: Jacquard is crocheting a pattern in a different color (stripes). Change the thread correctly at the last stage of crocheting a single crochet (when 2 loops on the hook are crocheted together). The non-working thread is usually laid under the sc.

โ€” Watermelon :

Info :

Yarn: Yarn Art Jeans 11, 69, 52, 78, 53, GJ 1136. Hook: 2.25 mm. Chain 42 with green yarn (G) and 1 sl st in the first loop. Then crochet spiral rounds without turning ch.

Round 1 :

42 sc (42)

Round 2 :

Join dark green (DG) yarn. Crochet: (G: 4 sc, DG: 1 sc, inc, 1 sc)*6

Round 3 :

(G: 2 sc, DG: 1 sc, G: inc, DG: 4 sc)*6

Round 4 :

(G: 2 sc, DG: inc, G: 2 sc, DG: 4 sc)*6

Round 5 :

(G: 2 sc, DG: 2 sc, G: 2 sc, DG: 2 sc, G: 1 sc, DG: inc)*6

Round 6 :

(G: 2 sc, DG: 2 sc, G: 2 sc, DG: 2 sc, G: inc, DG: 2 sc)*6

Round 7 :

(G: inc, 1 sc, DG: 2 sc, G: 2 sc, DG: 2 sc, G: 2 sc, DG: 2 sc)*6

Round 8 :

(G: 3 sc, DG: 2 sc, G: inc, 1 sc, DG: 2 sc, G: 2 sc, DG: 2 sc)*6

Round 9 :

(G: 3 sc, DG: inc, 1 sc, G: 3 sc, DG: 2 sc, G: 2 sc, DG: 2 sc)*6

Round 10 :

(G: 3 sc, DG: 3 sc, G: 3 sc, DG: 2 sc, G: inc, 1 sc, DG: 2 sc)*6

Round 11-12 :

(G: 3 sc, DG: 3 sc, G: 3 sc, DG: 2 sc, G: 3 sc, DG: 2 sc)*6

Round 13 :

1 round straight with light green YAJ 11

Info :

Join to the beginning chain Gazzal Jeans 1136.

Round 1 :

42 sc (42)

Round 2 :

(6 sc, inc)*6

Round 3 :

3 sc, inc, (7 sc, inc)*5, 4 sc

Round 4 :

(8 sc, inc)*6

Round 5 :

4 sc, inc, (9 sc, inc)*5, 5 sc

Round 6 :

(10 sc, inc)*6

Round 7 :

5 sc, inc, (11 sc, inc)*5, 6 sc

Round 8 :

(12 sc, inc)*6

Round 9 :

6 sc, inc, (13 sc, inc)*5, 7 sc

Round 10 :

(14 sc, inc)*6

Round 11 :

1 round straight

Round 12 :

1 round straight with YAJ 78

Round 13 :

1 round straight with YAJ 11, leave a long end

Info :

Turn to the front side through the central hole and sew with the end of the thread, gradually stuffing.

Info :

Embroider seeds with black yarn: 5 stitches converging at one point, stitch height 2 rows. For symmetry, embroider the seeds along the inc lines.

โ€” Pineapple :

Info :

Yarn: Yarn Art Jeans 35, 88, 69 and Alize Baby Cotton 113. Hook 2.25 mm. Chain 36 with light yellow (LY), 1 sl st in the first loop.

Round 1 :

36 sc (36)

Round 2 :

Join yellow (Y) yarn. (LY: 2 sc, Y: 1 sc, LY: 2 sc, Y: inc)*6

Round 3 :

(LY: 2 sc, Y: inc, LY: 2 sc, Y: 2 sc)*6

Round 4 :

(LY: 2 sc, Y: 2 sc, LY: 2 sc, Y: inc, 1 sc)*6

Round 5 :

(LY: 2 sc, Y: 2 sc, LY: inc, 1 sc, Y: 1 sc, LY: 1 sc, Y: 1 sc)*6

Round 6 :

(LY: inc, 1 sc, Y: 2 sc, LY: 3 sc, Y: 1 sc, LY: 1 sc, Y: 1 sc)*6

Round 7 :

(LY: 3 sc, Y: 2 sc, LY: 3 sc, Y: 1 sc, LY: inc, Y: 1 sc)*6

Round 8 :

(LY: 3 sc, Y: 1 sc, inc, LY: 3 sc, Y: 1 sc, LY: 2 sc, Y: 1 sc)*6

Round 9 :

(LY: 3 sc, Y: 1 sc, LY: 1 sc, Y: 1 sc, LY: 3 sc, Y: 1 sc, LY: 1 sc, inc, Y: 1 sc)*6

Round 10 :

(LY: 3 sc, Y: 3 sc, LY: 3 sc, Y: 1 sc, LY: 3 sc, Y: 1 sc)*6

Round 11 :

(LY: 3 sc, Y: 3 sc, LY: 3 sc, Y: 1 sc, LY: 3 sc, Y: 1 sc)*6

Round 12 :

1 round straight with YAJ 78 (if instructed)

Info :

Join Alize Cotton Baby 113 to the beginning chain. Crochet more tightly, as the pattern itself is loose.

Round 1 :

36 sc (36)

Round 2 :

(Skip 1 st, 4 htr in the 2nd st, skip 1 st, 1 sc in the 4th st)*9

Info :

To go to the next round climb to the top of the first shell with sl st. Crochet the shells of the second round in the sc, which is between the shells. By default, the transition to all next rounds is done in the same way.

Round 3 :

Crochet the shells of 5 htr in the sc of the previous round, and between them 1 sc at the tops of the shells of the previous round (checkerboard arrangement)

Round 4 :

Move on to the next round with sl st. Crochet shells of 6 dc in the sc of the previous round, and sc between them into the tops of the shells

Round 5 :

Shells of 7 dc

Round 6 :

Shells of 8 dc

Round 7 :

Shells of 9 dc

Round 8 :

Shells of 9 dc (repeat as needed)

Round 9 :

(1 sc, 2 htr, 3 dc, 2 htr, 2 sc)*9. Please note that the central double crochet should get into the lowest point - sc of the previous round.

Info :

Stuff, sew around. If you have large gaps between the shells, sew them with 1-2 stitches to fix.

Info :

Crochet the green tail (YAJ 69). Chain 35.

Round 1 :

1 sl st, 1 sc, 1 htr, 4 dc (at the start of tail)

Info :

Skip 2 ch, 1 sl st in the 3rd ch and crochet the second angle right from here: 8 ch, 1 sl st, 1 sc, 1 htr, 4 dc. Repeat till the end of the chain. Leave a long end.

Info :

Twist into a spiral, sew with the end of the thread. Sew on the pineapple ring.

โ€” Grapefruit / Orange :

Info :

Yarn: Yarn Art Jeans 23, 03, Alize Cotton Baby 145. Hook 2.25 mm. Chain 30 of orange yarns, 1 sl st in the first ch.

Round 1 :

30 sc (30)

Round 2 :

(4 sc, inc)*6

Round 3 :

2 sc, inc, (5 sc, inc)*5, 3 sc

Round 4 :

(6 sc, inc)*6

Round 5 :

3 sc, inc, (7 sc, inc)*5, 4 sc

Round 6 :

(8 sc, inc)*6

Round 7 :

4 sc, inc, (9 sc, inc)*5, 5 sc

Round 8 :

(10 sc, inc)*6

Round 9 :

5 sc, inc, (11 sc, inc)*5, 6 sc

Round 10 :

(12 sc, inc)*6

Round 10-11 :

2 rounds straight

Info :

Join Alize Cotton Baby 145 to the beginning chain. Crochet in the same way as the orange part from the 1st to the 9th rounds.

Round 10 :

1 round straight YAJ 03

Round 11 :

1 round straight YAJ 23 - leave a long end

Info :

Turn to the right side and sew with an orange yarn, stuffing in the process.

Info :

Embroider slices with ivory yarn.

โ€” Apple :

Info :

Yarn: Yarn Art Jeans 90, 86, 69, 53, 40. Hook 2.25 mm. Chain 24 of red yarn, sl st in the first ch.

Round 1 :

24 sc (24)

Round 2 :

(3 sc, inc)*6

Round 3 :

2 sc, inc, (4 sc, inc)*5, 2 sc

Round 4 :

(5 sc, inc)*6

Round 5 :

3 sc, inc, (6 sc, inc)*5, 3 sc

Round 6 :

(7 sc, inc)*6

Round 7 :

4 sc, inc, (8 sc, inc)*5, 4 sc

Round 8 :

(9 sc, inc)*6

Round 9 :

5 sc, inc, (10 sc, inc)*5, 5 sc

Round 10 :

1 round straight

Info :

Join YAJ 86 to the beginning chain and crochet in the same way as the red part from the 1st to the 9th rounds.

Round 10 :

Crochet last round of red, leave a long end

Info :

Turn to the right side, sew and stuff.

Info :

Make a tightening on top of the apple. From the outside make a stitch 2-3 rows long, and from the inside there should be no stitch; in and out the needle in the same hole between the stitches. This will leave the central hole unchanged, while the outer contour of the ring will take on the shape of an apple. Make 2-3 stitches at this point and secure the thread.

Info :

Do the same at the opposite side.

Info :

Crochet the green leaf: 11 ch, 1 sl st, 1 sc, 2 htr, 2 dc, 2 htr, 1 sc, 1 sl st. Then 1 turning ch and crochet in the same way along the lower side of the chain. Leave a long end. Sew the leaf to the apple groove.

Info :

Embroider seeds with black yarn around the edges of the hole.

Info :

Take 2 pieces of brown yarn and use a needle to feed them into the bottom groove of the apple. The ends of one thread should come out from different points, and from the side of the hole insert the needle into the same point so that the stitches cannot be seen. Tie the ends of the threads in pairs. Cut off, leaving short ends.

โ€” Final Assembly & Notes :

Info :

Turn each ring right side out where instructed, stuff gradually while closing the central hole. Sew rings closed and assemble on the central post or stacking stick as desired.

Info :

For jacquard stripes, change color at the last step of the sc so the non-working yarn lies under the stitch. Weave in ends and secure decorative embroidery stitches firmly to withstand play.

Assembly Instructions

  • Turn each ring to the right side through the central hole, stuff gradually and sew the opening closed by stitching through the round edge so the seam is neat.
  • For the pineapple, twist the green tail into a spiral and sew it securely to the top of the pineapple ring using the working tail.
  • Sew the apple leaf into the small groove on the apple, then thread two brown yarn pieces through the bottom groove and tie them in pairs to create the apple stem detail, trimming ends short.
  • Embroider seeds and slices after stuffing and closing: watermelon seeds with black yarn converging at one point, and grapefruit/orange slices with ivory yarn; place seeds/slices symmetrically along increase lines.
  • Pin all rings in stacking order to check fit, then make any small tacking stitches to centers or edges to stabilize shapes before final display or gifting.

Important Notes

  • ๐Ÿ’กWork jacquard color changes at the last yarn over of the single crochet so the non-working yarn lies under the stitch for clean edges.
  • ๐Ÿ’กStuff each ring gradually and evenly to avoid lumps; overstuffing will distort round shapes.
  • ๐Ÿ’กCrochet Alize Cotton Baby rounds slightly tighter than Jeans yarn rounds because the shell-work is looser; adjust tension to match photos.
  • ๐Ÿ’กIf shells or motif gaps occur, close them with 1-2 fixing stitches before final sewing for a tidy finish.

This Fruit Stacking Toy pattern is a playful, colorful project thats perfect for thoughtful handmade gifts and nursery decor.๐Ÿงถ Each ring is detailed with jacquard stripes, shells, and embroidered seeds to add personality and texture.๐Ÿ‰ Have fun mixing yarn colors and making a set thats uniquely yours โ€” happy crocheting!๐ŸŽ

You ask,

we answer.

FAQs

What size will the finished piece be?

The finished toy measures approximately 22 cm tall with the largest ring diameter around 11.5 cm using the recommended yarn and hooks.

Can I use different yarn weights for this pattern?

Yes, you can substitute yarn weights but this will change the final size; adjust your hook accordingly and make a gauge test to ensure rings stack well.

Do I need prior crochet experience for this pattern?

This pattern is rated intermediate, so basic knowledge of single crochet, increases, decreases and color changes is recommended for best results.

How long does this project typically take to complete?

Most crocheters finish the set in about 5-7 hours, though time varies depending on experience, color changes and assembly time.