About This Ghost in Pumpkin Amigurumi Pattern
This pattern creates a tiny amigurumi ghost sitting snugly inside a plush pumpkin, complete with a stem and optional tendril. It combines bobble stitches for textured details and front-loop work for shaping the pumpkin ridges. Clear round-by-round instructions guide you through color changes, stuffing, and finishing techniques. Perfect for a seasonal craft or a charming handmade gift.

The design uses chunky yarn for a squishy, tactile finish and 12mm safety eyes for a cute expression. Optional blush and a tendril add personality and a polished look.
Why You'll Love This Ghost in Pumpkin Amigurumi Pattern
I absolutely love this pattern because it turns simple stitches into a charming seasonal character that fits in the palm of your hand. I enjoy how the bobble stitch and sewn ribs transform a round shape into a recognizable pumpkin instantly. The color changes and stuffing steps give a satisfying shaping process that feels rewarding as you work. I also love how quick it is to make — you can finish one in an afternoon and have a sweet gift ready to go.
Switch Things Up
I love how easy it is to customize this Ghost in Pumpkin pattern by swapping yarn colors; try pale pastels for a soft, whimsical version or deep orange and rust tones for a vintage look.
You can change the size by adjusting yarn weight and hook: a bulkier yarn and larger hook make a squishier, larger pumpkin while a finer yarn makes a tiny keychain-sized ghost.
I often experiment with different eye types: try embroidered eyes for a softer toy or 8mm safety eyes for a cuter, smaller face.
Want different ribs? Sew more or fewer ribs and space them closer or farther apart to change the pumpkin's character and silhouette.
Decorate with tiny accessories: a crocheted scarf, a mini hat, or a felt name tag add personality and make each piece unique and gift-ready.
Try adding wire inside the tendril to make it poseable, or braid a few yarn strands for a rustic stem effect to vary texture.
For a spooky vibe, embroider a small jack-o-lantern face onto the pumpkin or stitch a small mouth on the ghost for expression variety.
I sometimes make a family of pumpkins with different expressions and sizes for a seasonal display; mixing yarn weights gives a charming collection.
If you want a firmer toy, use less stuffing and tighter tension; for a softer plush, add more stuffing and use a looser tension.
Swap the bobble stitch for a small cluster or popcorn stitch if you prefer a different texture; experiment to see what you like best for the pumpkin bumps.
Common Mistakes & How to Fix Them
✗ Failing to place safety eyes at the correct rounds can make the face look off-center; place 12mm eyes between rounds 8-9 with 2-3 visible stitches between them to keep the face balanced.
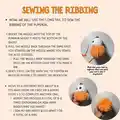
✗ Not closing the hole securely before sewing ribs can cause the stuffing to shift when tightening; insert the needle into the FLO of each stitch and pull to close tightly, then secure the tail with several knots.
✗ Using inconsistent tension when working bobble stitches will produce uneven bumps; work bobbles with steady tension and complete all loops for each bobble before finishing the stitch.
✗ Forgetting to stuff gradually leads to lumps or flat areas; stuff the head and pumpkin progressively, adjusting stuffing as you shape so the final form stays smooth.
✗ Cutting color tails too short during a color change may cause unraveling later; leave small tails and tie or weave in the ends securely after changing from brown to white or white to orange.