🧶 Beautiful ✨ Detailed 💝 Adorable

Ghost in Pumpkin Amigurumi Pattern

Ghost in Pumpkin Amigurumi Pattern
4.1★ Rating
2-3 Hours Time Needed
2.1K Made This
✂️

Intermediate Level

Ideal for those with basic crochet experience, featuring slightly more advanced stitches and techniques to expand your skills.

⏱️

Bite-Sized Project

Finishes in 2-4 hours—perfect for an afternoon of creative relaxation.

🧸

Cute Companion

An adorable friend to cherish, handcrafted with love to bring comfort and joy for years to come.

About This Ghost in Pumpkin Amigurumi Pattern

This pattern teaches you to crochet a tiny ghost snuggled inside a plush pumpkin, complete with a stem and optional tendril. It combines bobble stitches, color changes, and simple shaping to create charming ridges on the pumpkin. The pattern includes clear rounds and finishing instructions so you can assemble and embellish with confidence.

Ghost in Pumpkin Amigurumi Pattern crochet pattern - detailed view of completed project

Perfect for seasonal gifts or adding a handmade touch to your autumn decor. Detailed notes, materials, and step-by-step photos are included to guide you through each stage.

Why You'll Love This Ghost in Pumpkin Amigurumi Pattern

I absolutely love this pattern because it blends playful character design with simple pumpkin construction, making it both fun and satisfying to crochet. I enjoy how the bobble stitches create adorable texture while the sewing technique produces realistic pumpkin ridges. The project is small and quick, so I can finish multiple in one sitting and experiment with colors. Sharing these tiny creations always brightens someone's day, and I love imagining them displayed around the home or gifted to friends.

Ghost in Pumpkin Amigurumi Pattern step 1 - construction progress Ghost in Pumpkin Amigurumi Pattern step 2 - assembly progress Ghost in Pumpkin Amigurumi Pattern step 3 - details and accessories Ghost in Pumpkin Amigurumi Pattern step 4 - final assembly and finishing

Switch Things Up

I love swapping colors to change the mood of this little friend; try soft pastels for a sweet nursery look or deep autumn tones for classic fall decor.

I often alter size by changing yarn weight and hook size — bulky yarn with a larger hook makes a chunky, plush pumpkin, while fingering weight yarn gives a tiny keychain version.

I like adding embroidered mouths or tiny felt teeth to give different personalities; simple changes in eye placement completely change the expression.

Try making multiple pumpkins with different ribs and tendril lengths to create a mini pumpkin patch display on a shelf or table.

I sometimes replace safety eyes with French knots or buttons for a vintage look, taking care to securely stitch or place safety parts away from children's reach.

To make a wobbly or posable version, I insert a short piece of wire into the stem before closing to allow gentle bending of the head or leaves.

For seasonal gifts, I add a small crocheted scarf or hat — these accessories are easy to scale down and sew on for extra charm.

I also experiment with variegated yarns for the pumpkin to get subtle color changes in the ribs without switching yarns midproject.

When I want a sleek modern look, I skip the bobbles and work in regular single crochet ribs, then sew them more subtly for a cleaner silhouette.

Finally, I love grouping several different color and size versions together for a centerpiece — it makes a delightful, handmade arrangement that always gets compliments.

Common Mistakes & How to Fix Them

✗ Skipping the color change technique when switching from brown to white can leave messy loops; leave two loops on the hook, cut the first color, pull through the new color and tie the small tails together to secure. ✗ Not placing the safety eyes at the recommended rounds will change the ghost's expression; position 12mm eyes between rounds 8-9 with 2-3 visible stitches between them to match the pattern photo. ✗ Understuffing the head leads to a floppy shape that wont hold well; start stuffing early and stuff generously before closing to achieve a rounded head and stable pumpkin top. 
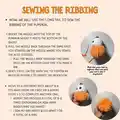
✗ Failing to leave a long tail when fastening off the pumpkin will make sewing ribs impossible; fasten off leaving a super long tail so you can use it to sew the bumps and ribs securely. ✗ Pulling the ribbing yarn too tight without distributing tension evenly can distort the pumpkin shape; gently tighten after each pull and space ribs approximately 5-6 stitches apart for balanced ridges.

Ghost in Pumpkin Amigurumi Pattern

Create a sweet little Ghost-in-Pumpkin amigurumi with this clear, photo‑illustrated pattern. Youll crochet a tiny ghost head, pumpkin body with ribs, and add a leafy stem and tendril for charm. Perfect as a gift, seasonal decor, or a cute keychain-sized project you can finish quickly.

Intermediate 2-3 Hours

Materials Needed for Ghost in Pumpkin Amigurumi Pattern

— Main Fabric

  • 01
    Brown yarn - small amount for stem (I use Parfait Chunky for photos)
  • 02
    White yarn - for ghost head (same weight as main for consistency)
  • 03
    Orange yarn - for pumpkin body (matching weight to white/brown)
  • 04
    Optional: Pink yarn - small amount for blush
  • 05
    Optional: Green yarn - small amount for tendril

— Tools Required

  • 01
    Crochet hook size 4.5mm
  • 02
    Safety eyes 12mm (2 pieces)
  • 03
    Scissors
  • 04
    Polyester stuffing
  • 05
    Stitch marker
  • 06
    Yarn needle for sewing
  • 07
    Optional: Pins for assembly

Progress Tracker

0% Complete

— Stem :

Info :

We are going to begin with the stem of the pumpkin.

Info :

In BROWN:

Round 1 :

4SC IN A MR (4)

Round 2-3 :

4SC AROUND (4)

Info :

Color change to WHITE:

— Ghost (Head) :

Round 4 :

IN THE FLO: [3SC IN EACH ST AROUND] (12)

Round 5 :

(SC, INC) X6 (18)

Round 6 :

(2SC, INC) X6 (24)

Round 7-9 :

SC AROUND (24) (3 ROUNDS)

Round 10 :

9SC, BO, 4SC, BO, 9SC (24)

Info :

BOBBLE STITCH = 6 LOOPS

Info :

PLACE 12MM EYES IN R.8 - R.9, 2-3 VISIBLE STS BETWEEN.

Round 11 :

DEC X12 (12)

Info :

Start to stuff the head before continuing with the pumpkin body.

— Pumpkin :

Info :

Now we will make the pumpkin.

Info :

COLOR CHANGE TO ORANGE:

Round 12 :

IN FLO: [3SC IN EACH ST AROUND] (36)

Round 13-15 :

SC AROUND (36) (3 ROUNDS)

Round 16 :

(4SC, DEC) X6 (30)

Round 17-18 :

SC AROUND (30) (2 ROUNDS)

Info :

START TO STUFF THE HEAD.

Round 19 :

(3SC, DEC) X6 (24)

Round 20 :

(2SC, DEC) X6 (18)

Info :

STUFF GENEROUSLY.

Round 21 :

(SC, DEC) X6 (12)

Info :

FINISH STUFFING IF NEEDED.

Info :

MAKE SURE ALL OTHER COLORS ARE CUT OFF.

Round 22 :

DEC X6 (6)

Info :

FO, LEAVING A SUPER LONG TAIL FOR SEWING THE BUMPS OF THE PUMPKIN.

Info :

INSERT NEEDLE INTO THE FLO OF EACH ST & PULL TO CLOSE THE HOLE.

— Sewing the Ribbing :

Info :

NOW, WE WILL USE THE LONG TAIL TO SEW THE RIBBING OF THE PUMPKIN.

Info :

1. INSERT THE NEEDLE INTO THE TOP OF THE PUMPKIN WHERE IT MEETS THE BOTTOM OF THE GHOST.

Info :

2. PULL THE NEEDLE BACK THROUGH THE SAME SPOT YOU STARTED (IN THE MIDDLE WHERE YOU SEWED THE HOLE CLOSED). PULL THE NEEDLE BACK THROUGH THIS SAME SPOT ON THE BOTTOM EACH TIME YOU MAKE A RIB.

Info :

3. GENTLY PULL ON THE YARN TAIL TO TIGHTEN AS MUCH AS POSSIBLE TO CREATE THE INDENTATION.

Info :

MOVE TO A DIFFERENT SPOT ABOUT 5-6 STS AWAY FROM THE FIRST RIB & REPEAT STEPS 1-3 TO COMPLETE ANOTHER ONE.

Info :

REPEAT THIS PROCESS A TOTAL OF 5-6 TIMES (DEPENDING ON HOW MANY RIDGES/RIBS YOU WANT). I SEW MY RIBS ABOUT 6 STS APART FOR A TOTAL OF 5 RIBS.

— Final Touches :

Info :

WEAVE IN THE ENDING TAIL TO FINISH OFF THE PUMPKIN.

Info :

YOU SHOULD HAVE NOTICEABLE RIDGES/RIBS OF YOUR PUMPKIN. IF NOT, COMPLETE THE STEPS ON THE PREVIOUS PAGE AGAIN.

Info :

*OPTIONAL BUT HIGHLY RECOMMENDED*

Info :

MAKE A TENDRIL!

— Tendril (Optional) :

Step 1 :

USING GREEN YARN, MAKE A SLIP KNOT & INSERT YOUR HOOK INTO ANY ST ON THE SIDE OF THE STEM.

Step 2 :

CH 8, STARTING IN THE 2ND CH FROM THE HOOK, DO 3SC IN EACH CH (21 TOTAL SC)

Info :

FEEL FREE TO CHANGE THE LENGTH BY ADDING OR SUBTRACTING CHAINS!

Info :

SEW BLUSH RIGHT UNDER/BY THE EYES! I SEW TWO STRAIGHT LINES RIGHT UNDER & TO THE SIDE OF THE EYE ABOUT A STITCH WIDE.

Assembly Instructions

  • Insert the long tail through the top of the pumpkin where it meets the bottom of the ghost, then pull the tail back through the middle where you closed the hole and use this to sew ribs from top to bottom.
  • Sew pumpkin ribs by moving about 5-6 stitches from the previous rib, pulling the tail to create indentations and repeating this 5-6 times for 5 ridges.
  • Attach the green tendril by making CH 8 and 3SC in each chain, then sew the tendril to the side of the stem where desired.
  • Place 12mm safety eyes between rounds 8 and 9 with 2-3 visible stitches between them, then sew blush under and slightly to the side of each eye for a cute expression.

Important Notes

  • 💡Pattern is crocheted in continuous rounds; use a stitch marker to mark your beginning of round to avoid losing your place.
  • 💡Leave a long tail when fastening off the pumpkin to use for sewing the ribs and bumps.
  • 💡Stuff the head and pumpkin as you go, stuffing generously before closing to maintain shape and avoid gaps.
  • 💡Place safety eyes before closing the head so they sit right above the bobble stitches and centered between the arms.

This cute Ghost in Pumpkin pattern brings seasonal charm in a tiny, huggable form. 🎃 It combines soft textures, playful shaping, and simple finishing techniques to create a delightful handmade gift. 🧶 Grab your yarn and stitch a little autumn friend to brighten any shelf or gift basket! ✨

You ask,

we answer.

FAQs

What size will the finished piece be?

The finished amigurumi is small and palm-sized; exact size depends on your yarn and tension but using Parfait Chunky and a 4.5mm hook will produce a tiny pumpkin approximately 6-9 cm tall.

Can I use different yarn weights for this pattern?

Yes, you can use different yarn weights but your finished size will change; use a suitably sized hook for your yarn and adjust stuffing and eye size accordingly.

Do I need prior crochet experience for this pattern?

This pattern is rated intermediate because it uses bobble stitches, color changes, and sewing techniques; basic amigurumi experience with single crochet and increases/decreases is helpful.

How long does this project typically take to complete?

Most crocheters complete this project in about 2-3 hours, though time may vary based on experience level, customization, and finishing details.