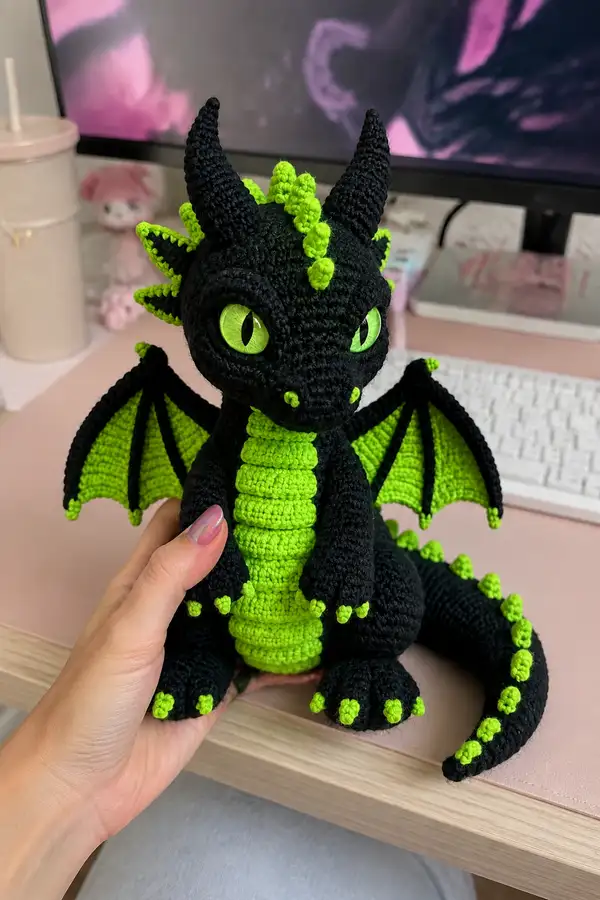
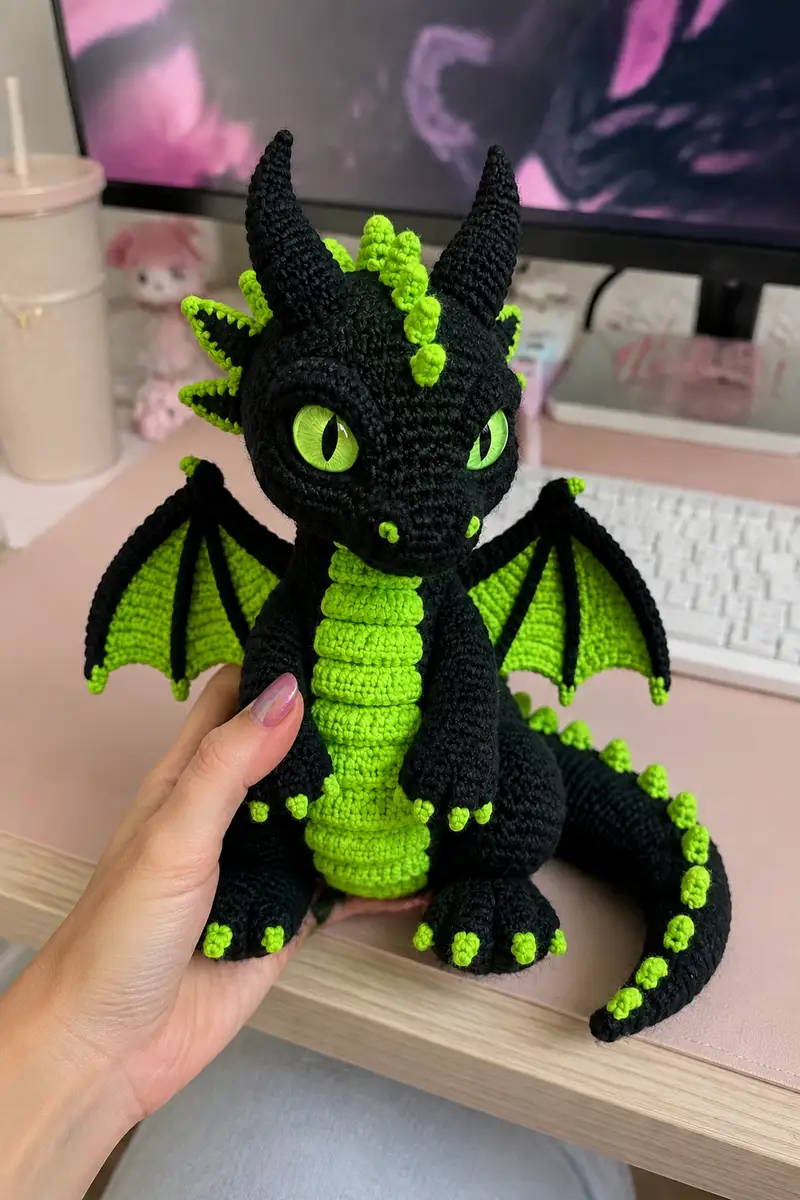
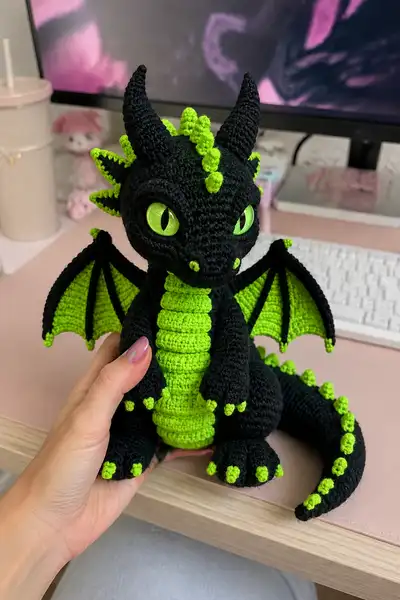
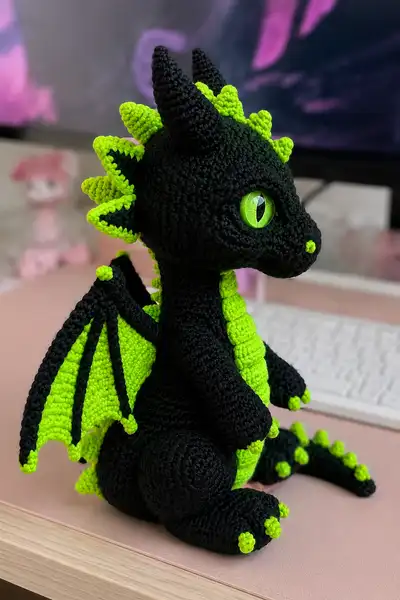
This charming spooky dragon combines deep black with neon green accents for a dramatic, modern amigurumi. Detailed shaping creates a rounded head, expressive eye sockets, curled snout, long neck, chunky body, articulated wings and a curled tail with bright spikes. Finished with neon green belly ridges, claws, dorsal spikes and stitched wing ribs for striking contrast.
Progress Tracker
0% Complete
— Head :
Round 1 :
6 sc in magic ring (6)
Round 3 :
(1 sc, inc) x 6 (18)
Round 4 :
(2 sc, inc) x 6 (24)
Round 5 :
(3 sc, inc) x 6 (30)
Round 6 :
(4 sc, inc) x 6 (36)
Round 7 :
(5 sc, inc) x 6 (42)
Round 8 :
(6 sc, inc) x 6 (48)
Round 9 :
(7 sc, inc) x 6 (54)
Round 10-14 :
1 sc in each st (54)
Info :
Place large safety eyes between rounds 13-14. For this large dragon use 18mm-20mm eyes. Position eyes approximately 12-14 stitches apart centre-to-centre depending on desired expression. Mark each eye stitch with a pin or scrap yarn before securing the washers.
Round 15 :
Start shaping the brow slightly by working 3 sc, dec, (6 sc, dec) x 6? NOTE: to maintain 54 stitches we will do shaping in front region by crocheting to the area for the snout in R16. 1 sc in each st (54)
Round 16 :
1 sc in each st (54) - keep rounds even to build height for eye sockets (54)
Info :
If you prefer deeper eye sockets, add 1-2 extra rounds even before snout shaping. Keep stitch markers at eye centers to maintain symmetry when shaping the snout and cheeks.
Round 17 :
(7 sc, dec) x 6 (48)
Round 18 :
(6 sc, dec) x 6 (42)
Round 19 :
(5 sc, dec) x 6 (36)
Info :
Begin stuffing the head here. Add small amounts of fiberfill gradually so you can shape the snout and leave room for further stuffing as rounds reduce. Stuff firmly around the eye area to keep eyes secure.
Round 20 :
(4 sc, dec) x 6 (30)
Round 21 :
(3 sc, dec) x 6 (24)
Round 22 :
(2 sc, dec) x 6 (18)
Round 23 :
(1 sc, dec) x 6 (12)
Round 24 :
1 sc in each st (12) - neck tube begin (12)
Round 25 :
1 sc in each st (12)
Round 26 :
1 sc in each st (12)
Info :
This short neck section is designed to be stuffed lightly. Keep the neck a bit flexible so you can sew it into the top opening of the body without bunching. Leave a long tail to stitch the neck to the body later (about 40-60 cm).
Round 27 :
(1 sc, inc) x 6 (18) - flare for neck-base join
Round 28 :
1 sc in each st (18)
Round 29 :
(2 sc, inc) x 6 (24) - final round to create a wide sewing edge (24)
Round 30-32 :
1 sc in each st (24)
Round 33 :
Fasten off leaving long tail for attaching head to body. Finish stuffing head to desired firmness. Use a yarn needle to close any small gaps behind the snout if needed (24)
Info :
For the sculpted snout and nostrils: embroider two tiny neon French knots or attach small neon bobbles (see 'nostril bobble' below) centered under the eye line. If you'd like a stronger muzzle shape, tack a small scrap of fiberfill in place with a couple of stitches to project the nose slightly before finishing the round 33 closure.
— Eye Sockets (Make 2) :
Round 1 :
6 sc in magic ring (6)
Round 3 :
(1 sc, inc) x 6 (18)
Round 4 :
(2 sc, inc) x 6 (24)
Round 5 :
(3 sc, inc) x 6 (30)
Round 6 :
1 sc in each st (30)
Round 7 :
1 sc in each st (30) - slightly flatten by pressing to form disc
Info :
Sew the eye sockets on to the head beginning with their bottom edge around round 12-14 of the head. Position so the eyes sit snuggly inside the socket and appear slightly recessed. Attach safety eye hardware after sewing the socket in place if you did not secure eyes earlier.
Round 8 :
FO leaving tail for sewing. Flatten slightly and whittle the outer edge under the eye to create a defined rim (30)
— Snout Nose Bobbles (Make 2) :
Round 1 :
4 sc in magic ring (4)
Round 2 :
1 sc in each st (4)
Round 3 :
Switch to neon green. 4 sc (4)
Round 4 :
FO leaving tail for sewing. Attach to snout tip as nostrils (4)
Info :
These tiny neon bobbles add personality. Sew one on each side of the snout tip. Use a needle to bring the stitch through the head and anchor firmly with several stitches on the inside.
— Body :
Round 1 :
6 sc in magic ring (6)
Round 3 :
(1 sc, inc) x 6 (18)
Round 4 :
(2 sc, inc) x 6 (24)
Round 5 :
(3 sc, inc) x 6 (30)
Round 6 :
(4 sc, inc) x 6 (36)
Round 7 :
(5 sc, inc) x 6 (42)
Round 8 :
(6 sc, inc) x 6 (48)
Round 9 :
(7 sc, inc) x 6 (54)
Round 10-15 :
1 sc in each st (54)
Info :
Work even rounds to create a tall and rounded torso. Keep tension slightly firmer than for head to support weight of head and legs. Place a marker at the front center of the body (this will help align the belly strip later).
Round 16 :
(7 sc, dec) x 6 (48)
Round 17 :
(6 sc, dec) x 6 (42)
Round 18 :
(5 sc, dec) x 6 (36)
Round 19 :
(4 sc, dec) x 6 (30)
Round 20-23 :
1 sc in each st (30)
Info :
Leave top edge of body open for head attachment. Stuff the lower body firmly but allow the top neck opening to remain flexible for sewing the head. Mark leg placement now: legs attach near bottom between rounds 2-6 of body depending on desired sitting posture.
Round 24 :
(3 sc, inc) x 6 (36) - increase slightly to create a seat area for the tail and legs
Round 25 :
1 sc in each st (36)
Round 26 :
(3 sc, dec) x 6 (30)
Round 27 :
(2 sc, dec) x 6 (24)
Round 28 :
Fasten off leaving long tail to sew head. Continue stuffing until body feels solid and can support the head when seated (24)
Info :
If you want the dragon to be free-standing, add a small disk of cardboard or plastic in the bottom of each foot later, or make the feet slightly wider before stuffing to increase stability.
— Belly Plate (Neon Green) :
Info :
The belly is worked as a long tube of ridged rounds in neon green, then sewn vertically along the front center from chest to tail. This creates the segmented rib look.
Round 1 :
Ch 7, join to work in rounds: 6 sc in 2nd ch from hook and across, then 3 sc in end to round the corner, continue back along chain working 6 sc, 3 sc in last ch end = a small oval. Alternatively begin with 12 sc in MR for tube (12)
Round 2 :
1 sc in each st (12)
Round 3 :
1 sc in each st BLO for ridge effect (12)
Round 4 :
1 sc in each st (12)
Round 5 :
1 sc in each st BLO (12)
Round 6 :
1 sc in each st (12)
Info :
Continue alternating 1 round normal and 1 round BLO to build about 10-12 ridges lengthwise. Keep it long enough to reach from neck to tail base when pinned on the body; expected length about 18-22 rounds of alternating ribbing depending on gauge.
Round 7-20 :
Work in alternation: odd rounds 1 sc in each st (12), even rounds 1 sc in each st BLO (12). Continue until the belly strip measures the length from neck base to tail-start when pinned (12 per round width).
Round 21 :
FO leaving a long tail for sewing. Pin the belly plate to the body center and sew carefully along both edges using whipstitch; stretch slightly so ridges sit proudly on the torso.
— Arms (Make 2) :
Round 1 :
6 sc in magic ring (6)
Round 3 :
(1 sc, inc) x 6 (18)
Round 4 :
(2 sc, inc) x 6 (24)
Info :
Stuff the hand portion firmly to give it weight; this will help it drape naturally when attached. Leave the top half unstuffed until after arm shaping for less bulk at shoulder seams.
Round 5-8 :
1 sc in each st (24) - form lower arm and wrist area
Round 9 :
(2 sc, dec) x 6 (18) - taper slightly toward elbow
Round 10-14 :
1 sc in each st (18) - upper arm length
Round 15 :
(1 sc, dec) x 6 (12)
Round 16-18 :
1 sc in each st (12) - leave top opening for sewing to body (12)
Info :
Before closing, insert a little extra stuffing to the hand so fingers appear rounded. Make small neon green claw bobbles (see 'claw bobble' below) and sew to the ends of the fingers—three little bobbles per hand are visible on the front paws in the reference.
— Claw Bobble (Make 12 small bobbles for fingers and toes) :
Round 1 :
6 sc in magic ring (6)
Round 2 :
1 sc in each st (6)
Round 3 :
Switch to neon green, 6 sc (6)
Round 4 :
FO leaving tail to sew. Flatten slightly and attach at finger/toe tips. Use small whipstitches to hold bobble firmly in place (6)
Info :
Make 3 bobbles for each front paw and 3-4 for each back foot depending on size. Place evenly around the tip so paw looks rounded and realistic.
— Legs (Make 2) :
Round 1 :
6 sc in magic ring (6)
Round 3 :
(1 sc, inc) x 6 (18)
Round 4 :
(2 sc, inc) x 6 (24)
Round 5 :
(3 sc, inc) x 6 (30)
Round 6-9 :
1 sc in each st (30) - build foot width and pad
Round 10 :
(3 sc, dec) x 6 (24) - taper from foot to ankle
Round 11-15 :
1 sc in each st (24) - lower leg
Round 16 :
(2 sc, dec) x 6 (18)
Round 17-20 :
1 sc in each st (18) - upper leg, leave opening to sew to body (18)
Round 21 :
Attach neon claw bobbles to toe tips as for arms (3-4 bobbles per foot). FO leaving long tail for sewing (18)
Info :
Stuff feet firmly with fiberfill to create a flat seated base — press flat while stuffing so the dragon sits stably. Sew legs to the body between rounds 2-6 on the underside, slightly angled outward for a seated pose.
— Tail :
Round 1 :
6 sc in magic ring (6)
Round 3 :
(1 sc, inc) x 6 (18)
Round 4-8 :
1 sc in each st (18) - build tail thickness
Round 9 :
(1 sc, dec) x 6 (12) - begin taper
Round 10-14 :
1 sc in each st (12)
Round 15 :
(1 sc, dec) x 4, sc in remaining 4 (8)
Round 16-20 :
1 sc in each st (8) - lengthen the tapered end
Round 21 :
(1 sc, inc) x 4 (12) - create a slight bulb to attach last tail spike
Round 22 :
1 sc in each st (12)
Round 23-25 :
1 sc in each st (12) - continue until tail reaches desired length; expected 20-25 rounds total depending on gauge
Info :
Before final closure, decide where you want to place the neon dorsal spikes. Sew small cone spikes (see 'spike cone') along the top of the tail, spacing them evenly. For a curled tail, lightly bend or insert a length of flexible wire, wrapping with yarn before stuffing to stabilize the curl. Leave a long tail for sewing to the body base.
— Spike Cone (Make 10-14 for dorsal spikes and tail tip) :
Round 1 :
6 sc in magic ring (6)
Round 2 :
1 sc in each st (6)
Round 3 :
Switch to neon green for visible spikes. 6 sc (6)
Round 4 :
(1 sc, dec) x 2 (4)
Round 5 :
1 sc in each st (4)
Round 6 :
FO leaving tail. Flatten and sew closed at base. Attach along the spine, starting at head back and continuing to tail tip. Use smaller or larger cones to create tapered look.
Info :
To recreate the bubble-like spikes seen in the reference, use the cone but add a small nub of fiberfill inside before closing so that spikes read plump. Make alternating sizes to create a natural taper down the back and tail.
— Horns (Make 2) :
Round 1 :
6 sc in magic ring (6)
Round 3 :
(1 sc, inc) x 6 (18)
Round 4-8 :
1 sc in each st (18) - build length
Round 9 :
(2 sc, dec) x 4 (14)
Round 10-12 :
1 sc in each st (14) - narrower horn
Round 13 :
(1 sc, dec) x 4 (10)
Round 14-16 :
1 sc in each st (10) - taper to tip
Round 17 :
FO leaving long tail for sewing. Lightly stuff to hold shape (10)
Info :
Sew the horns to the top of the head towards the back so they lean slightly inward. Ensure that the base of each horn is securely stitched to the head using mattress stitch or whipstitch for strength. Add a few anchor stitches through the head interior for stability if the horns are heavy.
— Ears / Side Spikes (Make 2 big ear/spike wings) :
Round 1 :
6 sc in magic ring (6)
Round 3 :
(1 sc, inc) x 6 (18)
Round 4 :
(2 sc, inc) x 6 (24)
Round 5 :
1 sc in each st (24)
Round 6 :
Work next round in black around the edge to create rim: 1 sc in each st BLO (24)
Round 7 :
Switch to neon green and work a decorative picot edge: *(ch 2, sl st in next st) repeat across outer edge to create sawtooth effect (24)
Info :
These ear pieces are shaped to sit behind the eye and form a backdrop for the neon sawtooth spikes. Sew them to the side head between rounds 10-12, slightly under the horn base so they peek out. You can add internal shaping by stitching through the ear base and adding a couple of tiny gathers to make them concave.
— Wings (Make 2) :
Info :
Each wing is worked as a semicircular membrane in neon green, edged and ribbed with black. Ribs are created by crocheting narrow tubes in black then sewing across the membrane radially.
Round 1 :
6 sc in magic ring (6) - membrane center
Round 3 :
(1 sc, inc) x 6 (18)
Round 4 :
(2 sc, inc) x 6 (24)
Round 5 :
(3 sc, inc) x 6 (30)
Round 6-10 :
1 sc in each st (30) - expand membrane semicircle
Round 11 :
Switch to black: work 1 round BLO to create a ridge for the wing edge (30)
Round 12 :
1 sc in each st (30)
Round 13 :
Create 3 black tubular ribs: in separate pieces, make 3 long chains (about 30-40 ch depending on wing size) and sc back along the chain to make a thin tube. Make 3 tubes for inner ribs in black.
Round 14 :
Sew tubes radially from base corner of wing toward the outer edge, spacing evenly. Anchor securely using whipstitch so the tubes lie flat and create the ribbed bat-wing look.
Round 15 :
Work a finishing round in black around outer edge: 1 sc in each st with small picot corners to create slightly scalloped points (30)
Info :
Pin the wing to the body before sewing. Wings attach at back sides between rounds 18-22 of the torso; sew the inner base securely with multiple passes to support the wing weight. If you want poseable wings, insert a length of thin wire into the outermost tube before stitching it down and wrap with leftover yarn.
— Assembly :
Info :
Before assembly, block and shape pieces as needed. Pin all pieces roughly in place on body to check symmetry: head centered at top opening; wings at back sides; legs at bottom sides; arms at shoulder height; tail at back underside center. Use photo references or hold the dragon in different poses to judge placement.
Step 1 :
Attach head to body by inserting neck tube (head round 24-29 area) into the top opening of body (body rounds 27-29). Pin in place and sew using yarn tail with mattress stitch, matching stitches evenly around the collar (approx 24 stitches). Ensure seam is smooth and head sits straight (24 stitches on head to 24 stitches on body).
Step 2 :
Sew legs to lower body: align each leg opening (leg round 17-20) to the underside of body between body rounds 2-6. Use ladder stitch or whipstitch, working through 18 stitches on leg to matching spacing on body. Add extra anchor stitches near inner seams for strength.
Step 3 :
Attach arms by placing them on sides of torso at shoulder height (between body rounds 14-18). Sew through both arm opening (12 sts) and body stitching points (12 stitches around) for a snug seam. Use small backstitches for invisible joins.
Step 4 :
Sew tail to the back center of the body at the bottom edge (body round 24 area). Stuff the base of the tail firmly so it forms a stable join. Sew with long tail and anchor to internal stitches to avoid wobble.
Step 5 :
Place and sew spikes along head and back: start from the head crown between horn bases and sew each spike cone through its base to body rounds so they sit centered on the dorsal midline. Space cones every 6-8 stitches depending on size.
Step 6 :
Sew wings to the back side seam between body rounds 18-22. Reinforce base by sewing interior stitches through body and wing inner membrane; if wings will be posed often consider inserting wire for internal support and securing it to the body base.
Info :
Weave and hide all yarn tails inside the body. Use small stitches for visible seams, and test balance—if the dragon leans forward, add a small pebble bag inside the bottom or tighten foot stuffing to re-balance.
— Finishing touches :
Step 1 :
Embroider small highlights on the eyes (tiny French knots or a dot of white paint) to create subtle reflections. Secure paint fully before handling if used.
Step 2 :
Whipstitch the neon green belly plate to the center front of the body, matching the top row with the neck seam and the bottom row with tail base. Sew through both edges on each side for an even seam.
Step 3 :
Attach claw bobbles to toes and fingers using a few tight stitches. Position them carefully so the dragon sits flat and the claws touch the surface evenly.
Step 4 :
Check all joins and strengthen where necessary with extra stitches. Trim stray fibers and use fabric glue sparingly on internal washers if eyes need extra security.
Info :
Stand back and evaluate final personality touches—rotate the horns slightly, adjust the wing angle, or reposition spikes for the most pleasing silhouette.
This spooky neon dragon is such a satisfying make — bold colors, lots of personality, and a sculptural silhouette that looks amazing on a shelf. The detailed rounds and assembly make it a project you can be proud of, and each stitch adds to the charm. I love how the neon accents catch the light and give the whole dragon a mischievous expression. 🧶🐉✨