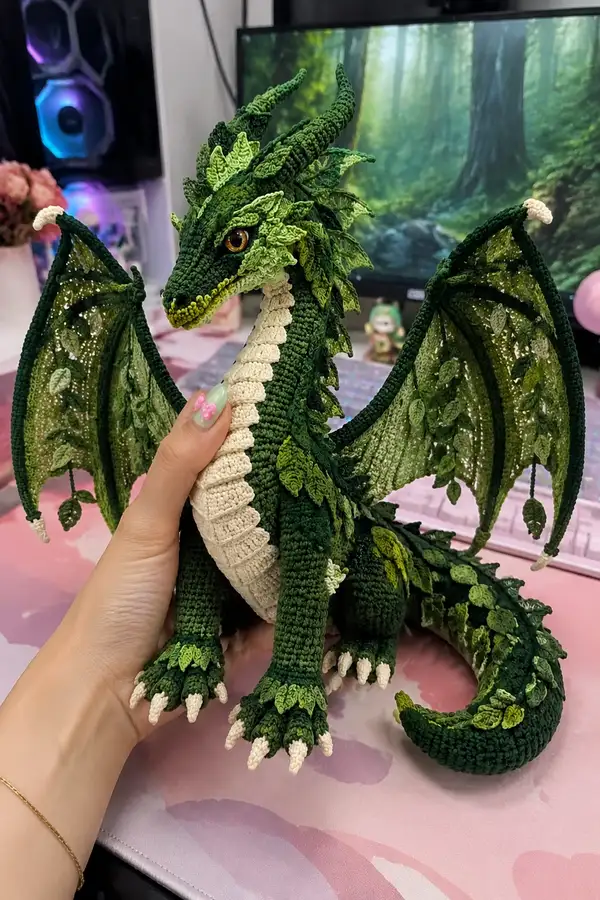
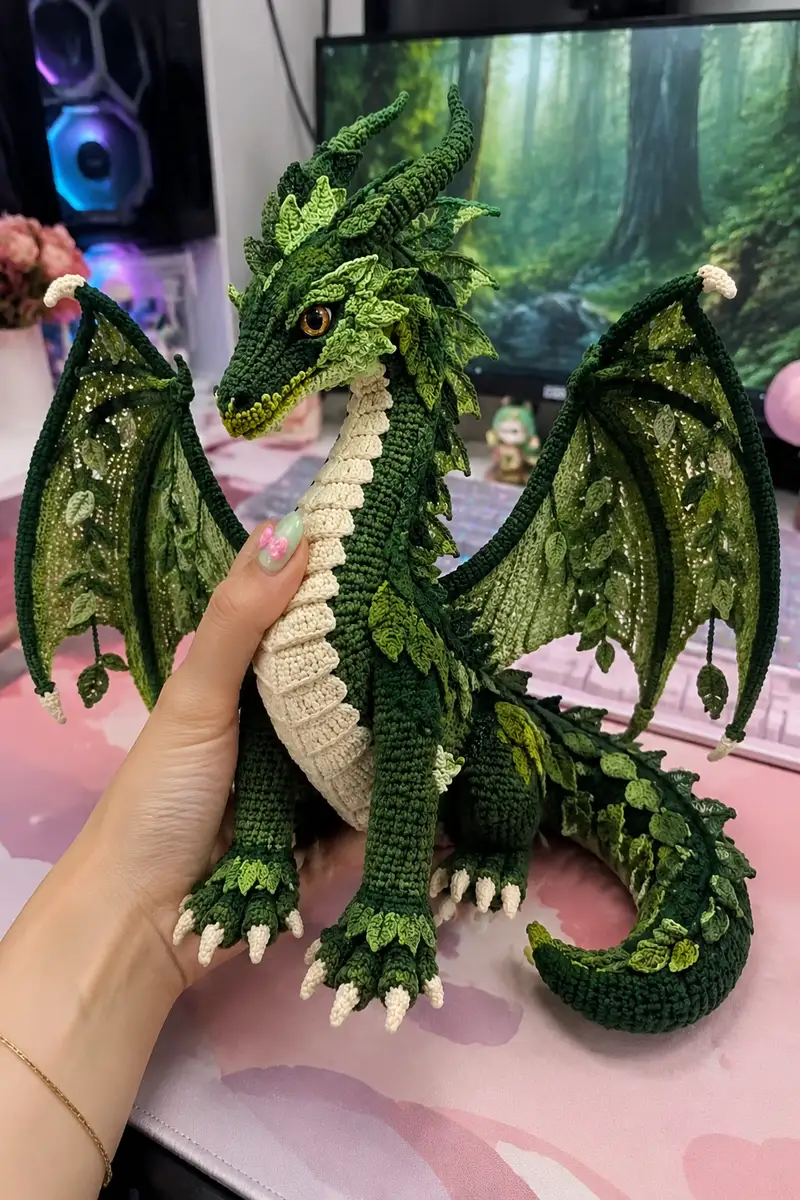
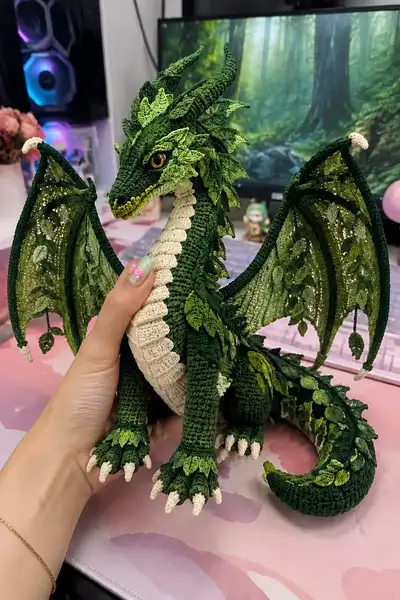
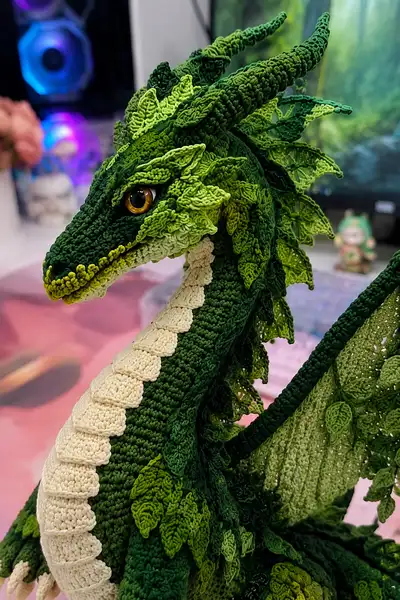
Create a majestic leafy forest dragon inspired by deep woodland greens and layered foliage. This pattern guides you through a sculpted head, articulated neck, detailed belly scales, poseable wings with leaf-laced membranes, and hundreds of decorative leaf scales. The finished piece is richly textured, highly poseable, and perfect as a statement plush for display or gifting.
Progress Tracker
0% Complete
— Head :
Round 1 :
6 sc in magic ring (6)
Round 3 :
(1 sc, 1 inc) x 6 (18)
Round 4 :
(2 sc, 1 inc) x 6 (24)
Round 5 :
(3 sc, 1 inc) x 6 (30)
Round 6 :
(4 sc, 1 inc) x 6 (36)
Round 7 :
(5 sc, 1 inc) x 6 (42)
Round 8 :
(6 sc, 1 inc) x 6 (48)
Round 9-20 :
1 sc in each st (48) — work 12 rounds to create the elongated skull and snout height
Info :
Place safety eyes between rounds 12-14, approximately 10-12 stitches apart (depending on desired expression). Use pins to preview placement. Embroider eyelids or attach leaf-frames after sewing head to neck to avoid repositioning issues.
Round 21 :
(6 sc, 1 dec) x 6 (42)
Round 22 :
(5 sc, 1 dec) x 6 (36)
Info :
Begin stuffing the snout area firmly but leave room for shaping. Use small tufts of stuffing pushed into narrow tube to maintain snout profile.
Round 23 :
(4 sc, 1 dec) x 6 (30)
Round 24 :
(3 sc, 1 dec) x 6 (24)
Round 25 :
(2 sc, 1 dec) x 6 (18)
Round 26 :
(1 sc, 1 dec) x 6 (12)
Info :
Fasten off head front if you are working the snout as separate piece to be sewn later. Otherwise leave long tail for sewing into neck piece. Continue sculpting upper skull and horns as separate attachments for precision.
— Neck (worked as long tapered tube) :
Round 1 :
6 sc in magic ring (6)
Round 3 :
(1 sc, 1 inc) x 6 (18)
Round 4 :
(2 sc, 1 inc) x 6 (24)
Round 5-6 :
1 sc in each st (24)
Info :
Change to main body green here if you worked head slightly darker; join yarn with invisible join and continue in continuous spiral.
Round 7-36 :
1 sc in each st (24) — work 30 rounds for a long graceful neck to match the dragon in the photo
Info :
Stuff moderately as you go: fill lower neck more firmly, leaving the base slightly softer to join to body. Use a stitch marker every 6-8 rounds to track length.
Round 37 :
(2 sc, 1 inc) x 6 (30) — start widening slightly for shoulder join
Round 38 :
(3 sc, 1 inc) x 6 (36)
Round 39 :
1 sc in each st (36)
Info :
Fasten off leaving a long tail for sewing to body. If you prefer, you can work the neck integrated with the body to avoid a seam, but sewing allows easier sculpting of belly plates.
— Belly Plates (Make and seam down center of neck and chest) :
Round 1 :
Ch 6, sl st to form ring or start with mr 6 sc (6)
Round 2 :
1 sc in each st (6)
Round 3 :
Change to cream. (1 sc, inc) x 3 (9)
Round 4 :
(2 sc, inc) x 3 (12)
Round 5 :
Ch1, turn. 6 sc on one side, ch1, turn (these plates worked flat as scallops). Alternatively shape as small semicircles 12 sts wide.
Round 6-9 :
Work 4 rows of sc across to make a scalloped plate ~4 rows high, fasten off leaving long tail for sewing. Make 10-14 plates depending on neck and belly length.
Info :
Sew plates overlapping slightly so each plate covers top edge of previous one. Use mattress stitch for a flat seam and sew down center of neck so plates flare slightly when complete.
— Body :
Round 1 :
6 sc in magic ring (6)
Round 3 :
(1 sc, 1 inc) x 6 (18)
Round 4 :
(2 sc, 1 inc) x 6 (24)
Round 5 :
(3 sc, 1 inc) x 6 (30)
Round 6 :
(4 sc, 1 inc) x 6 (36)
Round 7 :
(5 sc, 1 inc) x 6 (42)
Round 8 :
(6 sc, 1 inc) x 6 (48)
Round 9-14 :
1 sc in each st (48) — build height of torso and chest for seating posture
Info :
If adding a chest ridge or color band, change yarn now. Work next rounds in BLO to create a raised band for seam of legs.
Round 15 :
1 sc in each st BLO (48)
Round 16-24 :
1 sc in each st (48) — continue building torso height and depth (9 rounds)
Info :
Mark positions for leg attachments: measure roughly equidistant around the lower half of the body. For a seated pose, front legs attach at rounds 10-12 of the body (from top of torso) and hind legs at rounds 6-8.
Round 25 :
(6 sc, 1 dec) x 6 (42)
Round 26 :
(5 sc, 1 dec) x 6 (36)
Round 27 :
1 sc in each st (36)
Info :
Begin stuffing body firmly from base upward. Make sure to add more stuffing into the chest area so the neck seam sits proud and stable.
Round 28 :
(4 sc, 1 dec) x 6 (30)
Round 29 :
(3 sc, 1 dec) x 6 (24)
Round 30 :
(2 sc, 1 dec) x 6 (18)
Round 31 :
(1 sc, 1 dec) x 6 (12)
Info :
Fasten off leaving long tail for closing or for sewing in neck. You can also stop earlier and leave a larger opening to sew the neck into; pin pieces together to check alignment.
— Front Legs (Make 2) :
Round 1 :
6 sc in magic ring (6)
Round 3 :
(1 sc, 1 inc) x 6 (18)
Round 4 :
(2 sc, 1 inc) x 6 (24)
Round 5-8 :
1 sc in each st (24) — form paw base
Info :
Before closing paw, attach small inner cream claws by crocheting 3 little cone claws each (see Claws section) and sew into place. Stuff paw firmly at this stage to create a solid base for the leg.
Round 9-14 :
1 sc in each st (24) — work 6 rounds to form lower leg
Round 15 :
(3 sc, 1 dec) x 6 (18) — taper toward shoulder
Round 16-18 :
1 sc in each st (18) — finish upper leg with slight shaping if needed
Info :
Leave a long tail for sewing onto body. Insert wire for poseability if desired: fold end of wire, tape or wrap with yarn then insert down center of leg and stuff around it so it sits invisible and can be bent gently.
— Hind Legs (Make 2) :
Round 1 :
6 sc in magic ring (6)
Round 3 :
(1 sc, 1 inc) x 6 (18)
Round 4 :
(2 sc, 1 inc) x 6 (24)
Round 5-10 :
1 sc in each st (24) — round base for foot and allowing larger hindquarters
Info :
Splay toes or shape foot wider for seated stability. Stuff feet very firmly to help the dragon stand or sit without collapsing.
Round 11 :
(3 sc, 1 dec) x 6 (18)
Round 12-16 :
1 sc in each st (18) — form thigh
Round 17 :
(2 sc, 1 dec) x 6 (15) — slight taper for hip
Round 18-22 :
1 sc in each st (15) — finish top and leave long tail for sewing
Info :
Sew hind legs slightly behind front legs when attaching so the dragon can balance. Add extra stitches to the seam if you plan to pose often for reinforcement.
— Claws (Make 12 small claws) :
Round 2 :
(1 sc, inc) x 2 (6)
Round 3 :
1 sc in each st (6)
Round 4 :
(1 sc, dec) x 2 (4)
Round 5 :
4 sc — finish, fasten off leaving tail for sewing. Make 3 claws per paw (12 total) and sew so cream tip points outward from paw.
Info :
Arrange claws evenly on each paw—use pins and check balance. You can also make slightly longer claws by working another round increasing then tapering.
— Tail :
Round 1 :
6 sc in magic ring (6)
Round 3 :
(1 sc, 1 inc) x 6 (18)
Round 4-10 :
1 sc in each st (18) — work 7 rounds to shape thick base
Round 11 :
(2 sc, 1 dec) x 6 (15)
Round 12-28 :
1 sc in each st (15) — taper tail length (17 rounds for elegant curl)
Round 29 :
(2 sc, 1 dec) x 3 (12)
Round 30 :
(1 sc, 1 dec) x 4 (8)
Round 31 :
(1 sc, dec) x 2 (6)
Round 32 :
6 sc — finish, leave long tail for sewing to body
Info :
Insert a length of flexible wire into tail before stuffing to create a poseable curl. Make sure wire is wrapped and ends tucked well to prevent poking through stitches.
— Horns / Upper Head Ridges (Make 2 large spiraled horns) :
Round 1 :
6 sc in magic ring (6)
Round 3 :
(1 sc, 1 inc) x 6 (18)
Round 4-10 :
1 sc in each st (18) — lengthen horn with even rounds
Round 11 :
(2 sc, 1 dec) x 6 (15)
Round 12-15 :
1 sc in each st (15) — taper slightly
Round 16 :
(1 sc, 1 dec) x 5 (10)
Round 17-20 :
1 sc in each st (10) — finish tip, fasten off leaving long tail. Stuff minimally or add wire for curve.
Info :
Sew horns to upper skull aligned with ridged mane. Add small leaves at horn bases to blend horns into mane.
— Mane / Spine Leaves (many small leaf motifs; make 40-80 varying sizes):
Leaf Round 1 :
Ch 6, sl st to join into ring, ch1, 6 sc into ring (6)
Leaf Round 2 :
Work along one side of chain: sc, hdc, 2 dc, hdc, sc across to form a pointed leaf; turn and sl st back along underside to base. Fasten off leaving tail for sewing. (Make many sizes by increasing chain length and number of dc)
Info :
Create leaves in three sizes: small (short chain, 6-8 sts), medium (8-10 sts), large (10-14 sts). Use mix of bright, mid and dark greens and attach densely along neck, back, and tail to achieve layered leafy look.
Leaf variant :
For curled leaves, after creating base leaf, block lightly and use a small wire or pipe cleaner sewn into the center back to shape a curl before sewing onto body.
— Wing Structure :
Wing Finger (Make 2 for each wing, 3-4 fingers per wing) :
Round 1 : mr 6 sc (6)
Round 3-20 :
1 sc in each st (12) — lengthen the finger to desired length (work 18 rounds for long finger)
Info :
Insert 20-24 gauge wire inside each finger to create wing support. Leave excess wire out of the base to wrap into the wing join. Cover wire ends with tape or wrap with yarn before inserting.
Wing Membrane (worked flat then joined):
Round 1 : With light green, ch 50 (or width needed), row 1 sc across (49)
Row 2-12 :
1 sc in each st (49) — work 11 rows to build a rectangular membrane
Info :
Turn corners into rounded shape by decreasing 1-2 sts on alternate rows. Add decorative open lacy stitch rows (ch1, sk1, sc) to build lacy texture that looks like leaf veins in the membrane.
Membrane Edge :
Work 1 sc around entire finished membrane to clean edge; then add BLO surface crochet ridges in dark green to imitate wing bones.
Leaf Vines :
Make several small leaf pairs on short ch-strings and sew along bottom edge of membrane to dangle as seen in the picture. Leaves can be made by working 5-9 dc clusters on chains approximately 6-10 ch long then anchoring with slip stitch.
Info :
Attach wing fingers to membrane by sewing through the membrane edge and wrapping finger base with yarn. Reinforce with several passes for durable join. Use wire to secure final pose and reshape wings as needed.
— Wing Edging and Ribs :
Round 1 :
With dark green, sc along crease between each finger and membrane to create rib lines. Work 6-8 rows of sc along each rib to form raised structure.
Info :
Work the ribs in FLO so they sit raised over the membrane. Use a slightly smaller hook to make ribs firm. Add small picot points to wing tips for decorative rolled look.
— Decorative Leaf Scales (Attach dozens):
Leaf Scale 1 :
Ch 5, sc in 2nd ch from hook, hdc, dc, sl st to base — fasten off (teardrop leaf)
Leaf Scale 2 :
Ch 7, sc, hdc, 2 dc, hdc, sc across then sl st back on underside to base — make many in gradient greens
Info :
Layer leaf scales overlapping like roof shingles from tail to head. Use pins to experiment with density—dense along the spine and looser along sides. Vary orientation for organic effect.
— Eye Area and Facial Detail :
Info :
Insert safety eyes between rounds 12-14 of head before stuffing fully. Secure washers. Sew eyelid scales around the eye socket by attaching a few small leaf motifs arched over the top of the eye. Use a tiny bit of yarn to stitch a crescent eyelid for expression.
Snout Rim :
Work surface slip stitch in chartreuse along the lip ridge around snout for 2-3 rounds to create highlighted edge seen in photo.
Info :
Use a tiny hook (2.0-2.25mm) and carry fine yarn for rim highlighting. Work close, tiny stitches for crisp effect.
— Finishing Scales & Texturing :
Info :
Attach larger leaves along the back and smaller leaves near joints and feet. Use a combination of whipstitch and invisible mattress stitch for secure, low-profile seams. Add surface slip stitches and back loop ridges on body to simulate scale rows in some segments.
Scale Row (example) :
Working along back stitches: scblo each st for 6 rows to mimic ridged texture. Alternate with placed leaf motifs every 3-4 stitches.
Info :
For higher contrast, embroider some veins on larger leaves with a darker green and use picot edging (ch3, sl st into base) for small spikes.
— Assembly & Extras :
Info :
Pin head to neck and check balance before sewing. Add extra stuffing or flatten base if dragon tips forward. When sewing halves together, use mattress stitch for neatness and hide tails inside body to avoid visible knots.
Final Touch :
Sew any remaining leaves, secure wire ends, trim stray fibers and brush any cotton yarn lightly to fluff if desired. Optionally add a protective clear glue dot behind eyes for stability.
This Giant Emerald Forest Dragon is a labor of love that combines sculptural amigurumi with botanical embellishment to create a show-stopping handmade friend. Each scale, leaf and rib is added with care to evoke a creature from an enchanted forest. The finished dragon becomes a centerpiece—perfect for display, gifting, or simply admiring every stitch. 🐉🧶 Enjoy shaping every leaf and don't forget to share your finished dragon photos! 🌿