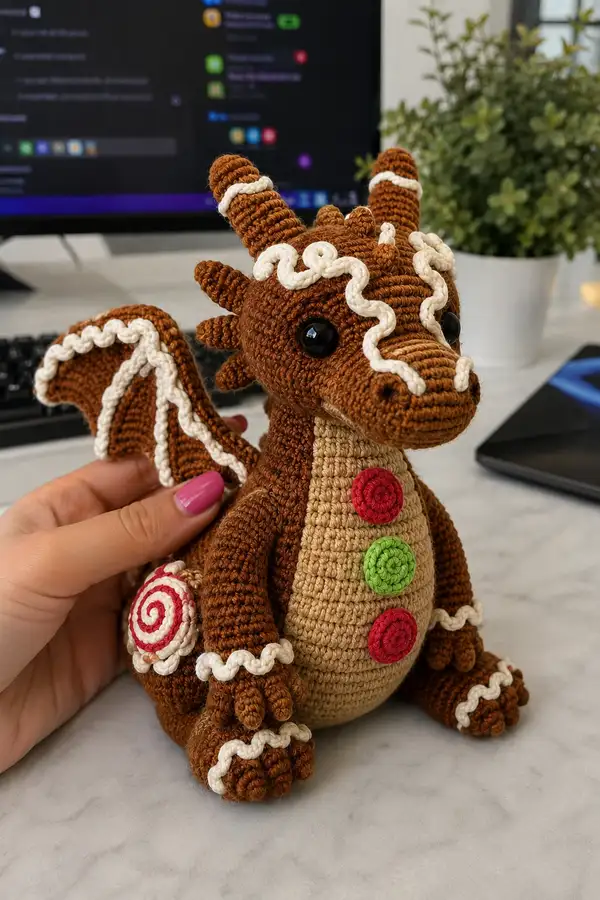
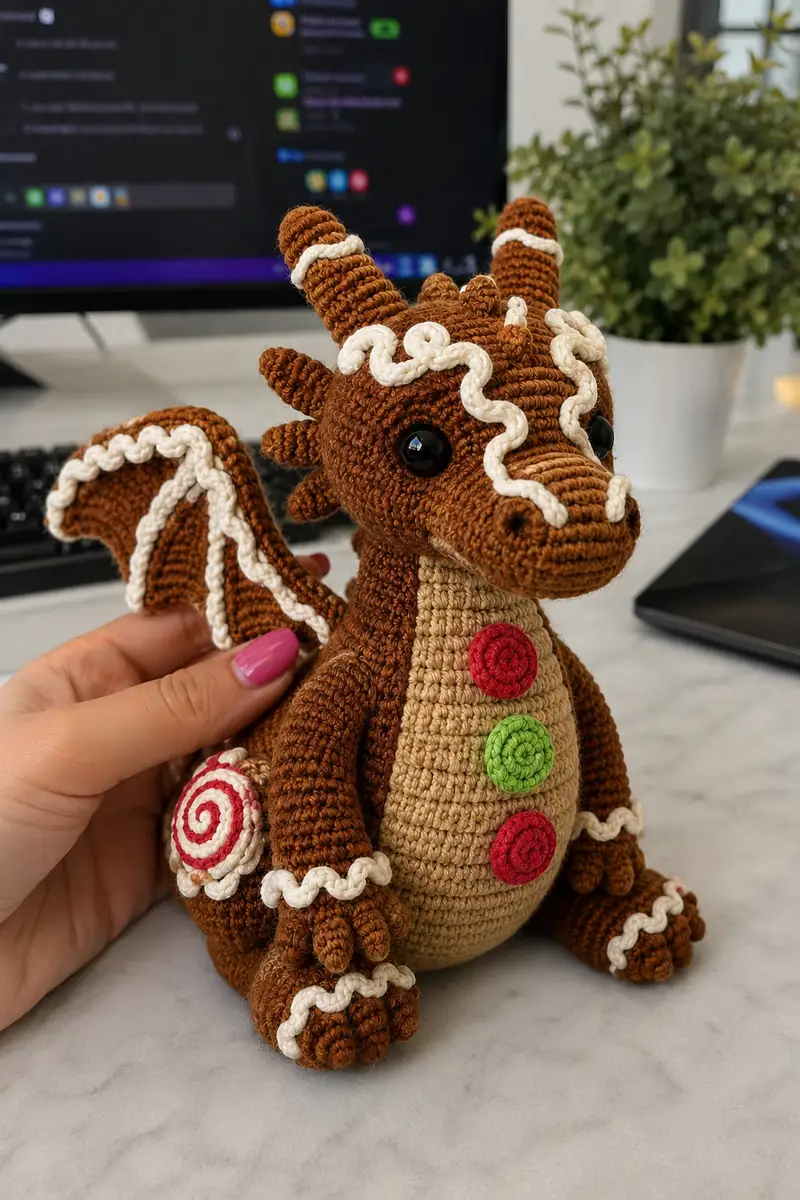
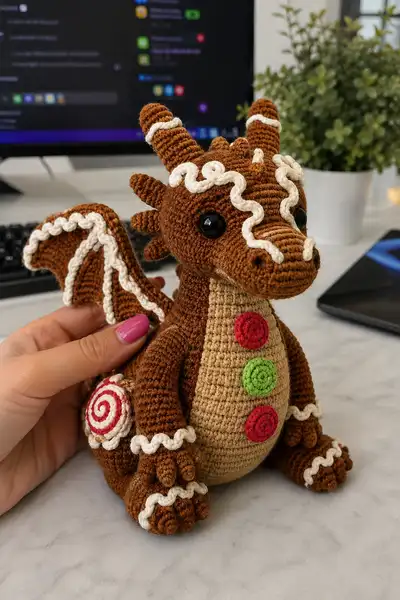
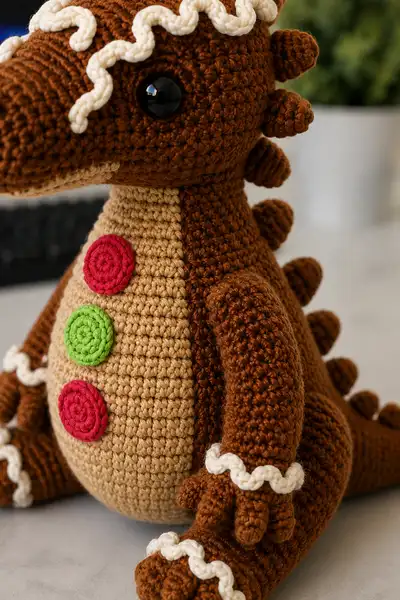
Create an adorable gingerbread dragon plush with warm brown 'cookie' body, tan belly, white icing rickrack trim, candy swirl tail and bright red/green candy buttons. This amigurumi features textured horns, scalloped wings edged with icing, and a cuddly round body—perfect as a seasonal gift or charming decor. The pattern uses amigurumi techniques, colorwork, and decorative surface elements for a playful, edible-inspired look.
Progress Tracker
0% Complete
— Head :
Round 1 :
6 sc in magic ring (6)
Round 3 :
(1 sc, inc) x 6 (18)
Round 4 :
(2 sc, inc) x 6 (24)
Round 5 :
(3 sc, inc) x 6 (30)
Round 6 :
(4 sc, inc) x 6 (36)
Round 7 :
(5 sc, inc) x 6 (42)
Round 8 :
(6 sc, inc) x 6 (48)
Info :
Begin shaping snout after round 8 by working even rounds to build length. Place safety eyes between rounds 13-15; measure about 9-11 stitches apart depending on desired expression. Mark round starts with a stitch marker.
Round 9-12 :
1 sc in each st (48)
Round 13 :
(6 sc, dec) x 6 (42)
Info :
Insert safety eyes between rounds 13 and 14, placing eyes centered on sides of head. For a soft look place them slightly closer to the snout; for a wide-eyed look place them wider apart.
Round 14 :
1 sc in each st (42)
Round 15 :
(5 sc, dec) x 6 (36)
Round 16 :
(4 sc, dec) x 6 (30)
Info :
Begin stuffing the head firmly but gently at this stage; stuff the snout area first so it keeps a defined shape. Continue stuffing gradually between decreases so the head stays smooth.
Round 17 :
(3 sc, dec) x 6 (24)
Round 18 :
(2 sc, dec) x 6 (18)
Round 19 :
(1 sc, dec) x 6 (12)
Info :
Fasten off leaving a long tail for sewing. Close opening using a yarn needle and ladder stitch. Weave tail into head to secure. Use a small bit of stuffing to round the snout before final closing.
Head Snout Extension (worked in continuation; attach before closing if you prefer):
Round 3 :
(1 sc, inc) x 6 (18)
Round 4-6 :
1 sc in each st (18)
Round 7 :
(1 sc, dec) x 6 (12)
Info :
Stuff lightly and sew snout extension to front of head aligning with rows where you want the nose to sit. Use the head last rounds to attach tightly so the snout sits firmly.
— Neck & Collar :
Round 1 :
Join yarn at base of head opening and sc around the neck opening to create a neat collar: 24 sc evenly around (24)
Round 2 :
1 sc in each st (24)
Info :
Work two rounds of single crochet to create a sturdy neck tube for sewing into the body later. Leave a tail for sewing the head to the body after you finish the body shaping and before final stuffing.
— Body :
Round 1 :
6 sc in magic ring (6)
Round 3 :
(1 sc, inc) x 6 (18)
Round 4 :
(2 sc, inc) x 6 (24)
Round 5 :
(3 sc, inc) x 6 (30)
Round 6 :
(4 sc, inc) x 6 (36)
Round 7 :
(5 sc, inc) x 6 (42)
Info :
We will now work even rounds to create the lower belly circumference and then form the tan belly panel with a color change. Make sure to count stitches so the center front lines up with your belly panel.
Round 8-12 :
1 sc in each st (42)
Info :
Change to tan/beige yarn for the belly panel on the next round. Carry the brown inside or fasten off brown and join tan at the front center stitch. Belly panel will be worked as a vertical strip from round 13 onward to create two-color body.
Round 13 :
Change to tan. Work 1 sc in first 7 stitches (tan), join brown yarn behind and continue 1 sc in next 35 stitches (total 42). The tan panel will be worked in rounds but only over the front 7 stitches—see Info for technique (42)
Info :
To create a vertical tan belly, work each round placing 1 sc in tan for the first 7 sts then 1 sc in brown for remainder. Carry unused colors inside or fasten off when not needed. This creates a clean two-tone column down the front.
Round 14-18 :
1 sc in each st maintaining tan in the first 7 sts and brown in the remaining 35 sts (42)
Round 19 :
(5 sc, inc) x 6 (48)
Round 20-24 :
1 sc in each st (48)
Info :
Begin stuffing the body moderately from the bottom up. Keep stuffing firmer at the base so the dragon sits upright. Leave the top open to attach the head later; do not overstuff the neck area to allow sewing.
Round 25 :
(6 sc, dec) x 6 (42)
Round 26 :
(5 sc, dec) x 6 (36)
Round 27 :
(4 sc, dec) x 6 (30)
Round 28 :
(3 sc, dec) x 6 (24)
Info :
Sew head to body now: align neck tube onto body opening, pin evenly, and sew using the long tail left on the head. Use whip stitch or ladder stitch for an invisible seam; attach tightly so head sits upright.
Round 29 :
(2 sc, dec) x 6 (18)
Round 30 :
(1 sc, dec) x 6 (12)
Round 31 :
6 dec (6) - if you have attached head and still need to close at the bottom of the body, fasten off and weave tail to close. If you prefer a flat base, do not fully close and sew a flat base disc (see Info).
Info :
Optional flat base: before closing, create a separate flat round disc with 30-36 sc and sew to the bottom edge to help the dragon sit firmly. Otherwise, close in rounds and flatten to sit.
— Arms (Make 2) :
Round 3 :
(1 sc, inc) x 6 (18)
Round 4 :
(2 sc, inc) x 6 (24)
Info :
These first rounds create the hand/flipper base. We will split into three small toe/thumb prongs and a wrist tube after shaping the hand bulge. Stuff fingertips lightly as you go.
Round 5-8 :
1 sc in each st (24)
Round 9 :
(3 sc, dec) x 6 (18)
Round 10 :
1 sc in each st (18)
Round 11 :
Divide for fingers: work 1 sc in next 6 sts for finger 1 (6), fasten off and leave tail. Rejoin to next 6 sts for finger 2 (6), fasten off. Rejoin to final 6 sts for finger 3 (6).
Finger Construction (repeat for each finger) :
Finger Round 1 :
6 sc in mr or continue in round as tube (6)
Finger Round 2 :
6 inc (12)
Finger Round 3-5 :
1 sc in each st (12)
Finger Round 6 :
(2 sc, dec) x 3 (9)
Finger Round 7 :
(1 sc, dec) x 3 (6) - Stuff fingertips firmly, fasten off leaving tail for sewing
Info :
Sew each finger back onto the wrist opening using the matching tail. Arrange three fingers close together and sew securely. Add a small amount of stuffing into the wrist for support before closing.
Wrist Tube (after fingers attached) :
Join brown yarn around base and work 1 sc in each st for 6 rounds (18) to create wrist and lower arm (18)
Round 12-20 :
Continue 1 sc in each st, slightly tapering with (2 sc, dec) in two places to shape upper arm if desired. Count will vary slightly depending on how you joined fingers. Aim for an arm length of approximately 18-20 rounds total from hand base.
Info :
Stuff hand firmly and arm lightly. Leave a long tail for sewing the arm to the body. Position arms so they sit at side seams between body rounds 18-22 and sew securely in place. Add icing trim after sewing if desired.
— Legs (Make 2) :
Round 3 :
(1 sc, inc) x 6 (18)
Round 4 :
(2 sc, inc) x 6 (24)
Round 5 :
(3 sc, inc) x 6 (30)
Round 6-8 :
1 sc in each st (30)
Info :
These rounds form the foot bulb. After round 8 we will separate toes and shape the ankle. Stuff toes as you finish them; feet should be firm for stability.
Round 9 :
(3 sc, dec) x 6 (24)
Round 10 :
1 sc in each st (24)
Round 11 :
Divide into 3 toes: 8 sts per toe. Work each toe in-turn: 6 sc in mr or 6 sc continuing in tube for each toe, then join and crochet around to shape foot. (Toes each made from 6 sc then 6 inc round for a total appearance of small bulbs)
Toe Round 5 :
(2 sc, dec) x 3 (9)
Toe Round 6 :
(1 sc, dec) x 3 (6) - Fasten off leaving tail and sew each toe to the foot base. Stuff toes firmly.
Round 12-18 :
Continue ankle and leg tube: 1 sc in each st for total length to reach body seam (aim 18-22 rounds total depending on desired leg length)
Round 19 :
(3 sc, inc) x 6 (24)
Round 20-22 :
1 sc in each st (24) - Stuff foot firmly and leg moderately; leave a long tail to sew into body at hip area (rounds 1-3 bottom depending on the body orientation)
Info :
Attach legs to the bottom of the body spaced evenly so the dragon sits upright. Use additional stitches at attachment for stability. Add icing trim around ankles after sewing if desired.
— Wings (Make 2) :
Round 1 :
Make a base ring of 6 sc in mr (6)
Round 3 :
(1 sc, inc) x 6 (18)
Round 4 :
(2 sc, inc) x 6 (24)
Round 5 :
(3 sc, inc) x 6 (30)
Round 6-8 :
1 sc in each st (30)
Info :
We will now shape the wing edge by working in BLO to create a thin membrane and later add a scalloped white icing trim using a separate cream yarn.
Round 9 :
1 sc in each st BLO (30)
Round 10-12 :
1 sc in each st (30)
Round 13 :
(4 sc, dec) x 5 (25)
Round 14 :
1 sc in each st (25)
Round 15 :
Fasten off brown. With cream/ivory yarn join at outer edge and work scalloped icing: *sc in next st, ch3, sl st in next st* repeat around to create a wavy border. Fasten off and weave ends (25 scallop cycles)
Info :
Sew wings to back of body between rounds 12-18, spacing them evenly from spine spikes. Position slightly flared outward. Use pins to hold placement before sewing.
— Horns (Make 2) :
Round 3-5 :
1 sc in each st (12)
Round 6 :
(2 sc, dec) x 3 (9)
Round 7 :
(1 sc, dec) x 3 (6)
Round 8-9 :
1 sc in each st (6) - Stuff lightly and fold a little to create a tapered horn shape
Round 10 :
Fasten off brown. With cream yarn embroider or wrap a spiral stripe around each horn: join cream yarn at base and sl st in a spiral going up around horn 2-3 times, fasten off, weave in ends
Info :
Sew horns to top of head symmetrical and slightly angled back. Add a little glue inside seam if desired for extra hold. Position horns near crown spikes so they look integrated.
— Back Spikes (Make 7 small spikes) :
Spike Round 1 :
6 sc in mr (6)
Spike Round 2 :
6 inc (12)
Spike Round 3 :
(1 sc, inc) x 6 (18)
Spike Round 4 :
1 sc in each st (18)
Spike Round 5 :
(1 sc, dec) x 6 (12)
Spike Round 6 :
6 dec (6) - Stuff very lightly, fasten off leaving tail for sewing
Info :
Make 7 identical spikes. Sew them along the back center from neck to tail spaced evenly, aligning with body rounds so they form a neat row. Reinforce stitching at base for durability.
— Tail :
Round 3 :
(1 sc, inc) x 6 (18)
Round 4-8 :
1 sc in each st (18)
Round 9 :
(2 sc, dec) x 6 (15)
Round 10-12 :
1 sc in each st (15) - taper tail by doing (1 sc, dec) until desired length then fasten off leaving long tail to sew to body
Info :
Attach tail to back lower body center. Add one or two spikes near tail base to integrate it with the spine. Sew candy swirl to side of tail base as pictured, using strong stitches to secure.
— Candy Swirl (tail decoration) :
Round 1 :
Using red yarn, make 6 sc in mr (6)
Round 3 :
(1 sc, inc) x 6 (18)
Round 4 :
With cream yarn join at outer edge and work alternating rounds to create the swirl by surface crocheting a spiral: sl st in next st and continue sl st around alternating red and cream to resemble a spiral swirl. Fasten off and sew to tail side.
Info :
Alternatively, make two flat discs and sew them together with stuffing between for a puffed peppermint look. The disc method: make a small disc in red then work cream rounds around as a spiral, or embroider spiral on a flat disc.
— Candy Buttons (Make 3) :
Button Round 1 :
6 sc in mr (6)
Button Round 2 :
6 inc (12)
Button Round 3 :
(1 sc, inc) x 6 (18)
Button Round 4 :
Work 1 round of sc in FLO to create a slightly raised ridge if desired, then fasten off and sew to center front belly. Make two red and one green button as pictured.
Info :
Sew buttons to the tan belly panel in a vertical line spaced about 6-8 rows apart. Use strong thread and sew through multiple times so buttons remain secure on a toy that may be handled.
— Icing Rickrack Trim (multiple pieces for head, horns, wrists, ankles, wings) :
Info :
This pattern uses a simple rickrack cord to imitate icing. Method 1 (preferred): Using cream yarn and 3.0mm hook, ch as long as needed, then into the 3rd chain from hook work *3 sc in same chain, sl st in next chain* and repeat to create a rickrack wave. For short trims (10-30 sts) adjust starting chains accordingly.
Rickrack Example :
Ch 40, sl st in 3rd ch from hook to anchor, then *3 sc in next ch, sl st in next ch* repeat across; fasten off and press lightly. Sew onto head contours, horns, wrists, ankles and wing edges using small stitches and matching cream yarn.
Info :
For tighter waves use smaller hook (3.0mm) and for looser waves use larger hook. Shorter chains produce tighter ruffles. Secure ends by weaving them into nearby stitches and using a drop of fabric glue if necessary.
— Decorative Face Details :
Info :
Embroider nostrils using 2 small French knots or tightly sewn black yarn on the snout tip. Embroider a simple curved mouth with brown or darker tan yarn, or leave plain for a cookie-like appearance. Add blush with fabric-safe pastel if desired.
— Assembly and Finishing Details :
Info :
Pin all details before sewing: position arms approximately between body rounds 16-22, legs centered at the base spaced to create a stable base, wings between rounds 12-18, spikes along center seam from neck to tail. Sew everything firmly and weave in all ends. Add icing rickrack last to cover visible seams and add charm.
Finishing Touch :
Wet-block lightly if using cotton or acrylic to smooth ridges. Trim any stray fibers and check all attachments for secure stitching before gifting or display.
This gingerbread dragon is a joyful blend of amigurumi technique and holiday whimsy—each icing ripple and candy button brings the character to life. Sewing everything together is the most satisfying part as the cookie-inspired pieces become a cuddly friend. 🧶 Make extra candy buttons and share with loved ones as a sweet handmade gift. Happy crocheting and enjoy every stitch of this cozy seasonal creature! 🎁✨