🧢 Beautiful ✨ Detailed πŸ’ Adorable

Gnome - organizer Amigurumi Pattern

Gnome - organizer Amigurumi Pattern
4.4β˜… Rating
12+ Hours Time Needed
4.0K Made This
βœ‚οΈ

Intermediate Level

Ideal for those with basic crochet experience, featuring slightly more advanced stitches and techniques to expand your skills.

⏱️

Multi-Day Project

A rewarding 12+ hour journeyβ€”perfect for dedicated crafters who love detailed work.

🧸

Cute Companion

An adorable friend to cherish, handcrafted with love to bring comfort and joy for years to come.

About This Gnome - organizer Amigurumi Pattern

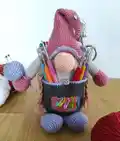
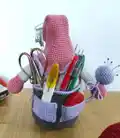
This pattern creates a functional gnome-shaped organizer with pockets and a hat, perfect for storing small tools and notions. It includes full instructions for body, pants, hat, hands, legs, nose, needle ball, pigtails and pockets. The organizer stands well by adding a cardboard base and glass beads for weight. Colors and small details are easy to customize to make your own unique gnome.

Gnome - organizer Amigurumi Pattern crochet pattern - detailed view of completed project

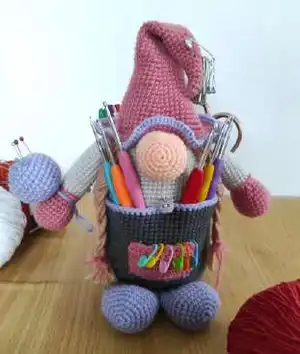
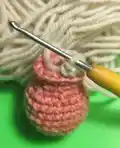
Worked in rounds using single crochet, back/front loop techniques, and simple shaping increases and decreases. Photos in the pattern show assembly and placement for accurate finishing.

Why You'll Love This Gnome - organizer Amigurumi Pattern

I absolutely love this pattern because it combines practicality with a sweet amigurumi form that brightens any craft space. I enjoy the clever way the base is weighted with glass beads and a cardboard disc to help the gnome stand securely. I also love the charming ruffled hat and braided pigtails β€” they add so much personality with just a little extra finishing. Sewing the pockets and arranging the accessories always feels like putting the final touches on a tiny handmade world.

Gnome - organizer Amigurumi Pattern step 1 - construction progress Gnome - organizer Amigurumi Pattern step 2 - assembly progress Gnome - organizer Amigurumi Pattern step 3 - details and accessories Gnome - organizer Amigurumi Pattern step 4 - final assembly and finishing

Switch Things Up

I love customizing the color palette for this gnome; try neutral tones for a modern look or bright pastels for a playful shelf buddy.

If you want a larger organizer, I change to a bulkier yarn and a larger hook which instantly increases the finished size.

To make a mini keychain version I use thinner yarn and a smaller hook and skip the cardboard base and beads.

I often embroider extra details like hearts or initials on the pockets to personalize gifts.

Swap the braided pigtails for a simple pompom or tassel for a different playful hairstyle.

I sometimes add wire into the arms when I want them poseable and able to hold small items upright.

Try different pocket placementsβ€”higher or lower on the pantsβ€”so the organizer fits specific tools like scissors or pens better.

Use felt appliques for fast, no-sew decoration on the hat or pockets if you prefer minimal sewing.

Make a matching set by changing hat color and pocket trims to coordinate with room decor or gifting themes.

Experiment with surface crochet or slip stitch stripes around the base for added texture and visual interest.

Common Mistakes & How to Fix Them
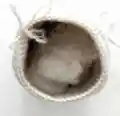
βœ— Skipping the cardboard base and glass beads will make the organizer unstable; cut a cardboard circle the same size as the crocheted circle and add 5 to 10 glass beads inside before stuffing to ensure it stands well. βœ— Stuffing the body too early or too tightly can distort shaping; stuff gradually while crocheting and add filler little by little to maintain even, rounded form. βœ— Not using BLO/FLO as instructed can change the appearance of the pants and trims; follow the instructions to switch to back or front loop only where specified for the correct texture. βœ— Forgetting to count stitches each round leads to uneven shaping and mismatched increases or decreases; count your stitches after each round and mark the beginning of the round with a stitch marker.

Gnome - organizer Amigurumi Pattern

Make a charming gnome organizer that doubles as a practical desk companion. This pattern guides you through crocheting a sturdy base, playful hat, braided pigtails and handy pockets so you can store small tools and notions. You will enjoy making a functional, decorative piece that stands well thanks to added glass beads and a firm base. Perfect for gifting or keeping your craft area tidy.

Intermediate 12+ Hours

Materials Needed for Gnome - organizer Amigurumi Pattern

β€” Main Fabric

  • 01
    Acrylic yarn 50 g / 125 m - grey (body base) - approx amounts used across project
  • 02
    Acrylic yarn 50 g / 125 m - white (body top and torso) - approx amounts used
  • 03
    Acrylic yarn 50 g / 125 m - pink (hat and mitts) - small skein
  • 04
    Acrylic yarn 50 g / 125 m - purple (feet, pockets, needle ball) - small skein
  • 05
    Acrylic yarn 50 g / 125 m - beige (nose) - small amount
  • 06
    Acrylic yarn 50 g / 125 m - brown (pigtails) - small amount for braids
  • 07
    Fiberfill stuffing - small bag for stuffing nose, hands, legs and body interior

β€” Tools Required

  • 01
    Crochet hook size 2.5 mm
  • 02
    Scissors
  • 03
    Yarn needle for sewing and weaving ends
  • 04
    Tread (thread) for embroidery
  • 05
    Needle
  • 06
    Stitch markers
  • 07
    Hard cardboard or plastic circle (cut to size of crocheted circle)
  • 08
    5 to 10 glass beads or marbles for weighting the base
  • 09
    Pins for assembly

Progress Tracker

0% Complete

β€” Body :

Round 1 :

(6 sc) into MR

Round 2 :

(inc) x 6 = 12 sc

Round 3 :

(1sc, inc) x 6 = 18

Round 4 :

(2sc, inc) x 6 = 24

Round 5 :

(3sc, inc) x 6 = 30

Round 6 :

(4sc, inc) x 6 = 36

Round 7 :

(5sc, inc) x 6 = 42

Round 8 :

(6sc, inc) x 6 = 48

Round 9 :

(7sc, inc) x 6 = 54

Round 10 :

(8sc, inc) x 6 = 60

Round 11 :

(9sc, inc) x 6 = 66

Round 12 :

(10sc, inc) x 6 = 72

Round 13 :

BLO = 72 sc

Round 14-15 :

= 72 sc (2 rounds)

Info :

Cut a circle out of hard cardboard or plastic. The size of the circle should be the same size as the crocheted circle.

Info :

Also put 5 to 10 glass balls inside. See the photo. This is necessary for the doll to stand well.

Info :

In the process of crocheting, put filler inside the body.

Round 16-42 :

R16.- 42. = 72 sc (27 rounds)

Round 43 :

(10sc, dec) x 6 = 66

Round 44-45 :

= 66 sc (2 rounds)

Round 46 :

(9sc, dec) x 6 = 60

Round 47-48 :

= 60 sc (2 rounds)

Round 49 :

(8sc, dec) x 6 = 54

Round 50-51 :

= 54 sc (2 rounds)

Round 52 :

(7sc, dec) x 6 = 48

Round 53 :

(6sc, dec) x 6 = 42

Round 54 :

(5sc, dec) x 6 = 36

Round 55 :

(4sc, dec) x 6 = 30

Round 56 :

(3sc, dec) x 6 = 24

Round 57 :

(2sc, dec) x 6 = 18

Round 58 :

(1sc, dec) x 6 = 12

Round 59 :

(6 dec) = 6

Info :

To break yarn.

β€” Pants (grey yarn) :

Info :

Attach yarn in 13 round

Round 1 :

FLO (5sc, inc) x 12 = 84

Round 2-27 :

= 84 sc (26 rounds)

Round 28 :

Purple yarn: = 84 sc

Info :

To break yarn.

β€” Hat (pink yarn) :

Round 1 :

(3 sc) into MR

Round 2 :

= 3 sc

Round 3 :

(inc) x 3 = 6 sc

Round 4-5 :

= 6 sc (2 rounds)

Round 6 :

(1sc, inc) x 3 = 9

Round 7-8 :

= 9 sc (2 rounds)

Round 9 :

(2sc, inc) x 3 = 12

Round 10-11 :

= 12 sc (2 rounds)

Round 12 :

(3sc, inc) x 3 = 15

Round 13-14 :

= 15 sc (2 rounds)

Round 15 :

(4sc, inc) x 3 = 18

Round 16-17 :

= 18 sc (2 rounds)

Round 18 :

(5sc, inc) x 3 = 21

Round 19-20 :

= 21 sc (2 rounds)

Round 21 :

(6sc, inc) x 3 = 24

Round 22-23 :

= 24 sc (2 rounds)

Round 24 :

(7sc, inc) x 3 = 27

Round 25-26 :

= 27 sc (2 rounds)

Round 27 :

(8sc, inc) x 3 = 30

Round 28-29 :

= 30 sc (2 rounds)

Round 30 :

(9sc, inc) x 3 = 33

Round 31-32 :

= 33 sc (2 rounds)

Round 33 :

(10sc, inc) x 3 = 36

Round 34-35 :

= 36 sc (2 rounds)

Round 36 :

(5sc, inc) x 6 = 42

Round 37-38 :

= 42 sc (2 rounds)

Round 39 :

(6sc, inc) x 6 = 48

Round 40-41 :

= 48 sc (2 rounds)

Round 42 :

(7sc, inc) x 6 = 54

Round 43 :

= 54 sc

Round 44 :

(8sc, inc) x 6 = 60

Round 45 :

= 60 sc

Round 46 :

(9sc, inc) x 6 = 66

Round 47 :

= 66 sc

Round 48 :

(5sc, inc) x 11 = 77

Round 49 :

(6sc, inc) x 11 = 88

Round 50 :

Purple yarn: (1 sc, 1inc) x 44 = 132

Info :

To break yarn. To weave in ends.

β€” Hands (2 parts) :

Round 1 :

(6 sc) into MR

Round 2 :

(inc) x 6 = 12 sc

Round 3 :

(1sc, inc) x 6 = 18

Round 4 :

(2sc, inc) x 6 = 24

Round 5-9 :

= 24 sc (5 rounds)

Round 10 :

(2sc, dec) x 6 = 18

Round 11 :

(1sc, dec) x 6 = 12

Round 12 :

(1sc, inc) x 6 = 18

Round 13 :

= 18 sc

Round 14 :

White yarn: BLO 18 sc

Round 15-31 :

= 18 sc (17 rounds)

Info :

Put the filler inside not completely.

Info :

Fold the part in half. Crochet 9 sc. To break yarn. To weave in ends.

Info :

Attach hands to the body.

β€” Legs (2 parts) :

Round 1 :

(6 sc) into MR

Round 2 :

(inc) x 6 = 12 sc

Round 3 :

(1sc, inc) x 6 = 18

Round 4 :

(2sc, inc) x 6 = 24

Round 5 :

(3sc, inc) x 6 = 30

Round 6-10 :

= 30 sc (5 rounds)

Round 11 :

(3sc, dec) x 6 = 24

Round 12 :

= 24 sc

Round 13 :

(2sc, dec) x 6 = 18

Round 14 :

= 18 sc

Info :

Put the filler inside not completely.

Info :

Fold the part in half. Crochet 9 sc. To break yarn. To weave in ends.

Info :

Attach legs to the body.

β€” Nose (beige yarn) :

Round 1 :

(6 sc) into MR

Round 2 :

(inc) x 6 = 12 sc

Round 3 :

(1sc, inc) x 6 = 18

Round 4 :

(2sc, inc) x 6 = 24

Round 5 :

(3sc, inc) x 6 = 30

Round 6-9 :

= 30 sc (4 rounds)

Round 10 :

(3sc, dec) x 6 = 24

Round 11 :

(2sc, dec) x 6 = 18

Info :

In the process of crocheting, put filler inside the nose.

Info :

Fold the part in half. Crochet 9 sc. To break yarn. To weave in ends.

Info :

Attach legs to the body.

β€” Needle ball (purple yarn) :

Round 1 :

(6 sc) into MR

Round 2 :

(inc) x 6 = 12 sc

Round 3 :

(1sc, inc) x 6 = 18

Round 4 :

(2sc, inc) x 6 = 24

Round 5 :

(3sc, inc) x 6 = 30

Round 6-9 :

= 30 sc (4 rounds)

Round 10 :

(3sc, dec) x 6 = 24

Round 11 :

(2sc, dec) x 6 = 18

Round 12 :

(1sc, dec) x 6 = 12

Round 13 :

(6 dec) = 6

Info :

In the process of crocheting, put filler inside the nose.

Info :

To break yarn. To weave in ends. Attach thread to tie to hand.

β€” Pigtails (brown) :

Info :

Yarn length for a 3-ply braid 15 cm / 6 in.

β€” Pockets (3 parts) :

Front pocket (1 part) :

pink yarn: R1. 13 ch, crochet into the 2nd ch from the hook 12 sc, turn knit

Round 2-8 :

12 sc, turn knit (7 rounds)

Info :

To break yarn.

Back pockets (2 parts) :

purple yarn: R1. 14 ch, crochet into the 2nd ch from the hook 13 sc, turn knit

Round 2-10 :

13 sc, turn knit (9 rounds)

Info :

To break yarn. Attach pockets to the pants.

Info :

Attention, pockets are sewn only to the pants. Not to pants and body!

Info :

Attach the button to the front of the pants and body.

β€” Finishing & Assembly :

Info :

Attach hands to the body in position shown in photos.

Info :

Attach legs to the body and sew securely so the gnome can stand.

Info :

Sew nose to the center front of the face area; stuff nose before folding and closing.

Info :

Sew pockets only to the pants. Attach button to front of pants and body.

Info :

Weave in all ends and block lightly if desired. Gnome - organizer ready!

Assembly Instructions

  • Cut a cardboard or plastic circle the same size as the crocheted base and place it inside the base before finishing, then add 5 to 10 glass beads for weight so the gnome stands well.
  • Attach the hands to the body by positioning them at the sides and sewing through matching rounds, securing firmly with a yarn needle and hidden stitches.
  • Fold each leg/hand part in half, crochet 9 sc to close as instructed, then sew legs to the bottom of the body spaced evenly for balance.
  • Sew the nose to the center front of the face area after stuffing and folding; use pins to check placement before securing.
  • Sew pockets only to the pants (not to the body); attach the small button to the front of the pants as a decorative closure.

Important Notes

  • πŸ’‘Use stitch markers to mark the beginning of each round to avoid losing track during shaping and color changes.
  • πŸ’‘Stuff the parts gradually and do not overstuff; a little firmness is sufficient and overstuffing can distort the silhouette.
  • πŸ’‘Weave in yarn ends as you go to keep finishing simple and tidy at the end of assembly.
  • πŸ’‘Sew pockets only to the pants as instructed to avoid misplacement and maintain the look and function of the organizer.

This cute gnome organizer combines sweet amigurumi charm with practical storage for your desk or craft area. It stands sturdy thanks to a cardboard base and a few glass beads placed inside, making it both decorative and functional. Make one in your favorite colors and give it as a handmade gift or keep it to organize tools and notions at home. 🧢🧡

You ask,

we answer.

FAQs

What size will the finished piece be?

The finished organizer measures approximately 25 cm / 10 inches tall when made with the recommended yarn weight and 2.5 mm hook.

Can I use different yarn weights for this pattern?

Yes, you can use different yarn weights, but the finished size and proportion will change; adjust hook size accordingly and expect differences in stitch counts and final look.

Do I need special tools to make the organizer?

No special tools are required beyond a 2.5 mm hook, stuffing, needle for sewing and a cardboard circle and glass beads for weighting the base to ensure it stands well.

How long does this project typically take to complete?

This is a multi-day project and typically takes 12+ hours depending on your experience and how many details (braids, pockets, accessories) you add.