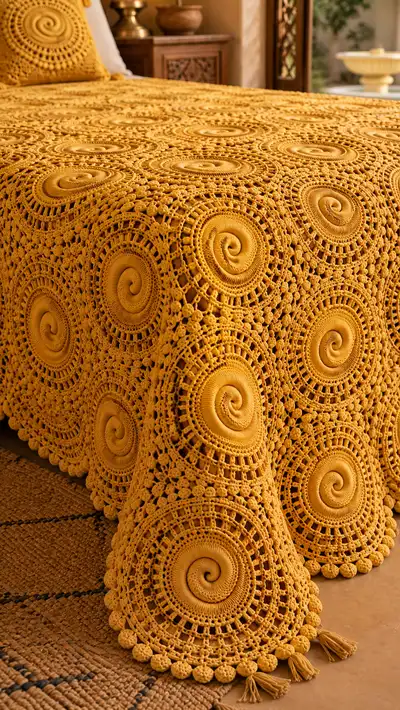
A warm golden honey bedspread made from large spiral granny medallions joined into a lacy, textured bedcover. This pattern recreates the sculptural spiral centers, airy lace rounds, bobble edging and tassel-trimmed corners seen in the photo. Detailed motif, joining and border instructions make it easy to create a dramatic, boho-inspired coverlet for a queen or full bed.
Progress Tracker
0% Complete
— Materials & Gauge :
Info :
Gauge is motif-dependent. Sample one full motif and block it before calculating how many motifs you need to reach your bed dimensions. For the sample motif with 4.0mm hook, blocked diameter = approx 13.5-14 inches (34-36 cm). Adjust hook or yarn as needed to match your desired motif size and overall bed coverage.
Info :
Notes: This pattern describes one large spiral medallion motif, instructions to frame it into a square motif, mesh joining method and a multi-row bobble border with tassel corners. Work motifs consistently with the same tension and yarn. Block each motif before joining for best results.
— Central Spiral Motif :
Round 1 :
6 sc in magic ring (6)
Round 3 :
(1 sc, 1 inc) x 6 (18)
Round 4 :
(2 sc, 1 inc) x 6 (24)
Round 5 :
(3 sc, 1 inc) x 6 (30)
Round 6 :
(4 sc, 1 inc) x 6 (36)
Info :
Keep tension slightly tight through the spiral center to create the sculptural coil seen in the photo. If you want a deeper coil, switch to a 3.5mm hook for rounds 1-6, then change back to 4.0mm for the body.
Round 7 :
(5 sc, 1 inc) x 6 (42)
Round 8 :
(6 sc, 1 inc) x 6 (48)
Round 9 :
1 sc in each st BLO (48)
Info :
Working Round 9 in BLO creates a shallow ridge that helps the spiral center sit proud and form the tight coil. Slip-stitch join or work continuous rounds — consistent joins help hiding seams in the spiral.
Round 10 :
1 sc in each st (48)
Round 11 :
Alternate 1 sc, 1 sc into next st FLO around to create a narrow ridge effect (48)
Round 12 :
(3 sc, 1 inc) x 12 (60)
Round 13 :
1 sc in each st (60)
Info :
From Round 12 the motif begins to widen more quickly. Count stitches carefully before transitioning into openwork rounds so the lace aligns evenly later.
Round 14 :
(4 sc, 1 inc) x 12 (72)
Round 15 :
1 sc in each st (72)
Round 16 :
Ch 3 (counts as dc), *skip 1 st, dc in next st; rep from * around; join (36 dc, 36 skipped spaces) (72)
Round 17 :
Ch 1, sc in same st, *ch 3, skip 2 sts, sc in next st; rep from * around (24 ch-3 spaces; 48 sc and ch structure) (72)
Info :
Round 16-17 form the first airy lace round. Keep chain spaces consistent to maintain circular shape. If your circle begins to ripple, adjust by adding or removing single sc evenly in the next solid round.
Round 18 :
1 sc in each st and into each ch-3 space around to create a solid line of single crochets (72)
Round 19 :
(6 sc, 1 inc) x 8 (80)
Round 20 :
1 sc in each st (80)
Round 21 :
*Fpdc around next 2 sts, bpdc around next 2 sts; rep from * around (80)
Round 22 :
1 sc in each st BLO (80)
Info :
Round 21 uses front and back post double crochets to establish slight ribbing that helps the medallion appear 3D. The spacing will become the anchor for later decorative clusters and bobbles.
Round 23 :
(7 sc, 1 inc) x 10 (90)
Round 24 :
Ch 1, sc, *ch 3, skip 3 sts, sc in next st; rep from * around (approx 22 ch-3 spaces; maintain 90 starting st count where scs align) (90)
Round 25 :
Join into ch-spaces: In each ch-3 space: (sc, ch 3, sc) to create open arches; sc between arches in the single crochet positions (90)
Info :
The arch round (R25) will become a decorative lattice when repeated. Keep ch spaces consistent and pull chains up so the arches are open but stable.
Round 26 :
1 sc in each st and in top of each arch across the round to tidy join (90)
Round 27 :
*(ch 2, 3 dc) in next sc (shell), skip 3 sts, sc in next st; rep from * around to create a scalloped shell round (approx 18 shells; 90)
Round 28 :
1 sc between shells and sc in each shell center to secure shells (90)
Round 29 :
Work bobble-row base: *ch 2, (bobble) in next sc, ch 2, sc in next st; rep from * around (approx 45 bobble positions; maintain 90 st architecture)
Info :
Bobble technique: yarn over, insert hook, pull up loop (5 loops on hook), yarn over pull through 2 twice until one loop remains; finish each bobble with sl st into same stitch to secure. Keep bobbles consistent in size by using the same number of yarn overs.
Round 30 :
1 sc in each st and into the back of each bobble to secure them; place them into a tidy alignment (90)
Round 31 :
(10 sc, 1 inc) x 9 (99)
Round 32 :
1 sc in each st (99)
Round 33 :
Turn this round into a slight squared orientation by working in sets: *sc in next 12 sts, ch 5, skip 1 st to create a corner chain space; rep x 3 and sc to finish, join to first sc (approx will form 4 corner chain-spaces to be turned into defined corners) (99)
Info :
Round 33 begins to hint towards squaring the medallion. These long chain-corner spaces are used to shape the subsequent square frame rounds. Adjust corner chains to match how round sits on your blocking board — equal corner chains give the motif symmetry.
Round 34 :
Work into corner chain spaces: At each corner space: (sc, ch 3, 3 dc, ch 3, sc) to make a pronounced corner; along sides: *(dc, ch 1, dc) in sets of side stitches as needed to maintain even spacing (final count will be approx 120 sts oriented into 4 sides)
Round 35 :
1 sc in each stitch along sides and 3 sc across the corner points to tidy corners (approx 120)
Round 36 :
Finishing spiral center detail: Working surface slip stitch spiral: With right-side facing, surface sl st from center outward to emphasize coil, tying off securely when done. Finish and weave in ends.
Info :
Block this completed motif flat into a circle-turned-square, pinning each corner to the same measurement to make identical square motifs. Allow to dry completely before joining. Blocking is essential to achieve the dramatic, even layout seen in the image.
— Motif Square Frame (Optional alternate rounds to make flat square) :
Round 37 :
Ch 1, sc evenly around working into last round edge to build a flat frame (120)
Round 38 :
*(sc in next 14 sts, 5 sc in corner chain space) x 4; rep along sides to maintain squared edge (approx 140)
Round 39 :
1 sc in each st (140)
Info :
If you prefer a pronounced square instead of a softened circle, work two tidy rounds building even sc rows and shape corners by placing extra stitches at the corners evenly.
Round 40 :
Work a decorative filet-lace round: *dc, ch 2, skip 2 sts; dc in next st across sides; at corners, (dc, ch 4, dc) to maintain corner opening (approx count remains 140)
Round 41 :
1 sc in each st and in each ch-space around to secure the lace (140)
Round 42 :
Work a shell and picot round to frame motif: *5 dc in same st, sl st in next 3 sts; rep around (approx shells evenly spaced across sides) (140)
Info :
These optional square framing rounds let you make motifs that join as neat squares so the blanket grid lines look cleaner rather than circular motifs floating on mesh. Choose the framing style that matches your aesthetic.
— Joining Mesh (Make a grid and join motifs) :
Round 43 :
After blocking, lay out motifs in desired arrangement. Join motifs using join-as-you-go mesh: For the east and south joins, in the final round of a motif work into equivalent positions of the neighboring motif with slip stitches and ch spaces to create an airy lattice.
Round 44 :
Joining step example: With motifs A and B adjacent, at the side: sc in side st of A, ch 3, sc in corresponding side st of B to form an anchored chain-3 bridge; continue around making one join every 8-10 stitches depending on motif size. Repeat for all adjoining sides.
Info :
Work join-as-you-go on one motif row at a time so the mesh lines are consistent. Use a stitch marker to identify joining points on all motifs before you begin. Keep tension relaxed to avoid pulling motifs out of shape.
Round 45 :
For inner grid sections where four motifs meet, create a central ring: into the corner spaces of the 4 motifs join: sl st into corner of motif A, ch 1, sc into corner of B, ch 1, sc into corner of C and D to create a neat 4-way junction; secure with sl st and weave tail through junction for stability.
Round 46 :
After establishing the anchor joins, work a mesh overlay: In the spaces between motifs work: *ch 6, sc into next join point across the opening; rep across each opening creating a lattice that ties motif edges together (mesh will not change base motif stitch counts)
Info :
When joining, check that motifs remain flat and edges align. If a motif puckers, unpick the last few joins, re-pin and re-join with slightly looser tension. A row of temporary pins helps hold layout steady while joining.
Round 47 :
Once the entire bed cover grid is joined, tidy any loose joins by working a sc round around every join seam: sc in each join and sc in bridging ch spaces to make the mesh durable and even.
Round 48 :
1 sc around all outer exposed seams to prepare for the border (work evenly to maintain straight outer edge and count stitches around entire spread to plan border stitches)
Info :
At this stage, measure the whole bedspread. The number of motifs you need will be determined by blocked motif size: e.g. if blocked motif measures 14" and you need a 84" width: 84/14 = 6 motifs across. Plan rows and columns accordingly plus border allowances.
— Edge Bobble Border (Multiple rounds for scallop and bobbles) :
Round 49 :
With right-side facing, join yarn at any outer sc. Ch 1, sc evenly around the entire spread perimeter; place 3 sc in each outer corner chain-space to maintain smooth corner shaping (st count dependent on spread perimeter)
Round 50 :
*(sc in next 6 sts, shell in next st (3 dc, ch 2, 3 dc), sc in next 6 sts); rep around to form repeating shell scallops along edge. Place shells to land centered between motifs for balanced look.
Round 51 :
1 sc in each st across to secure shell positions (perimeter count)
Info :
Spacing shells evenly around a large perimeter may require adding or subtracting side single crochets every few inches. Use pins to mark shell placement before crocheting to ensure harmony across corners and sides.
Round 52 :
Bobble round preparation: *sc in next 4 sts, ch 2, (bobble) in next st, ch 2, sc in next 4 sts; rep around. Aim to place bobbles evenly across scallops (bobble count will vary with overall perimeter).
Round 53 :
Secure bobbles: 1 sc around entire edge, working 1 sc into each ch-2 space and through the base of each bobble to stabilize (perimeter count)
Round 54 :
Decorative picot ridge: *sc in next 3 sts, (ch 3, sl st in top of sc) to form picot; rep around between bobbles for delicate finishing (perimeter count)
Info :
When working bobble rounds on a large spread, do them in sections: work one side, then move to next to keep tension uniform. Use stitch markers at every motif boundary to help align bobbles and shells with underlying motif architecture.
Round 55 :
Optional second bobble-row for deeper scallop: *in shell top: work 7 sc around shell arc; at each bobble base work an additional bobble pushed slightly outward to deepen edge (secure with sc round afterwards)
Round 56 :
Final tidy: 1 sc around entire edge slowly and evenly; this evens out the perimeter and prepares points for tassel attachments (perimeter count)
Info :
Fasten off, weave ends into back of border with a large yarn needle. Trim ends close after securing to prevent slipping over time. Consider adding a firm but flexible sew-through backing along the fold under the edge for extra stability if bedspread will be laundered frequently.
— Tassel Corner Finishing :
Round 57 :
Make 4 tassels for the corners if desired: Wrap yarn around a 3.5" card 40 times (adjust for tassel fullness), tie at top with a small piece of yarn, cut bottom loops, trim evenly for final tassel length of approx 5-6". Make 4-8 tassels per corner cluster for the dramatic look in the photos.
Round 58 :
Attach tassels: Fold the top of tassel loop over corner point and pull securely through with a yarn needle; knot and secure by stitching through the tassel head several times for durability. Repeat for each corner cluster.
Info :
To create the roped multi-tassel corners like in the photo, group 3-4 tassels at each corner and bind them with a short wrap of yarn, then sew the bound top into the corner so the tassel cluster hangs neatly.
— Pillow Cover Variant (Make 2 matching square panels) :
Round 59 :
Work 4 full motifs and join them as a square of 2x2 motifs using the same join-as-you-go instructions (Rounds 43-48) to create a single pillow front approximately the size of a large square cushion (match counts to your motif size).
Round 60 :
Make a back panel either as a single fabric panel: join together additional motifs to match front dimension, or crochet a solid square backing: ch to required width and work rows of sc/hdc until the back matches the front, finish with sc border.
Round 61 :
Assemble pillow: Place front and back panels right sides together and work sc around edges, leaving a 4-6" opening. Turn right side out, insert pillow form, and sc closed or use whip stitch to finish invisibly.
Info :
Pillow variant allows you to use the same motif aesthetic on bedside cushions; add tassels to matching corners for a unified look. For long-term durability, sew a fabric backing inside the crochet cushion to protect yarn from wear.
— Finishing & Care :
Round 62 :
Weave in all ends using a large tapestry needle, working back-and-forth through several stitches to lock yarn tails so they cannot slip out over time.
Round 63 :
Block entire spread flat on a soft blocking board or towels. Pin each motif square to exact dimensions, and pin the outer edge scallops and bobbles into position. Leave to dry completely (24-48 hours) before use.
Round 64 :
Care instructions: Hand wash or gentle machine wash in cold water in a mesh bag with mild detergent. Lay flat to dry. Avoid tumble drying to preserve shape and bobbles.
Info :
Periodic re-blocking may be needed to keep bobbles and scallops looking crisp. For heavy use, consider placing a light cotton sheet between the coverlet and direct contact to protect raised bobbles over time.
Round 65 :
Optional weighted corners: Add a small fabric pouch filled with flat weights beneath the corner tassel cluster and sew closed if you want the spread to drape heavily and resist blowing in breezy rooms.
Round 66 :
Enjoy: Lay the spread on bed, arrange tassels and bobbles, smooth down and admire your handcrafted boho bedcover.
Info :
This pattern intentionally gives counts as approximate for large perimeter work because the total stitch count will vary with motif quantity and blocked motif size. Always count and adjust locally when working border repeats to keep shell and bobble spacing harmonious.
Completing this Golden Honey Spiral Granny Square Bedspread is a truly special journey — each medallion is a little victory that, when joined, becomes a showpiece for the bedroom. The tactile spiral centers, airy lacework, and playful bobbles create captivating texture and warmth. Give yourself time to block and join; those finishing steps make all the difference. 🧶✨ Your finished spread will be a dramatic, cozy heirloom that dresses a bed with handcrafted elegance. Happy stitching! 🧵