🧶 Beautiful ✨ Detailed 💝 Adorable

Goose Mittens Pattern

Goose Mittens Pattern
4.6★ Rating
2-4 Hours Time Needed
3.6K Made This
✂️

Beginner Friendly Level

Perfect for those just starting their crochet journey, with clear instructions and simple techniques

⏱️

Bite-Sized Project

Finishes in 2-4 hours—perfect for an afternoon of creative relaxation.

🧣

Snug Essential

Everyday comfort with practical charm, designed for both functionality and style through changing seasons.

About This Goose Mittens Pattern

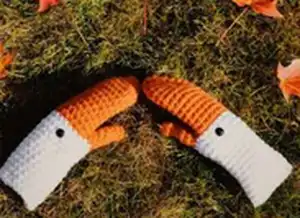
This pattern teaches you to crochet a pair of goose-themed mittens worked top-down in the round with customizable sizing. It uses two strands of worsted weight yarn held together for a thicker, warmer fabric and simple single crochet construction. With clear rounds and a small thumb join, youll be able to tailor the fit precisely for teens and adults. Cute eye placement and color change instructions finish the goose look.

Goose Mittens Pattern crochet pattern - detailed view of completed project

Designed for a beginner-friendly experience, the pattern gives tips for adjusting size and fit. You can easily change yarn weight or hook size to make smaller or larger mittens.

Why You'll Love This Goose Mittens Pattern

I absolutely love this pattern because it turns a practical item into something playful and memorable. I was inspired by classic mitten shapes and added a goose face to bring smiles whenever theyre worn. The top-down construction makes it easy for me to check fit as I go, and using two strands of yarn creates a wonderfully cozy fabric. I also enjoy that the pattern is highly customizable — I often make variations in color or eye placement to suit different tastes.

Goose Mittens Pattern step 1 - construction progress Goose Mittens Pattern step 2 - assembly progress Goose Mittens Pattern step 3 - details and accessories Goose Mittens Pattern step 4 - final assembly and finishing

Switch Things Up

I love customizing these mittens by switching the color placement to make different animals; try pastel shades for a softer look or high-contrast colors for a bold goose effect.

You can make the mittens bigger or smaller by changing yarn weight and hook size—bulky yarn with a larger hook creates a chunky cozy pair, while fingering yarn makes tiny mitts.

I often add stripes in the wrist area or a contrasting ribbed cuff to give the mitten a more polished finish and extra warmth.

For a playful twist, embroider a simple smile or add a tiny felt beak overlay for a raised detail that stands out from the flat crochet surface.

Try using safety eyes, buttons, or crocheted circles for the eyes—each option changes the personality of the mitten and how child-safe the pair is.

If you want posable fingers or a shaped thumb, experiment with short rows or adding decreases earlier to contour the mitten to the hand shape.

I sometimes hold a textured yarn as one of the two strands (for example boucle with a smooth worsted) to add subtle texture and visual interest without changing gauge much.

To make matching sets, change only the cuff color for a coordinated but not identical look—perfect for gift sets or family mittens.

For durability, reinforce the thumb area by working with a slightly smaller hook for the first thumb round or by back-loop stitching a firm trim around the thumb base.

If you love pockets, convert the mitten into convertible mittens by crocheting a flap that buttons across the fingers; this is a fun functional change I do often.

Common Mistakes & How to Fix Them

✗ Skipping stitch counts during the increase rounds can make the mitten shape uneven; count your stitches at the end of each round and correct any missing or extra stitches immediately. ✗ Making the thumb hole chain too loose or too tight will distort the thumb placement; follow the pattern suggestion of chain 6 and adjust only by even numbers while testing fit before fastening off. ✗ Changing color without securing ends will create a gap at the color join; weave in the color change tail and follow the instruction to slip stitch and sc into the same stitch three stitches away to hide the gap. ✗ Not trying the mitten on while working can lead to incorrect length; continue single crochet rounds until the glove reaches the crook of your hand and try on as you go to adjust length precisely.

Goose Mittens Pattern

Make cozy, whimsical goose-themed mittens with this easy-to-follow crochet pattern. Youll work top-down in the round, customizing sizing to fit teens or adults while using two strands for a plush, sturdy fabric. The playful color block and eye placement give these mittens personality and charm. Perfect for gifts or everyday warmth, this pattern guides you step-by-step so you can create a snug, handmade pair you will love.

Beginner Friendly 2-4 Hours

Materials Needed for Goose Mittens Pattern

— Main Fabric

  • 01
    Worsted weight yarn (#4) - 1 skein (364 yards) orange (hold two strands together)
  • 02
    Worsted weight yarn (#4) - 1 skein (364 yards) white (hold two strands together)

— Tools Required

  • 01
    Yarn needle
  • 02
    12mm flat back safety eyes (or black buttons) - choose size to suit your mitten
  • 03
    J-6mm crochet hook

Progress Tracker

0% Complete

— Sizes and Gauge :

Info :

Sizes: Custom sizing (Gauge not necessary)

Info :

Gauge: 20 sts X 1 rows = 20"

Info :

Level: beginner

— Before we begin :

Info :

These mittens will be made to fit the wearers hands. You will be creating these mittens from the top down in the round. At the end of the round, you will not be joining stitches (It is worked in a spiral, as done in amigurumi projects). Afterwards, you will create the thumb while attaching it to the glove.

— Making the top of the mitten :

Info :

With 2 Strands of Orange:

Round 1 :

Start 10 sc in a magic ring (10)

Round 2 :

Sc around (10)

Round 3 :

Sc around (10) *Weave in magic ring end*

Round 4 :

Inc in each st around (20)

Info :

See how the glove is fitting so far, if you have medium to large size hands, you may want to do several more rounds of (sc in st, inc in next) repeat around

Rounds 5-14 :

Sc around (20)

Info :

After reaching the proper width for your hand, continue to make rounds of sc until the glove reaches the crook of your hand. (If you slip on the mitten, it should be just touching the space in between your thumb and index finger)

Round 15 :

Thumb hole round: Sc in the first stitch of the round, chain 6* 'not too loose or tight', skip the next two stitches in the round and sc in the next st. Sc around until you get back to that first stitch that had the chain 6. Fasten off, weave ends.

Info :

Note: You can chain more stitches in an even number to create a larger thumb hole

— Making the lower hand and wrist of the mitten :

Info :

With 2 Strands of White:

Round 16 :

Slip st and then sc into that same st 3 sts away from the thumb hole. (You can choose anywhere in the round if you would like, this color change will be hardly visible.) Sc around. (24)

Round 17 :

You may notice a gap at the beginning of this next round from where the color change happened. We are going to start this next round without any joining, just sc in the first stitch (skip the slip st) and sc around. (24)

Round 18 :

Sc around (24)

Info :

Note: From here on forward with the pattern, you can continue to sc around without any decreasing to have looser fitting mittens. Or, you can choose to shape them by decreasing as they go down your hand and your wrist for a snug fit. (Test mittens are made with a snug fit). So, wherever you see fit to make the mitten tighter, repeat for each round (Sc in 2sts, decrease in next st)

Round 19 :

(Sc in 2sts, decrease in next) (18)

Rounds 20-28 :

Sc around (18)

Info :

Fasten off. You can add some ribbing to the end of the mitten if you wish.

— Making the thumb :

Info :

With 2 Strands of Orange:

Info :

Flip glove inside out, and you will be crocheting from the inside of the circle (See image)

Round 1 :

Slip st yarn into any chain around the thumb hole. Sc in the same st. Then in traditional and non-traditional spaces, work 12 sts around. (12)

Rounds 2-3 :

Sc around

Info :

See how the thumb hole is fitting so far, if you have medium to large size hands and long fingers, you may want to do a few more rounds of sc. Stop making sc rounds when you reach slightly past your thumb knuckle.

Round 4 :

Decrease in all sts (6)

Info :

If you added more chains than 6 when you made the thumb hole, continue to decrease in each st until you reach 6 sts in the round.

Rounds 5-7 :

Sc around (6)

Info :

Fasten off and weave top of thumb shut.

— Placing the eyes :

Info :

Flip the glove right side out and place your goose eyes (Can be flat back eyes that are then melted at the sharp end, also buttons, or small crocheted circles) on the inner corner of the glove, with the test gloves, the eyes were placed between the 2nd and 3rd round of white.

Info :

The mittens are complete! Honk!

Assembly Instructions

  • After finishing the thumb and main body, flip the glove right side out and place your eyes on the inner corner of the glove between the 2nd and 3rd round of white, adjusting placement to your preference.
  • Secure 12mm flat back safety eyes or sew on small buttons, ensuring the back is secured or button shanks are sewn tightly and ends are woven in to prevent movement.
  • Weave in all loose ends and weave in the orange and white tails at the color change to hide gaps; weave in ends on the inside of the mitten for a clean finish.
  • If desired, add ribbing to the wrist edge after fastening off by working reverse single crochet or rows of sc around the cuff to create a snug hem.
  • When creating the thumb, decrease to 6 sts and fasten off, then close top of thumb neatly by weaving through the final round and pulling tight to shut.

Important Notes

  • 💡Work in a spiral without joining at the end of rounds to maintain smooth, continuous single crochet fabric.
  • 💡Try the mitten on as you work to check fit—stop single crochet rounds when the glove reaches the crook of the hand for correct length.
  • 💡Use two strands held together for both colors to achieve the correct thickness and color coverage as shown in the sample mittens.
  • 💡Chain thumb hole stitches in even numbers to increase thumb hole size, and add or reduce rounds for thumb length as needed.

These playful Goose Mittens bring a smile to cold days with a clever color-blocked beak and tiny eyes. Handcrafted warmth meets whimsical charm for cozy walks and thoughtful gifts. Make a pair today and add your own color twist to create a collection of honking good mittens! 🧶🧤

You ask,

we answer.

FAQs

What size will the finished piece be?

The mittens are made to custom sizing; test mittens made with the sample yarn and hook fit a teen/womens small, and you can adjust rounds for larger or smaller hands.

Can I use different yarn weights for this pattern?

Yes, you can use different yarn weights but the finished size will change; adjust your hook size accordingly and check fit as you go.

Do I need prior crochet experience for this pattern?

This pattern is beginner friendly and uses single crochet worked in the round; basic knowledge of sc, increases, and decreases is helpful.

How long does this project typically take to complete?

Most crocheters finish a pair in about 2-4 hours, depending on size adjustments and the time spent on finishing details like eyes and ribbing.