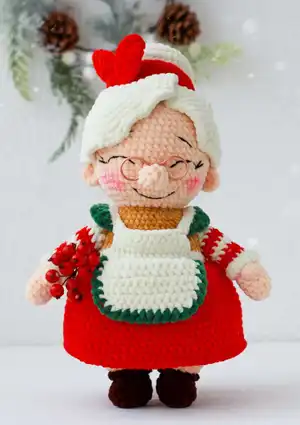
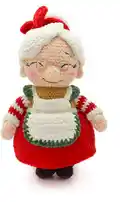
Make a charming Granny Claus amigurumi with this detailed crochet pattern. You will get step-by-step rounds, clear assembly guidance, and materials lists so you can recreate her festive look. Perfect for gifting or holiday decor, this pattern guides you through shaping the body, head, arms, legs, skirt, apron and charming details. Enjoy a cozy, creative project that adds handmade cheer to your home.
Progress Tracker
0% Complete
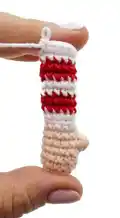
— Arms :
Info :
*cream yarn. *stuff well the palm, don't stuff the rest of the arm for now. *make 2 details.
Round 0 :
Chain 5 (work in spiral without a turning CH and SS) (oval-shape detail)
Round 1 :
start in the 2nd chain from the hook: 3 SC, 3 SC into the last chain from the hook, on the other side: 2 SC, INC (10)
Round 2 :
(4 SC, INC)*2 (12)
Round 3-4 :
2 rounds of 12 SC (12)
Round 5 :
5 SC, PS, 6 SC (12)
Round 6 :
12 SC. - change thread color to white
Round 8 :
BLO: 12 SC. - change thread color to red
Round 9-10 :
2 rounds of 12 SC. - change thread color to white
Round 11-12 :
2 rounds of 12 SC. - change thread color to red
Round 13-14 :
2 rounds of 12 SC. - change thread color to white, fix and cut the red thread
Round 15-16 :
2 rounds of 12 SC. - work several additional SC to the side edge of the detail (when folding). - fix and cut the thread
Info :
Sleeve edge: go back to Round 7 of the arm; attach the white thread to the free front loop of the round and work 2 rounds according to the pattern: 1. FLO: (3 SC, INC)*3 (15). 2. 15 SC. - fix and cut the thread, hide the thread end inside the arm.
— Apron :
Info :
*white yarn. *make a turn and work a turning CH at the end of each row.
Round 1 :
start in the 2nd chain from the hook: 14 SC
Round 6 :
Skip a St, 11 SC, DEC (12)
Round 7 :
Skip a St, 9 SC, DEC (10) - fix the thread and leave a long end
Info :
attach a green thread to the side upper corner of the apron and work the side and bottom edges with a crab stitch (in the reverse direction) with a CH between stitches. when working with green thread, attach the left white thread end from the base of the apron between the stitches. - fix and cut the thread.
— Legs :
Info :
*start with brown yarn. *make 2 details. *stuff in process.
Round 0 :
Chain 7 - work in spiral (without a turning CH and SS)
Round 1 :
start in the 2nd chain from the hook: 5 SC, 3 SC into the last chain from the hook, on the other side: 4 SC, INC (14)
Round 2 :
INC, 4 SC, 3 INC, 4 SC, 2 INC (20)
Round 3 :
20 SC - align the stitch marker exactly in the middle of the heel (if needed)
Round 4 :
5 SC, 5 DEC, 5 SC (15)
Round 5 :
5 SC, 3 DEC, 4 SC (12)
Round 6 :
(3 SC, INC)*3 (15) - change thread color to cream, don't cut the brown thread and leave it on the outside
Round 8 :
(4 SC, INC)*3 (18)
Round 10 :
(5 SC, INC)*3 (21) - fix and cut the thread
Info :
go back to Round 6 of the leg to the left brown thread; attach the thread to the free front loop of the round and work BLO 15 SC; join with SS the first and the last stitches of the round, bring the thread inside the leg and fix it.
— Body-Head :
Info :
Leg connector (middle part): *mustard yarn. *make sure to leave a long end of the thread at the beginning, with the help of which we connect the legs in the middle with the middle part.
Round 1 :
10 SC in MR - don't fasten off - mark 3 SC on the sides of the leg connector at a distance of 2 SC
Info :
mark 3 SC on the side inner parts of the legs
Info :
now join the middle part and the legs: place them on the sides of the middle part, so that the continuation of crocheting is behind the side of the left leg; the middle part is upwards; continue crocheting on the left leg behind using the thread from the middle part; stuff in process;
Round 11 :
on the left leg: 18 SC, on the middle part: 2 SC, on the right leg: 18 SC, on the middle part: 2 SC (40)
Info :
work each leg and the middle part together with SS using left at the beginning mustard thread
Round 12 :
(SC, INC)*2, 8 SC, (SC, INC)*6, 8 SC, (SC, INC)*4 (52)
Round 13 :
(2 SC, INC)*2, 8 SC, (2 SC, INC)*6, 8 SC, (2 SC, INC)*4 (64)
Round 14-24 :
11 rounds of 64 SC
Info :
place the stitch marker exactly in the middle of the back (if needed)
Round 25 :
(3 SC, DEC)*3, 34 SC, (DEC, 3 SC)*3 (58) - change thread color to red, don't cut the mustard thread
Round 26 :
58 SC - change thread color to white, fix and cut the red thread
Round 27 :
BLO: (2 SC, DEC)*3, 34 SC, (DEC, 2 SC)*3 (52)
Info :
in Round 28 we are going to attach the apron; mark 16 St in the middle of the belly (place of attachment); if required, adjust the place of attachment in Round 28
Round 28 :
18 SC, 16 SC with the apron, 18 SC (52)
Round 29 :
BLO: (SC, DEC)*3, 34 SC, (DEC, SC)*3 (46) - change thread color to mustard, fix and cut the white thread
Info :
in Round 30 we are going to attach the arms; place the stitch marker exactly in the middle of the back (if required); mark 6 SC on each arm (place of attachment); thumbs forward; for accuracy of attachment mark 6 SC on the sides on the body at a distance of 18 SC on the chest and 16 SC on the back; if required, adjust the place of attachment in Round 30
Round 30 :
8 SC, 6 SC with the arm, 18 SC, 6 SC with the arm, 8 SC (46)
Round 31 :
8 SC, 6 SC on the outer edge of the arm, 18 SC, 6 SC on the outer edge of the arm, 8 SC (46)
Round 12 (body continued numbering) :
32. (14 SC, DEC)*2, 14 SC (44)
Round 33 :
(9 SC, DEC)*4 (40)
Round 34 :
(8 SC, DEC)*4 (36)
Round 35 :
(4 SC, DEC)*6 (30)
Round 36 :
(3 SC, DEC)*6 (24) - change thread color to cream, fix and cut the mustard yarn
Info :
continue crocheting the head
Round 38 :
(SC, INC)*12 (36)
Round 39 :
(2 SC, INC)*12 (48)
Round 40 :
(7 SC, INC)*6 (54)
Round 41-52 :
12 rounds of 54 SC
Round 53 :
(7 SC, DEC)*6 (48)
Round 54 :
(6 SC, DEC)*6 (42)
Round 55 :
(5 SC, DEC)*6 (36)
Round 56 :
(4 SC, DEC)*6 (30)
Round 57 :
(3 SC, DEC)*6 (24)
Round 58 :
(2 SC, DEC)*6 (18)
Round 59 :
(SC, DEC)*6 (12)
Round 60 :
6 DEC (6) - tighten the hole, fix the thread and hide it inside
— Skirt :
Info :
go back to Round 26 of the body; turn the body upside down, attach the red thread at the back to the front free loop in Round 26; work in spiral according to the pattern
Round 1 :
FLO: 7 SC, INC, (6 SC, INC)*6, 7 SC, INC (66)
Round 3 :
(10 SC, INC)*6 (72)
Round 4-15 :
12 rounds of 72 SC
Round 16 :
crab stitch (in reverse direction): 72 SC - finish with a straight line, hide the thread end between the loops on the wrong side
— Apron top :
Info :
go back to Round 28 of the body; mark 14 front loops in the middle on the belly (place for apron top attachment)
This Granny Claus amigurumi pattern brings handmade holiday charm to your home with a warm, vintage-inspired design. The pattern includes step-by-step rounds, photos, and video links to make tricky steps easier to follow. Create a cozy keepsake or a heartfelt gift this season—happy crocheting! 🎄🧶