🧢 Beautiful ✨ Detailed πŸ’ Adorable

Granny Square Baby Blanket with shell boarder Pattern

Granny Square Baby Blanket with shell boarder Pattern
4.0β˜… Rating
5-7 Hours Time Needed
3.9K Made This
βœ‚οΈ

Beginner Friendly Level

Perfect for those just starting their crochet journey, with clear instructions and simple techniques

⏱️

Weekend Treat

Takes 5-7 hours, making it an enjoyable project to finish over a couple of days.

πŸ€—

Soft Hug

Gentle, plush, and full of warmth, creating a sense of comfort and coziness wherever they find a home.

About This Granny Square Baby Blanket with shell boarder Pattern

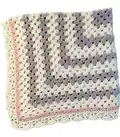
This pattern creates a classic granny square baby blanket with a delicate shell border, sized approximately 34" x 34". It uses Paintbox Aran yarn in three colors for a soft, modern palette. Directions include how to form the centre square, change yarn, continue rounds, and add the shell edging.

Granny Square Baby Blanket with shell boarder Pattern crochet pattern - detailed view of completed project

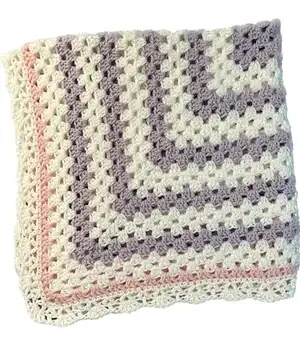
Designed for beginners, the tutorial includes step-by-step round instructions and photos to guide you through each stage. The finished blanket is cozy, gift-ready, and beautifully finished with a scalloped border.

Why You'll Love This Granny Square Baby Blanket with shell boarder Pattern

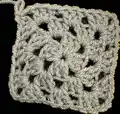
I absolutely love this pattern because it combines the timeless charm of the granny square with a delicate shell border that really elevates the finished piece. I enjoy how quickly the centre square grows β€” it is very satisfying to see the blanket take shape. The palette I used (paper white, dusty rose, candyfloss pink) gives a soft, modern look that is perfect for babies and nurseries. I also love that this pattern is beginner-friendly, so I can share it confidently with new crocheters who want a rewarding, beautiful result.

Granny Square Baby Blanket with shell boarder Pattern step 1 - construction progress Granny Square Baby Blanket with shell boarder Pattern step 2 - assembly progress Granny Square Baby Blanket with shell boarder Pattern step 3 - details and accessories Granny Square Baby Blanket with shell boarder Pattern step 4 - final assembly and finishing

Switch Things Up

I love how easily this pattern adapts to different colourways; I often swap the dusty rose for a soft mint or pale blue for a fresh look.

To make a larger blanket, I simply add more rounds to the repeat pattern, keeping the corner increases consistent so the shape stays square.

If you want a smaller version, I use a lighter weight yarn and a smaller hook to create a mini blanket or stroller blanket.

I sometimes change the shell border to a picot edge for a more delicate finish β€” it gives a different vintage feel.

Try using three different neutrals for a modern, gender-neutral blanket that matches any nursery decor.

I like to embroider a tiny heart or initials on one corner for a personalized gift touch.

Swap the final pink round for a contrasting dark colour to make the shell border pop and frame the blanket visually.

I also experiment with textured stitches between granny rounds, like a round of half double crochet, to add a little density to the fabric.

For a holiday-themed blanket, pick seasonal colours and consider adding a sparkly or metallic yarn for one accent round.

When making multiple blankets, I mix and match the order of the stripes to create coordinated sets without repeating the exact same sequence each time.

Common Mistakes & How to Fix Them

βœ— Skipping the initial slip stitch into the starting chain can lead to a twisted centre; always ss into the 3rd chain to join the round as instructed. βœ— Not counting clusters at the end of the round may make your corners uneven; check that you have four corner clusters after Round 1 before continuing.
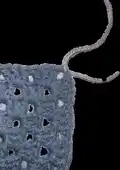
 βœ— Changing yarn without securing tails can cause loose joins later; fasten off neatly and weave in ends before working the next colour. βœ— Working the shell border too tightly will distort the edging shape; keep a relaxed tension and practice a v-stitch in scrap before starting the border.

Granny Square Baby Blanket with shell boarder Pattern

Make a cozy, classic granny square baby blanket with a pretty shell border. This beginner-friendly pattern walks you through each round, yarn changes, and the shell edging so you can create a soft 34" x 34" blanket in favorite colors. Perfect for gifting or snuggling, the pattern includes clear instructions and helpful photos to guide you.

Beginner Friendly 5-7 Hours

Materials Needed for Granny Square Baby Blanket with shell boarder Pattern

β€” Main Fabric

  • 01
    Paintbox Aran yarn (aran weight) - Paper white (used for main rounds and border)
  • 02
    Paintbox Aran yarn (aran weight) - Dusty rose (used for contrasting rounds)
  • 03
    Paintbox Aran yarn (aran weight) - Candyfloss pink (used for the final pink round)

β€” Tools Required

  • 01
    Crochet hook size 5mm
  • 02
    Scissors
  • 03
    Yarn needle for sewing in ends

Progress Tracker

0% Complete

β€” Centre Square :

Making the ring :

With dusty rose yarn make a slip knot and chain 3 ss in to first chain You have now made the ring :)

Round 1 :

ch 3 (this counts as first dc) 2dc into ring 3dc in to ring, ch 2 (do this 2 more times) ss in to 3rd ch You should now have 4 clusters of dc with a chsp in between each one You should have 4 corners

Round 2 :

ch 3 (this counts as first dc) 2dc in to chsp [3dc, ch 2, 3dc] in to next chsp (this makes your corner) [3dc, ch2, 3dc] in to next chsp (this makes another corner) [3dc, ch2, 3dc] in to next chsp (this makes another corner) 3dc in to first chsp, ch2 then ss in to third ch

Round 3 :

ch 3 (this counts as first dc) 2dc into chsp 3dc in to next chsp [3dc, ch2, 3dc] in to next chsp (forms corner) 3dc in to next chsp [3dc, ch2, 3dc] in to next chsp (forms corner) 3dc in to next chsp [3dc, ch2, 3dc] in to next chsp (forms corner) 3dc in to next chsp 3dc in to first chsp, ch2 then ss in to third ch

Round 4 :

ch 3 (this counts as first dc) 2dc in to chsp 3dc in to next chsp 3dc in to next chsp [3dc, ch2, 3dc] in to next chsp (forms corner) 3dc in to next chsp 3dc in to next chsp [3dc, ch2, 3dc] in to next chsp (forms corner) 3dc in to next chsp 3dc in to next chsp [3dc, ch2, 3dc] in to next chsp (forms corner) 3dc in to next chsp 3dc in to next chsp 3dc in to first chsp, ch2 then ss in to third ch

Round 5 :

ch 3 (this counts as first dc) 2dc in to chsp 3dc in to next chsp (4 times) in to corner chsp [3dc, ch2, 3dc] 3dc in to next chsp (4 times) in to next corner chsp [3dc, ch2, 3dc] 3dc in to next chsp (4 times) in to next corner chsp [3dc, ch2, 3dc] 3dc in to next chsp (4 times) 3dc in to first chsp, ch2 then ss in to third ch and fasten off

β€” Changing yarn and Continuing the blanket :

Info :

Attach the white yarn to any corner

Info :

Continue with rounds starting with: ch3, 2dc and putting 3dc in every chsp 3dc,ch2, 3dc in to every corner 3dc, ch2, ss into 3rd ch into the starting corner

Info :

Repeat [3 rounds of white and 2 rounds of dusty rose] 4 times

β€” Finishing off :

Info :

Once you have completed your rounds, do 3 more rounds of white, fasten off

Info :

Attach pink yarn and do one round, fasten off

β€” Shell boarder :

Info :

Attach white yarn ch1, 1sc in to every stitch 3sc in to every corner sc in to ch1

Info :

Now we are back at the first corner we can now do a v-stitch round:

Round :

ch2, skip 1 (1dc, ch1, 1dc in to same stitch). This makes your v-stitch

Info :

Work [skip 2, (1dc, ch1, 1dc in to same stitch)] until you get to the corner.

Info :

As you come to your corner [skip1, (1dc, ch1, 1dc in to same stitch)] until the corner is finished. continue with v-stitch until you get back to the first corner

Info :

At the first corner, dc into same stitch as ch3, ch 1 then ss in to 3rd ch

Shell border continuation :

Now let's do the shell boarder :) ch3 [5dc into v-stitch, 1dc into next v-stitch] repeat until back at ch3

Info :

Once you are back to the ch3, ss in to 3rd ch

Info :

Fasten off and sew in all ends

Assembly Instructions

  • Attach the white yarn to any corner to begin the rounds after the centre square and continue as instructed through the colour sequence.
  • Once you have completed your rounds, work 3 more rounds of white, fasten off, then attach the pink yarn and work one round, fasten off.
  • For the shell border: attach white yarn, ch1 then 1sc into every stitch and 3sc into every corner before working the v-stitch round.
  • Work the v-stitch round (ch2, skip 1, (1dc,ch1,1dc) in same stitch) around, finishing corners as instructed until you return to the starting corner.
  • Fasten off after finishing the shell border and sew in all ends securely with a yarn needle.

Important Notes

  • πŸ’‘This is a beginner friendly pattern; follow the step photos and take your time with the first few rounds to learn the rhythm.
  • πŸ’‘Use a 5mm hook with Paintbox Aran yarn for the gauge and final size of approximately 34" x 34".
  • πŸ’‘Securely fasten off and weave in ends after each colour change to keep the edges neat and avoid loose tails.
  • πŸ’‘When working the shell border, keep your tension relaxed so the scallops lie flat and look even around the blanket.

Thank you for making this granny square baby blanket β€” your handmade creation will bring warmth and comfort to a little one. The soft palette and scalloped shell border make it a beautiful keepsake and perfect gift. Enjoy every stitch and share your finished blanket to inspire others! 🧢✨

You ask,

we answer.

FAQs

What size will the finished piece be?

The blanket measures approximately 34" x 34" when made with Paintbox Aran yarn and a 5mm hook.

Can I use different yarn weights for this pattern?

Yes, you can use different yarn weights, but this will affect the final size; adjust your hook to suit the yarn and check gauge.

Do I need prior crochet experience for this pattern?

This pattern is beginner friendly, so basic knowledge of chains, double crochet, and slip stitch is helpful and enough to complete the blanket.

How long does this project typically take to complete?

Most crocheters finish this baby blanket in about 5-7 hours, depending on experience level and how many breaks you take.