🧢 Beautiful ✨ Detailed πŸ’ Adorable

Granny Square Pocket Bottle Holder Pattern

Granny Square Pocket Bottle Holder Pattern
4.9β˜… Rating
2-3 Hours Time Needed
2.1K Made This
βœ‚οΈ

Beginner Friendly Level

Perfect for those just starting their crochet journey, with clear instructions and simple techniques

⏱️

Bite-Sized Project

Finishes in 2-4 hoursβ€”perfect for an afternoon of creative relaxation.

✨

Stylish Touch

An elegant detail to elevate any look, combining traditional techniques with contemporary design sensibilities.

About This Granny Square Pocket Bottle Holder Pattern

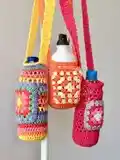
This pattern creates a compact, wearable bottle holder with a strap and optional phone pocket. It includes two pocket options β€” a granny square pocket and a plain solid-colour pocket β€” and two methods for making the strap. The design is versatile so you can make solid, striped or multi-colour versions to match your style.

Granny Square Pocket Bottle Holder Pattern crochet pattern - detailed view of completed project

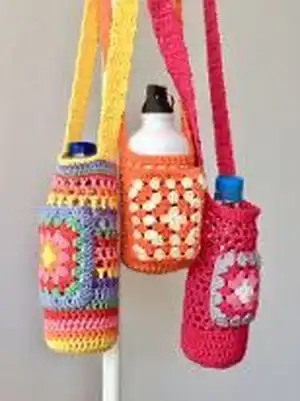
The body section is the same for all variations; choose the pocket style you prefer and follow the finishing and assembly steps. Perfect for festivals, walks, shopping or everyday hands-free use.

Why You'll Love This Granny Square Pocket Bottle Holder Pattern

I absolutely love this pattern because it turned a simple request from a customer into a practical, stylish everyday item. I enjoy how quickly a holder comes together using simple rounds and how easy it is to customise with colours or a granny square pocket. The two strap methods let me make a stretchy or more stable handle depending on how I plan to use the holder. It is satisfying to measure on a real bottle as you work and watch the piece become a snug fit. I get excited sharing this because it is useful, fun to personalise and makes a lovely handmade gift.

Granny Square Pocket Bottle Holder Pattern step 1 - construction progress Granny Square Pocket Bottle Holder Pattern step 2 - assembly progress Granny Square Pocket Bottle Holder Pattern step 3 - details and accessories Granny Square Pocket Bottle Holder Pattern step 4 - final assembly and finishing

Switch Things Up

I love changing up colours in this pattern to create totally different looks; try ombre stripes or contrasting trims for a unique holder.

You can swap DK cotton for a cotton blend or acrylic to change the drape and stretchβ€”remember to adjust your hook and stitch count accordingly.

For a sturdier strap, I sometimes crochet the handle horizontally and sew it on; it stretches less and feels more secure across the body.

Try making the granny square pocket in bright contrasting colours to make it a focal point, or use tonal shades for a subtle effect.

To make a smaller or larger holder, change your yarn weight and hook size β€” bulky yarn with a larger hook gives a chunky version, while fingering weight yields a mini holder.

I often line the pocket with lightweight fabric to protect phones from moisture; simply sew a fabric rectangle to the back before attaching to the cover.

Want a wristlet instead? Make a shorter strap length or add a detachable keyring clip to convert the holder into a wrist carrier.

For extra stretch prevention, I stitch a ribbon across the underside of the strap or add a cotton webbing reinforcement before sewing the strap ends.

Add decorative touches like tassels, pom-poms, or embroidered initials on the granny square to personalise gifts for friends.

If you want a crossbody length, measure 200-240 ch as suggested and test the length across your body before finishing the strap ends.

I also like to replace the drawstring with a toggle or bead closure for a more finished look; thread the chain through and secure with a decorative bead at the ends.

Experiment with the pocket height: add extra rows to make the pocket taller for larger phones or keep it short for cards and small items.

Common Mistakes & How to Fix Them

βœ— Not checking fit on a real bottle early can lead to a cover that is too loose or too tight; measure frequently on the bottle and adjust rows as needed. βœ— Using a hook that is too large for DK cotton will create a loose fabric that won’t hold the bottle securely; use the recommended 3.0mm (or 3.5–4.0mm if needed for your gauge) and check the gauge sample. βœ— Forgetting to account for cotton stretch can make the pocket or strap sag over time; allow for stretch by making the pocket slightly snug and consider adding a ribbon or fabric reinforcement under the strap. βœ— Skipping the magic loop securely can cause the base to come undone; secure and weave in the magic loop tail tightly when finishing the bottom. βœ— Not keeping consistent tension between base, netting and final rows can distort the shape; maintain even tension and count stitches at the end of each round to stay consistent.

Granny Square Pocket Bottle Holder Pattern

Make a stylish, hands-free bottle holder with a built-in pocket using this easy crochet pattern. You can create a simple solid-colour cover or add a granny square pocket and colourful stripes for a playful look. The pattern uses DK (8 ply) cotton and includes two strap methods, a netting body and clear assembly instructions so you can finish a functional accessory quickly.

Beginner Friendly 2-3 Hours

Materials Needed for Granny Square Pocket Bottle Holder Pattern

β€” Main Fabric

  • 01
    8 ply (DK) cotton such as Paintbox - recommended (approx 2 x 50g balls for main colour)
  • 02
    Main colour: 2 x 50g balls (one ball each for stripes if making stripes)
  • 03
    Accent colours: 3-4 different colours, 1 ball each for stripes or granny square
  • 04
    Stash scraps of wool or cotton for the granny square pocket (small amounts per colour)
  • 05
    Optional: cotton blend or acrylic (note cotton blend stretches less; may need +2-3 stitches after 3rd row)

β€” Tools Required

  • 01
    Crochet hook size 3.00 mm (I used 3.00mm)
  • 02
    Optional crochet hook sizes 3.5 mm or 4.0 mm depending on your gauge
  • 03
    Tapestry/yarn needle for sewing and weaving in ends
  • 04
    Needle for sewing on pocket and strap
  • 05
    Scissors
  • 06
    Measuring tape or ruler to check fit on water bottle
  • 07
    Stitch markers (optional)
  • 08
    Metal snap (optional) to secure phone pocket
  • 09
    Ribbon or fabric for strap reinforcement (optional)

Progress Tracker

0% Complete

β€” Materials & Notes :

Info :

SKILL LEVEL: Upper Beginner. NOTE: The body section is the same for all the holders in the photos above. Below the body section you will find instructions for both the SOLID PLAIN COLOUR POCKET and the GRANNY SQUARE POCKET. So you have two patterns in one!

Info :

GAUGE: 5DC per 3cm, 4 rows DC per 4cm. ABBREVIATIONS (US TERMS): st= stitch. ch= chain. sc= single crochet. DC = double crochet. slst= slip stitch.

β€” Bottom Solid Section :

Round 1 :

Make a magic loop (there are many instructions online if unsure how to do this)

Round 2 :

Ch 3, DC into magic loop 11 times, sl st into 3rd chain of initial 3ch to make a circle.

Round 3 :

You should now have a small circle of 11DC and 3ch counting as one DC, total 12 DC.

Round 4 :

Ch 3, 2DC into each stitch till end, slst into 3rd chain to close circle (24DC).

Round 5 :

Ch 3, *1DC in next stitch, 2DC in next stitch, repeat from * till end, slst into 3rd chain to close circle (36 DC).

Round 6 :

Complete 4 more rows of 3ch, then 1DC in each stitch and slst into 3rd chain. As there are no increases, the crochet will begin to form a cylinder shape. You can measure it on a water bottle to check fit. It should fit tightly as it will stretch if cotton. For cotton blend or acrylic refer to note above.

Round 7 :

When you have completed 4-6 rows depending on how large the water bottle is you are now ready to make the netting part of the pattern.

β€” Netting Section :

Round 8 :

NETTING SECTION: Ch 3 and 1DC into second stitch, ch1 sk 1 stitch and 1DC into next stitch. Continue 1DC, ch1, sk 1 to end. At the end of the round there should be 18 DC and 18 chains (unless you increased stitches earlier then add accordingly). Continue completing this same round until nearly to the top of the water bottle leaving some space for the final dc or sc rows. I usually do 14 rows.

β€” Body :

Round 9 :

BODY: Finish body section by completing 1-2 rows of 1DC or 3 rows of sc, depending on the length of your bottle and your preference.

β€” Bag Strap :

Info :

To make the strap, there are two possible methods. Choose method 1 for a vertical strap made from the body top, or method 2 for a horizontally crocheted handle that stretches less.

Method 1 :

Ch 3 from where you are and complete 5DC into the top of the last dc round. Measure how long the strap needs to be across your body. Continue in rows of 3ch, 5DC and turn, back and forth until you reach your desired length. Fasten off yarn leaving approximately 20 cm tail to sew other end of strap onto body. Fold bottle holder in half and sew end of strap on the opposite side.

Method 2 :

Alternatively, I now crochet the handle horizontally, as it stretches less than the first method. Make a 200-240 ch depending on the person's height and 3 rows of HDC then sew on tightly to opposite sides.

β€” Granny Square Pocket :

Round 11 :

GRANNY SQUARE POCKET: Measure the phone size and crochet enough rounds to leave approximately 2cm on either side of the phone. For a longer pocket, add an extra row or two at top, bottom or both to achieve the correct size, leaving a long tail for sewing onto bottle.

β€” Plain Solid Colour Pocket :

Round 11 :

PLAIN SOLID COLOUR POCKET: Ch 22, work into 3rd st in hdc (20 sts in each row) for approx 24 rows of hdc until the pocket measures from the bottom of the mesh to the top just below the final DC row (or to your own desired length) leaving a long tail for sewing onto bottle. When making the pocket I now try to make it longer than a phone and put a metal snap to keep it closed so the phone can't fall out; generally it is in the pocket quite tightly, however the cotton does stretch over time.

Info :

Your finished body section should look like the pictured mesh and cylinder shape when fitted to a bottle.

Round 12 :

Place the granny square pocket between the straps and make sure it is straight as you sew around the three sides to form a pocket. I found it easier to sew the pocket on while the cover was on the bottle.

Round 13 :

Sew in any ends inside the bottle holder, taking particular care to secure the magic loop end tightly.

Info :

Also the cotton strap will stretch so if you want to prevent stretching sew a ribbon or fabric on the underside to prevent stretching.

β€” Drawstring :

Info :

DRAWSTRING: To make the drawstring make a chain of 100 ch and thread it through every second stitch in the top final round above the netting starting from the middle back (the pocket is on the front and the drafting ends meet at the back).

Assembly Instructions

  • Place the granny square pocket between the straps, align it straight and sew around the three open sides to form the pocket while the cover is on the bottle for easier positioning.
  • Fold the bottle holder in half and sew the strap ends to opposite sides of the top edge, leaving approximately 20 cm tail to secure before finishing.
  • Weave and sew in all yarn ends inside the bottle holder, taking particular care to secure the magic loop end tightly to prevent unraveling.
  • If desired, sew a ribbon or fabric piece along the underside of the cotton strap to prevent stretching and add reinforcement.

Important Notes

  • πŸ’‘Measure the piece on the actual water bottle as you work to check fitβ€”cotton stretches so a snug initial fit is ideal.
  • πŸ’‘Secure the magic loop tail and weave in ends tightly to prevent the base from coming undone after use.
  • πŸ’‘Choose your hook to match gauge; if your fabric is too loose switch to a smaller hook or adjust stitch count as needed.
  • πŸ’‘Consider adding a metal snap to the pocket to keep a phone secure, especially as cotton stretches with use.

This handy Granny Square Pocket Bottle Holder pattern gives you two pocket options and two strap methods so you can personalise every detail. It’s perfect for festivals, walks or everyday hands-free carrying and makes a wonderful handmade gift. Have fun selecting colours, adding trims and making each holder unique! 🧢✨

You ask,

we answer.

FAQs

What size will the finished piece be?

The finished holder fits a standard small water bottle; size depends on yarn and hook. Measure on your bottle as you work and adjust rows to fit.

Can I use different yarn weights for this pattern?

Yes, but different yarn weights will affect final size and stretch. If you use a thicker yarn, use a larger hook and reduce rounds; for thinner yarn use a smaller hook and possibly more rounds.

Do I need prior crochet experience for this pattern?

This pattern is suitable for upper beginners; you should be comfortable with chains, DC (double crochet), HDC and reading simple round instructions.

How long does this project typically take to complete?

Most crocheters can complete a bottle holder in about 2-3 hours, depending on experience and whether you add a granny square pocket or extra details.