🧢 Beautiful ✨ Detailed πŸ’ Adorable

Rose Turtle Amigurumi Pattern

Rose Turtle Amigurumi Pattern
4.6β˜… Rating
5-7 Hours Time Needed
3.9K Made This
βœ‚οΈ

Intermediate Level

Ideal for those with basic crochet experience, featuring slightly more advanced stitches and techniques to expand your skills.

⏱️

Weekend Treat

Takes 5-7 hours, making it an enjoyable project to finish over a couple of days.

🧸

Cute Companion

An adorable friend to cherish, handcrafted with love to bring comfort and joy for years to come.

About This Rose Turtle Amigurumi Pattern

This pattern creates a sweet turtle with a rose-shaped shell worked in bulky, velvety yarn. The shell petals are formed by working into the front loops for a beautiful layered rose effect. Youll make the head, body, four legs, tail, and a dramatic red rose shell, then assemble them to create a charming finished piece.

Rose Turtle Amigurumi Pattern crochet pattern - detailed view of completed project

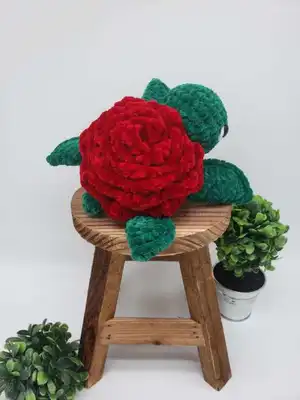
The pattern uses fuzzy/chunky yarn and a 4.5mm hook to create a plush texture and durable shape. Detailed notes and photos guide placement of eyes, legs, and petals for tidy assembly.

Why You'll Love This Rose Turtle Amigurumi Pattern

I absolutely love this pattern because it combines a classic amigurumi turtle with a floral twist that feels magical. The rose petals worked in the front loops give the shell such a rich, textured look that always delights me when a finished piece comes together. I also enjoy how forgiving the petal sequence is β€” each flower ends up unique, which makes every turtle special. The pattern uses bulky yarn for quick progress and a wonderfully plush finish that invites cuddles.

Rose Turtle Amigurumi Pattern step 1 - construction progress Rose Turtle Amigurumi Pattern step 2 - assembly progress Rose Turtle Amigurumi Pattern step 3 - details and accessories Rose Turtle Amigurumi Pattern step 4 - final assembly and finishing

Switch Things Up

I love experimenting with color combinations for the rose shell; try a soft pink gradient for a romantic look or bold crimson for dramatic contrast.

I often change yarn weight and hook size to create different sizes; using thicker yarn and a larger hook gives a chunky, statement piece while thinner yarn makes a delicate mini version.

I sometimes embroider small details on the shell or add a tiny crocheted leaf for more botanical detail.

Try different safety eye sizes or embroidered eyes for a softer, child-friendly finish.

I like to make matching sets by varying petal patterns and joining multiple small roses to create a textured shell cluster.

For a posable turtle, add a small length of wire inside limbs before stuffing so you can gently bend legs into different poses.

Swap the rose for other motifs like a sunflower or layered round motifs to personalize the design.

I recommend testing a small swatch to see how your selected yarn shows the petal texture before committing to your main color choice.

If you want to make a keychain or ornament, work the pattern with thinner yarn and a smaller hook, and omit stuffing or use minimal stuffing.

I also sometimes embellish with beads or tiny sequins in the center of the rose for a subtle sparkle, but keep safety in mind if the piece is for a child.

Common Mistakes & How to Fix Them

βœ— Missing front loops while working petals will leave gaps; mark your front loops and work slowly through each marked loop to ensure you dont skip any. βœ— Attaching legs in the wrong orientation can make the turtle look off-balance; refer to the placement photos and note the specified curve direction (right/left) when sewing each leg. βœ— Overstuffing the head or body causes distorted shaping and difficulty closing; stuff gradually, checking shape often and adding small amounts until you reach the desired firmness. βœ— Not using stitch markers with fluffy or chunky yarn makes counting rounds hard; place markers at the start of rounds and mark front loops when working the shell to avoid confusion. βœ— Leaving tails too short when finishing rounds prevents secure sewing; leave a long tail (about 8-9 inches for the head) to make sewing pieces together easier and more secure.

Rose Turtle Amigurumi Pattern

Make a charming Rose Turtle with a plush rose shell and soft, chunky yarn. This pattern guides you through crocheting the head, body, legs, tail, and sculpted rose petals step-by-step. Youll love the textured petals made in the front loops and the cuddly feel of this bulky yarn amigurumi. Perfect as a handmade gift or home accent, the instructions are clear and image-supported.

Intermediate 5-7 Hours

Materials Needed for Rose Turtle Amigurumi Pattern

β€” Main Fabric

  • 01
    Yarn: Size 5-6 Bulky Yarn (pattern uses size 5-6 bulky for plush texture)
  • 02
    Premier Parfait Chunky (Size 6): Emerald (for body and details)
  • 03
    Premier Parfait Chunky (Size 6): White (optional eye detail)
  • 04
    Yarn Bee Velvety Smooth (Size 5): Red (for rose petals)
  • 05
    Note: Premier Parfait Chunky and Yarn Bee Velvety Smooth are similar in size; consider both size 5 for this project

β€” Tools Required

  • 01
    Crochet hook size 4.5mm
  • 02
    Safety eyes 14mm (2 pieces)
  • 03
    Tapestry needle
  • 04
    Scissors
  • 05
    Poly-Fil for stuffing
  • 06
    Stitch markers (recommended for front loops and round start)
  • 07
    Pins for assembly (optional)

Progress Tracker

0% Complete

β€” Front Legs :

Round 1 :

8SC in MR

Round 2 :

Inc (16)

Round 3 :

SC, Inc (24)

Round 4 :

3SC, Inc (30)

Info :

Fold your circle in half to make a half circle.

Infos :

Working around the half circle and through both sides, SC through both stitches. Continue until you reach the end of the half circle. FO, there is no need to leave a tail for sewing, you will SC the legs into a round of the body.

β€” Back Legs :

Round 1 :

8SC in MR

Round 2 :

Inc (16)

Round 3 :

SC, Inc (24)

Infos :

Working around the half circle and through both sides, SC through both stitches. Continue until you reach the end of the half circle. FO, there is no need to leave a tail for sewing, you will SC the legs into a round of the body.

β€” Tail :

Round 1 :

6SC in MR

Round 2-4 :

SC (6)

Info :

SS, FO, there is no need to leave a tail for sewing, you will SC the tail piece into a round of the body.

β€” Head :

Round 1 :

8SC in MR

Round 2 :

Inc (16)

Round 3 :

SC, Inc (24)

Round 4 :

3SC, Inc (30)

Round 5-7 :

SC (30)

Round 8 :

3SC, Dec (24)

Round 9 :

SC, Dec (16)

Infos :

SS, leave a long tail for sewing. I leave about 8-9 inches to be safe, but I usually have a lot left over. Add eyes and stuff the head. I added my eyes at around rows 5-6 and about 9-10 stitches apart.

β€” Shell/Body :

Info :

The top of the shell is all worked in the BLO (back loops only) of the previous round. The petals are formed in the front unworked loops once the top of the shell is completed.

Round 1 :

8 SC in MR

Round 2 :

Working in BLO: Inc (16)

Info :

*I highly suggest stitch markers to mark your front loops, at least one in the front loop of the first stitch of each row.

Round 3 :

Working in BLO: SC, Inc (24)

Round 4 :

Working in BLO: (SC, Inc, SC)*8 (32)

Round 5 :

Working in BLO: 3SC, Inc (40)

Round 6 :

Working in BLO: (5SC, Inc, 2SC)*5 (45)

Info :

Color change to green

Round 7 :

Working in BLO: SC (45)

Info :

We will now make the petals. Drop your working yarn, the rest of the body will be finished after we complete the petals.

Info :

Petals: To make the petals, you will be working in a continuous spiral on top of the shell in the unworked front loops of each round.

Petals :

Grab your red yarn and attach it with a SC in the very first unworked front loop of row 2.

Petal Pattern :

Working into the remaining front loops repeat the following pattern until you reach the last front loop: HDC, DC, TC, DC, HDC, SS

Info :

**Please note, you should be careful not to miss any stitches, however, this is a very forgiving sequence of stitches so if you miss a loop/double up a loop anywhere it is not a huge deal. No two flowers are the same, so it is ok if your turtle is unique! If you find you have missed a stitch/stitches just end the round on whichever stitch you have left and complete a SS in the ending stitch as well. If you find you have stitches remaining you can continue the sequence until you reach the end or you can SS until the end, whichever you prefer.

Info :

FO, weave in the ends.

Info :

The remaining steps of the body will be worked normally, through both loops. Picking up where you left off with your green yarn.

Round 8 :

3SC, Dec (36)

Round 9 :

Grab your legs and tail, this is the row you will SC your pieces into. You place your pieces in front of the stitches of the body, pushing your hook through the leg/tail first then through the body stitch. - 4SC - Grab the first big leg, attach using 3SC (refer to photo for placement, the curve of the leg should be on your right). - 5SC - Grab the first small leg, attach using 2SC (refer to photo above for placement, the curve of the leg should be on your right). - 3SC - Grab your tail and using 3SC attach the tail (see photo for placement). - 3SC - Grab the second small leg, attach using 2SC (refer to photo below for placement, the curve of the leg should be on your left). - 5SC - Grab the second big leg, attach using 3SC (refer to photo above for placement, the curve of the leg should be on your left). - 3SC (36)

Round 10 :

SC, Dec (24)

Info :

Stuff the body to your desired firmness.

Round 11 :

SC, Dec (16)

Info :

Add any additional stuffing.

Round 12 :

Dec (8)

Info :

SS, cut yarn leaving a short tail to sew the hole closed. Weave the yarn tail back and forth into the stitches around then pull tight to close. Tie to secure and weave the rest of the yarn tail into the body.

β€” Finishing Details :

Info :

Sew the head onto the body. I sew mine in the middle of the front two legs, half way over the rose and half over the bottom portion of the body, this help cover your color changes.

Info :

Eye Detail: If you would like the white detail on the eye, grab your white yarn and embroider a line up the side of the eye. Insert your needle at the middle bottom of the safety eye and bring it up to the top middle of the safety eye, it will tend to curve around the safety eye when you pull it tighter.

Assembly Instructions

  • Sew the head onto the body centered over the front two legs, positioning it halfway over the rose and halfway over the bottom portion of the body to help hide color changes.
  • Attach legs and tail into Round 9 of the body by placing the leg or tail in front of the body stitch, pushing your hook through leg/tail then through the body stitch and completing the specified SCs (follow the sequence and curve directions in the photos).
  • Secure the rose petals to the shell by weaving in ends and ensuring the petals are layered evenly; the petals are worked in a continuous spiral in the unworked front loops.
  • Close the body opening after stuffing by SS, leaving a short tail and weaving the tail back and forth through surrounding stitches, pulling tight to close and tying securely before weaving in the remainder.
  • Add eye detail by embroidering a white line up the side of the safety eye using white yarn: insert needle at the middle bottom of the eye and bring it up to the top middle so the line curves around the eye.

Important Notes

  • πŸ’‘Use stitch markers to keep track of rounds and especially to mark front loops when working the shell petals.
  • πŸ’‘Stuff gradually and check the shape as you go; overstuffing can distort the turtle and under-stuffing can leave gaps.
  • πŸ’‘There is no need to leave long tails on legs and tail pieces because they are crocheted into Round 9 of the body, but leave a long tail for the head for easier sewing.

This Rose Turtle makes a delightful handmade gift or a cozy addition to your decor, combining plush texture and floral charm. The rose shell technique creates a beautiful, layered bloom that is unique with every make. Enjoy the slow, satisfying process of crocheting petals and assembling this sweet companion. 🧢🌹

You ask,

we answer.

FAQs

What size will the finished piece be?

The finished amigurumi measures approximately 6 inches long, 6.5 inches wide, and 3 inches tall using the recommended bulky yarn and 4.5mm hook.

Can I use different yarn weights for this pattern?

Yes, you can use different yarn weights but the final size and texture will change; use an appropriate hook for your chosen yarn and expect differences in the petal definition and overall size.

Do I need prior crochet experience for this pattern?

This pattern is rated intermediate, so basic knowledge of crochet stitches (MR, SC, INC, DEC) and working in BLO/FLO is recommended for best results.

How long does this project typically take to complete?

Most crocheters complete this project in 5-7 hours, though time will vary based on experience level and how comfortable you are working with bulky/fluffy yarn.