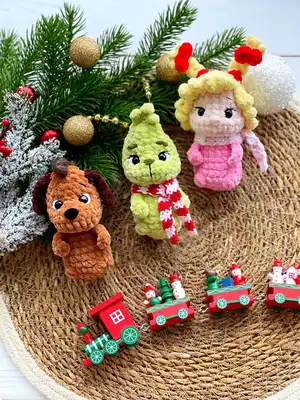
Make a charming trio of mini amigurumi characters — the Grinch, Cindy Lou, and Max — using plush and DK yarns. This pattern gives you step-by-step rounds, assembly tips, and finishing details so you can create sweet holiday friends. Perfect for gifting, ornaments, or a festive display, each toy finishes about 10 cm tall.
Progress Tracker
0% Complete
— Grinch :
Info :
Crochet from the bottom to the top. Stuff the toy with fiberfill as you crochet.
Round 1 :
7 sc into MR (7)
Round 3 :
(1 sc, inc)*7 (21)
Round 4 :
Back loops only: 7 sc, HDC 3 together, 4 sc, HDC 3 together, 8 sc (21)
Info :
Click the link to watch how to crochet the 4th round.
Round 5-7 :
21 sc (3 rounds) (21)
Round 8 :
(5 sc, dec)*3 (18)
Round 9 :
6 sc, chain 7 and start crocheting in the 3rd chain from hook: HDC inc, 4 sl sts (arm), 6 sc, chain 7 and start crocheting in the 3rd chain from hook: HDC inc, 4 sl sts (arm), 6 sc (18)
Round 10 :
(1 sc, dec)*6 (12)
Info :
Click the icon to watch how to crochet rounds 9 and 10.
Round 13 :
11 sc, 4 inc – in the center (make shift stitches if needed) 9 sc (28)
Round 14-15 :
28 sc (2 rounds) (28)
Round 16 :
9 sc, 2 dec, 4 sc – in the center, 2 dec, 7 sc (24)
Round 18 :
(2 sc, dec)*6 (18)
Round 20 :
(1 sc, dec)*6 (12)
Info :
If you use safety eyes - install the eyes between rounds 17 and 18. The distance between the eye stems is 5 sc.
Round 21-22 :
12 sc (2 rounds) (12)
Info :
Fasten off, break yarn, and hide the tail inside.
— Forelock :
Info :
Attach the basic color yarn to the top. Chain 3, and start crocheting in the 2nd chain from hook 2 sl sts, sl st in the base. Chain 4 and start crocheting in the 2nd chain from hook 3 sl sts, sl st in the top, chain 3 and start crocheting in the 2nd chain from hook 2 sl sts, sl st in the base.
Info :
Fasten off, break yarn, and hide the tail inside.
Info :
Click the icon to watch the video about how to crochet the forelock.
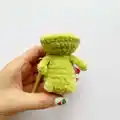
— Assembly :
Info :
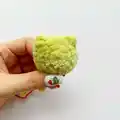
Sculpt the eye sockets.
Info :
Click the icon to watch how to sculpt the eyes.
Info :
- embroider the whites on the outer side of the eye with white plush yarn;
Info :
- embroider the eyelashes with black thread;
Info :
- embroider the eyebrows in round 19 with dark green thread (the length is 2 sc).
Info :
The distance between the eyebrows is 3 sc.
Info :
Embroider the nose between the eyes (between rounds 16 and 17).
Info :
The length of the nose is 1 sc. Make 2 stitches;
Info :
- Embroider the mouth as guided in the photo.
Info :
Click the link to watch how to embroider the smile.
— Scarf :
Info :
With YarnArt Jeans yarn and a 2 mm crochet hook.
Info :
Work in back and forth rows. Chain 1 at the beginning of each row. Start crocheting with red yarn.
Round 1 :
Chain 3 and start crocheting in the 2nd chain from hook 2 sc, chain 1.
Round 2-3 :
Change to white yarn, 2 sc, chain 1 (2 rounds) with white color
Round 4-5 :
Change to red yarn, 2 sc, chain 1 (2 rounds) with red color
Info :
Repeat rounds 2-5 until you reach the desired length of the scarf.
Info :
Click the link to watch how to crochet the scarf.
— Cindy Lou :
Info :
Crochet from the bottom to the top. Stuff with fiberfill as you crochet, Start crocheting with pink yarn.
Round 1 :
7 sc into MR (7)
Round 3 :
(1 sc, inc)*7 (21)
Round 4 :
BLO: 7 sc, HDC 3 together, 4 sc, HDC 3 together, 8 sc (21)
Round 5-7 :
21 sc (3 rounds) (21)
Round 8 :
(5 sc, dec)*3 (18)
Round 9 :
6 sc, chain 7 and start crocheting in the 3rd chain from hook: HDC inc, 4 sl sts (arm), 6 sc, chain 7 and start crocheting in the 3rd chain from hook: HDC inc, 4 sl sts (arm), 6 sc (18)
Round 10 :
(1 sc, dec)*6 (12)
Info :
Change to beige yarn. Cut pink yarn and secure it.
Round 13 :
11 sc, 4 inc – in the center, 9 sc (28)
Round 14-15 :
28 sc (2 rounds) (28)
Round 16 :
9 sc, 2 dec, 4 sc – in the center, 2 dec, 7 sc (24)
Round 18 :
(2 sc, dec)*6 (18)
Info :
If you use safety eyes - install the eyes between rounds 16 and 17. The distance between the eye stems is 5 sc.
Round 20 :
(1 sc, dec)*6 (12)
Info :
Fasten off, break yarn, and hide the tail inside.
— Cindy Lou Assembly :
Info :
Sculpt the eye sockets similar to the Grinch but between rounds 16 and 17.
Info :
- embroider the whites on the outer side of the eye with white plush yarn;
Info :
- embroider the eyelashes and eyebrows in round 18 with black thread (the length is 2 sc). The distance is 3 sc;
Info :
- embroider the nose between the eyes (between rounds 15 and 16) with beige thread. The length of the nose is 1 sc. Make 2 stitches;
Info :
- embroider the mouth in round 14 with pink thread as guided in the photo.
— Hair :
Info :
Crochet with yellow plush HIMALAYA Dolphin Fine yarn and a 2,5 mm crochet hook.
Round 1 :
6 sc into MR (6)
Round 3 :
(1 sc, inc)*6 (18)
Round 4 :
(2 sc, inc)*6 (24)
Round 5 :
(3 sc, inc)*6 (30)
Round 6 :
(4 sc, inc)*6 (36)
Round 8 :
(chain 8 and start crocheting in the 2nd chain from hook: 7 sc, skip 1 stitch, sl st in the next stitch)* repeat to the end of the rounds. I made 18 strands.
Info :
Click the icon to watch how to crochet the hair strand.
Info :
Put the wig on the head and pin 14 strands. Leave 4 hair strands in the center on the front side. Sew them to the base gently.
Info :
Sew the hair strands to the head (see photo).
Info :
Click the icon to watch how to sew the hair.
— Braids (make 2) :
Info :
Start crocheting with red yarn and a 2,5 mm crochet hook.
Round 1 :
Chain 6 and start crocheting in the second chain from hook: 1 sc, change to yellow yarn, cut red yarn (chain 12 and start crocheting in the 2nd chain from hook 11 sl sts, sl st in the next stitch on the chain foundation)* repeat 2 times.
Info :
Click the icon to watch how to crochet the braids.
— Bow (make 2) :
Info :
Crochet with red yarn.
Round 1 :
Chain 2 and start crocheting in the 2nd chain from hook: DC, chain 2, sl st in the base, chain 2, DC in the base, chain 2, sl st in the base.
Info :
Break yarn, leaving a long tail for sewing.
Info :
Wrap around the center of the bow with the remaining yarn tail. Braid the hair and tie the bow. Fasten off.
Info :
Secure the ends of the plush yarn with a drop of glue.
Info :
Sew the braids to the head (see photo).
Info :
Click the link to watch how to crochet the bow.
— Cindy Lou Scarf :
Info :
With YarnArt Jeans yarn and a 2 mm crochet hook.
Info :
Work in back and forth rows. Chain 1 at the beginning of the row. Start crocheting with pink yarn.
Round 1 :
hain 3 and start crocheting in the 2nd chain from hook 2 sc, chain 1.
Round 2-3 :
Change to white yarn, 2 sc, chain 1 (2 rounds) with white color
Round 4-5 :
Change to pink yarn, 2 sc, chain 1 (2 rounds) with pink color
Info :
Repeat rounds 2-5 until you reach the desired length of the scarf.
— Max :
Info :
Crochet from the bottom to the top. Stuff with fiberfill as you crochet. Crochet with brown yarn.
Round 1 :
7 sc into MR (7)
Round 3 :
(1 sc, inc)*7 (21)
Info :
In the next round, crochet the paws and tail.
Round 4 :
BLO: 7 sc, HDC 3 together, 4 sc, HDC 3 together, 8 sc, Chain 5 and start crocheting in the 2nd chain from hook 4 sc (tail) (21)
Round 5-7 :
21 sc (3 rounds) (21)
Round 8 :
(5 sc, dec)*3 (18)
Round 9 :
6 sc, chain 7 and start crocheting in the 3rd chain from hook: HDC inc, 4 sl sts (arm), 6 sc, chain 7 and start crocheting in the 3rd chain from hook: HDC inc, 4 sl sts (arm), 6 sc (18)
Round 10 :
(1 sc, dec)*6 (12)
Round 12 :
5 sc inc, 3 DC inc, 4 sc inc (24)
Round 13 :
11 sc, 4 DC inc – in the center, 9 sc (28)
Round 14-15 :
28 sc (2 rounds) (28)
Round 16 :
9 sc, 6 dec – in the center (marked with stitch markers in the photo), 7 sc (22)
Round 18 :
(2 sc, dec)*5, 2 sc (17)
Info :
If you use safety eyes - install the eyes between rounds 16 and 17. The distance between the eye stems is 5 sc.
Round 20 :
(1 sc, dec)*5, 2 sc 12)
Info :
Fasten off, break yarn, and hide the tail inside.
— Max Assembly :
Info :
Sculpt the eye sockets.
Info :
Click the link to watch how to sculpt the eyes.
Info :
- embroider the whites on the outer side of the eye with white plush yarn;
Info :
- install the nose in the center of the muzzle between rounds 14 and 15;
Info :
- embroider the eyebrows in round 18 with black thread (the length is 2 sc). The distance is 3 sc;
Info :
- embroider the mouth in round 13 with black thread as guided in the photo.
— Ears (make 2) :
Info :
Attach dark brown yarn to the toy. Crochet both ears in round 19. The distance between the ears is 7 stitches.
Info :
Skip 4 stitches from the eyes and attach yarn in round 19. Chain 10 and start crocheting in the 3rd chain from hook 8 DC. Skip 2 stitches, fasten off and make sl st in the next stitch.
Info :
Fasten off, break yarn, and hide the tail.
Info :
Click the icon to watch how to crochet the ears.
— Forelock :
Info :
Embroider the forelock on the top of the head with brown YarnArt Mink yarn. Make 8-10 stitches. Create the hairstyle.
— Collar :
Info :
Chain the required number of chains with red yarn. I made 35 chains.
Info :
Put the collar onto the toy, tie it into a few knots, and hide the tail inside the toy.
This charming Grinch and his friends pattern gives you everything you need to crochet three adorable mini amigurumi characters. Whether you make them as ornaments, gifts, or a festive shelf display, they are full of personality and tiny details. Happy crocheting and warm holiday vibes from my hooks to yours! 🧶🎄