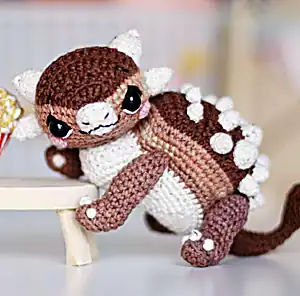
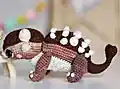
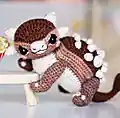
Create your very own adorable Ankylosaurus Bruno with this delightful crochet pattern! This charming dinosaur features distinctive spikes along his back and a massive club tail, just like the real prehistoric creature. Bruno is perfect for dinosaur lovers and makes a wonderful gift for children or collectors. With his cute expression and sturdy build, this little tank of a dinosaur will become a treasured companion for movie nights and imaginative play adventures.
Progress Tracker
0% Complete
— HEAD :
Round 1 :
11 loops, turning, 10sc (starting from the 2nd loop from the hook) (10l)
Round 2 :
1 loop, turning, inc, 8sc, inc (12l)
Round 3 :
1 loop, turning, 12sc (12l)
Round 4 :
1 loop, turning, inc, 10sc, inc (14l)
Round 5 :
1 loop, turning, 14sc only through front loops (14l)
Round 6-7 :
1 loop, turning, 14sc (14l)
Round 8 :
1 loop, turning, dec, 10sc, dec (12l)
Round 9 :
1 loop, turning, 12sc only through front loops (12l)
Round 10-11 :
1 loop, turning, 12sc (12l)
Round 12 :
1 loop, turning, inc, 10sc, inc (14l)
Round 13 :
1 loop, turning, 14sc only through front loops (14l)
Round 14-15 :
1 loop, turning 14sc (14l)
Round 16 :
1 loop, turning, dec, 10sc, dec (12l)
Round 17 :
1 loop, turning, 12sc only through front loops (12l)
Round 18 :
1 loop, turning, dec, 8sc, dec (10l)
Round 19 :
1 loop, turning, [dec]х2, 2sc, [dec]х2 (6l)
Round 20 :
1 loop, turning, 6sc (6l)
Round 21 :
1 loop, turning, 6sc only through front loops (6l)
Round 22 :
1 loop, turning, dec, 2sc, dec (4l)
Info :
Change to yarn B, crochet around perimeter counter-clockwise from start point
Round 23 :
22sc up; 10sc straight; 22sc down; 4sc straight (58l)
Round 24 :
4sc, dec, 10sc, dec, 18sc, dec, 10sc, dec, 8sc (54l)
Round 28 :
[7sc, dec]х6 (48l)
Round 29 :
[6sc, dec]х6 (42l)
Round 30 :
[5sc, dec]х6 (36l)
Round 31 :
[sc, dec]х12 (24l)
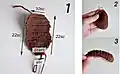
— MUZZLE :
Round 1 :
5 loops, turning, 4sc (starting from the 2nd loop from the hook), 4sc (from the back of the chain) (8l)
Round 2 :
[sc, inc]х4 (12l)
Round 3 :
12sc, sl st in the 1st sc (12l)
— SPIKES :
Small Spikes (2 pcs) Round 1 :
2 loops, 4sc in 2nd loop from hook (amigurumi ring) (4l)
Round 4 :
[3sc, inc]х2 (10l)
Round 6 :
[4sc, inc]х2 (12l)
Big Spikes (2 pcs) Round 1 :
2 loops, 3sc in 2nd loop from hook (amigurumi ring) (3l)
Round 2 :
sc, inc, sc (4l)
Round 3 :
[sc, inc]х2 (6l)
Round 5 :
[2sc, inc]х4 (16l)
Round 7 :
[7sc, inc]х2 (18l)
— BODY :
Back Round 1 :
14 loops, turning, 13sc (starting from the 2nd loop from the hook) (13l)
Round 2 :
1 loop, turning, 13sc (13l)
Round 3 :
1 loop, turning, inc, 11sc, inc (15l)
Round 4 :
1 loop, turning, 15sc only through front loops (15l)
Round 5 :
1 loop, turning, inc, 13sc, inc (17l)
Round 24 :
crochet 22sc, 13sc, 22sc on the back; crochet 13sc on the tail (70l)
Round 28 :
[5sc, dec]х10 (60l)
Round 29 :
[8sc, dec]х6 (54l)
— LEGS :
Front Legs (2 pcs) Round 1 :
5 loops, turning, 4sc (starting from the 2nd loop from the hook), 4sc (from the back of the chain) (8l)
Round 2 :
3sc in the next loop, 6sc, 3sc in the next loop (12l)
Round 3 :
only through back loops 12sc (12l)
Round 4-5 :
[inc]х2, 3sc, {sc3tog}, 4sc (12l)
Round 15 :
[sc, dec]х4 (8l)
Round 16 :
[2sc, dec]х2 (6l)
This enchanting Ankylosaurus Bruno pattern brings prehistoric charm to your crochet collection! With his characteristic armor plating, club tail, and sweet cinema-loving personality, Bruno is perfect for dinosaur enthusiasts of all ages. The pattern includes detailed photo instructions and even a bonus popcorn bucket to complete his movie theater adventure. Every stitch tells the story of this little armored warrior who's as tough as he is adorable. 🦕 Happy crocheting! 🧶✨