🧢 Beautiful ✨ Detailed πŸ’ Adorable

Groot Amigurumi Pattern

Groot Amigurumi Pattern
4.2β˜… Rating
5-7 Hours Time Needed
4.2K Made This
βœ‚οΈ

Intermediate Level

Ideal for those with basic crochet experience, featuring slightly more advanced stitches and techniques to expand your skills.

⏱️

Weekend Treat

Takes 5-7 hours, making it an enjoyable project to finish over a couple of days.

🧸

Cute Companion

An adorable friend to cherish, handcrafted with love to bring comfort and joy for years to come.

About This Groot Amigurumi Pattern

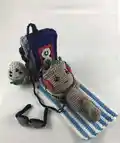
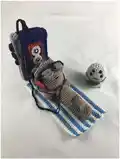
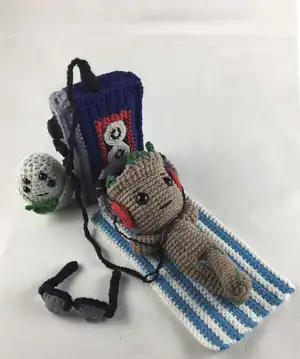
This pattern creates a small Groot amigurumi complete with a crown, embroidered vines, smile, and tiny headphones. You will crochet legs, body, head, crown, arms and accessories, then assemble and decorate for the finished look. The pattern includes photo references and full round-by-round instructions to help you through every step.

Groot Amigurumi Pattern crochet pattern - detailed view of completed project

Perfect for intermediate crocheters who enjoy shaping and finishing details. The finished toy is compact and makes a lovely gift or keepsake.

Why You'll Love This Groot Amigurumi Pattern

I absolutely love this pattern because it captures so much personality in a small crochet figure with simple stitches. I enjoy the mix of shaping rounds and fun finishing touches like the crown and embroidered vines that make Groot feel alive. Seeing the tiny headphones and smile come together brings me so much joy, and I hope it does for you too. The pattern is detailed and photo-supported, so I feel confident sharing this design with other crocheters.

Groot Amigurumi Pattern step 1 - construction progress Groot Amigurumi Pattern step 2 - assembly progress Groot Amigurumi Pattern step 3 - details and accessories Groot Amigurumi Pattern step 4 - final assembly and finishing

Switch Things Up

I love how versatile this pattern is for customization; try changing yarn colors to create a different mood for your Groot.

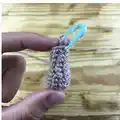
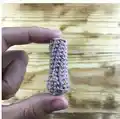
I often make a mini version by using thinner thread and a 1.75mm hook for a tiny keychain-sized Groot.

To make a chunkier, cuddlier Groot, use a bulkier yarn and larger hook β€” adjust safety eye sizes for proportion.

I sometimes add wire inside the arms or body for posability so the figure can sit or wave.

Swap the crown color or remove the crown altogether for a simpler character look.

Try embroidering different vine patterns or add small felt leaves for a mixed-media finish.

Make matching accessories like a tiny scarf or knitted blanket to give Groot personality and story.

I also change eye placement slightly to alter expression β€” move eyes closer for a cuter look or wider for a surprised expression.

Use metallic thread or beads for tiny jewelry accents if you want a fancier finished piece.

If you want a safer toy for young children, replace safety eyes with embroidered eyes and secure all embellishments very carefully.

Common Mistakes & How to Fix Them

βœ— Working without stitch markers during rounds can lead to lost counts and uneven shaping; use a marker at the beginning of each round so you always know where to start and count regularly. βœ— Skipping stuffing until late causes difficulty shaping the limbs and body; stuff gradually while you crochet, especially before closing decreases to keep the shape even. βœ— Not counting increases and decreases carefully will change stitch counts unexpectedly; recount after every increase/decrease round and compare to the target stitch total printed in the pattern. βœ— Pulling stitches too tight when sewing pieces in place will distort the seams and shape; use even, gentle tension while sewing and pin parts first to check placement. βœ— Forgetting to hide and secure yarn tails can cause unraveling over time; always weave in ends securely and tie off hidden threads when finishing small details.

Groot Amigurumi Pattern

Make your own adorable Groot amigurumi with this detailed crochet pattern. You will follow step-by-step rounds, shaping, and assembly to create a poseable little Groot with a crown, embroidered decorations and tiny headphones. The pattern uses fine yarn and clear photos to guide you β€” perfect for gifting or display. Grab your hook and enjoy bringing this tiny tree friend to life.

Intermediate 5-7 Hours

Materials Needed for Groot Amigurumi Pattern

β€” Main Fabric

  • 01
    Yarn: brown, green, red, black, blue, gray, light gray, white, azure (55% cotton + 45% acrylic), 180 yds/1.76 oz (#2 fine)
  • 02
    Small amounts of red and gray for headphones and trim
  • 03
    Black fine yarn for facial embroidery and smile

β€” Tools Required

  • 01
    Crochet hook size 2.5mm
  • 02
    Small crochet hook 1.40mm for fine embroidery (for smile)
  • 03
    Needle for sewing and embroidery
  • 04
    Scissors
  • 05
    Polyester stuffing (filler)
  • 06
    Two 9mm black plastic safety eyes
  • 07
    Four 6mm black plastic safety eyes (for other accents)
  • 08
    Stitch markers
  • 09
    Pins for assembly

Progress Tracker

0% Complete

β€” Legs :

Round 1 :

6sc in MR;

Round 2 :

6inc (12);

Round 3 :

12sc BLO (crochet in the back loop of the stitches) (12);

Round 4-5 :

12sc (2row);

Round 6 :

dec, 4sc, dec, 4sc (10);

Round 7 :

dec, 8sc (9);

Round 8-14 :

9sc (7rows);

Round 15 :

8sc, slst;

Info :

Do not forget to fill the toy with filler while knitting. We do not cut the threads from the second leg, we continue to knit the body.

β€” Body :

Round 16 :

2ch, attach the first leg 9sc, 2sc by ch, 9sc on the second leg, 2sc by ch (22);

Round 17-25 :

22sc (9rows);

Round 26 :

(3sc, dec)*4, 2sc (18);

Round 27 :

(1sc, dec)*6 (12);

Round 28 :

12sc;

Info :

Do not forget to fill the toy with filler while knitting. We continue to knit the head.

β€” Head :

Round 29 :

12inc (24);

Round 30 :

(1sc, inc)*12 (36);

Round 31-32 :

36sc (2row);

Round 33 :

(5sc, inc)*6 (42);

Round 34-41 :

42sc (8rows);

Info :

Insert eyes in row 37, 5sc between the eyes. Check that everything is exactly and you like it and only then put on the puck. Do not forget to fill the toy with filler while knitting.

Round 42 :

(5sc, dec)*6 BLO (36);

Round 43 :

(4sc, dec)*6 (30)

Round 44 :

(3sc, dec)*6 (24)

Round 45 :

(2sc, dec)*6 (18)

Round 46 :

(1sc, dec)*6 (12)

Round 47 :

6dec. Cut and hide the thread.

β€” Crown :

Info :

Crown: brown. We return to the 42nd row, FLO (crochet in the front loop of the stitches).

Round 43 :

2ch, 42hdc, slst (42);

Round 44 :

ch, 11sc, 4hdc, 6dc, 2ch, slst into the next stitch, 2ch, 3dc, 1hdc, 16sc, slst (41);

Info :

Tie and hide excess threads.

Info :

Insert the green thread into the 17th loop of the 44th row of the crown.

Round 45 :

2ch, 2dc, 1hdc. Tie and hide excess threads.

Info :

Insert the thread again in the 44th row in the 22nd loop from the beginning of the row.

Round 45 :

2ch, 1hdc, 1sc. Cut and hide the threads.

Info :

Once again, insert the thread now into the 29th loop of the 44th row of the crown.

Round 45 :

2ch, 1hdc, 1sc. Tie and hide excess threads.

β€” Arms :

Round 1 :

5sc in MR;

Round 2 :

5sc;

Round 3 :

inc, 4sc (6);

Round 4 :

6sc;

Round 5 :

inc, 5sc (7);

Round 6 :

7sc;

Round 7 :

inc, 6sc (8);

Round 8-14 :

8sc (7rows);

Info :

Fill the lower part of the arm to the 8th row, then fold and hold the 8th row to fill the upper part of the arm.

Round 15 :

fold the edges together and knit 3sc. Cut off the thread, leaving 4 inch for sewing.

Info :

With another thread of the same color, sew the 8th row, tie and hide the extra threads.

Info :

Sew on arms in row 26, tie and hide excess threads.

β€” Smile :

Info :

Smile: black. Divide a large piece of yarn into two thinner threads. Then divide the thin thread into two more thin threads. We knit with the thinnest single thread. Hook 1.40mm.

Round 1 :

5ch.

Info :

Cut off the thread, leaving 4 inch for sewing. Sew on a smile in the 33rd row, tie and hide the extra threads.

β€” Decorations :

Info :

Decorations: green. Divide a large piece of yarn into two thinner threads. Embroider the decoration as shown in the pictures. Then one of the separated threads is divided again into two thinner threads. Use a single thread to embroider thin jewelry as shown in the pictures.

β€” Headphones (start black) :

Round 1 :

6sc in MR

Round 2 :

at the beginning change color to red 6inc (12)

Round 3 :

(1sc, inc)*6 (18)

Round 4 :

18sc

Round 5 :

(1sc, dec)*6 (12)

Round 6 :

6dec. Cut and hide the threads.

β€” Headphones part 2 (gray) :

Round 1 :

33ch, turn;

Round 2 :

32sc, ch, turn (32);

Round 3 :

32sc. Cut off the thread, leaving 8 inch for sewing.

Info :

Fold the first row to the third and sew along the entire length. Then sew the second part of the headphones to the first and to the head. Do as shown in the pictures.

Info :

Insert the thread into the rim of the headphones and embroider about 0.3 inches. Then tie and hide the extra threads.

Assembly Instructions

  • Attach the legs to the body using the chain connector created in round 16: position the first leg and crochet 9sc, then chain 2 and join the second leg with 9sc and 2sc by chain; sew securely and weave in ends.
  • Insert safety eyes between rounds 36-38 (insert eyes in row 37) with 5sc between them, then stuff the head firmly before continuing decreases and finishing.
  • Sew arms to the body at row 26, pinning both arms symmetrically before stitching and hiding excess threads when finished.
  • Embroider facial details and vines using thin green and black threads as shown, dividing yarn into thinner threads for delicate stitches and hiding tails after knotting.
  • Sew the headphones together and attach them to the head by sewing the gray band and red ear cups into place, then embroider rim details and hide threads.
  • Pin and sew the folded hands to the head following the photo references and stitch securely, making sure the arms and hands are evenly placed and symmetrical.

Important Notes

  • πŸ’‘Use stitch markers to mark the beginning of each round, especially during increases and decreases to keep accurate stitch counts.
  • πŸ’‘Stuff the toy gradually while crocheting so you can shape limbs and the head properly before closing decreases.
  • πŸ’‘Weave in and hide all thread tails securely after finishing sections to prevent unraveling and to keep the finished toy neat.

This tiny Groot amigurumi is full of character and small details that make it uniquely lovable. The crown, embroidered vines and tiny headphones add playful personality for display or gifting. Create your own handmade Groot and enjoy every stitch of this charming little project. 🧢🌱

You ask,

we answer.

FAQs

What size will the finished piece be?

The finished amigurumi measures approximately 12-15 cm tall when using the recommended fine yarn and a 2.5 mm hook; final size depends on your tension.

Can I use different yarn weights for this pattern?

Yes, you can use different yarn weights but this will change the final size and stitch counts; adjust hook size and be prepared for proportion differences.

Do I need prior crochet experience for this pattern?

This pattern is rated intermediate, so basic knowledge of single crochet, increases, decreases, magic ring and simple embroidery is recommended.

How long does this project typically take to complete?

Most crocheters complete this project in 5-7 hours, though time may vary depending on experience level, finishing details, and embroidery work.