🧶 Beautiful ✨ Detailed 💝 Adorable

Halloween cats Amigurumi Pattern

Halloween cats Amigurumi Pattern
4.3★ Rating
5-7 Hours Time Needed
2.1K Made This
✂️

Intermediate Level

Ideal for those with basic crochet experience, featuring slightly more advanced stitches and techniques to expand your skills.

⏱️

Weekend Treat

Takes 5-7 hours, making it an enjoyable project to finish over a couple of days.

🧸

Cute Companion

An adorable friend to cherish, handcrafted with love to bring comfort and joy for years to come.

About This Halloween cats Amigurumi Pattern

This pattern will help you crochet two tiny Halloween cats wearing witch hats, full of cute details. It includes full round-by-round instructions for each piece so you can follow easily. The design uses sport-weight yarn and a small hook to create a compact, polished amigurumi.

Halloween cats Amigurumi Pattern crochet pattern - detailed view of completed project

Photos in the tutorial show each step to make assembly easier. You can change yarn colors to personalize your cats.

Why You'll Love This Halloween cats Amigurumi Pattern

I absolutely love this pattern because it combines simple amigurumi shaping with a playful witch hat that gives so much character. I enjoy the way the small details — like the tiny buckle and curled hat tip — bring each cat to life. The pattern is satisfying to work through because each piece is quick to crochet yet rewarding to assemble. I also love how versatile it is: swapping colors instantly changes the mood of the toy.

Halloween cats Amigurumi Pattern step 1 - construction progress Halloween cats Amigurumi Pattern step 2 - assembly progress Halloween cats Amigurumi Pattern step 3 - details and accessories Halloween cats Amigurumi Pattern step 4 - final assembly and finishing

Switch Things Up

I love experimenting with color schemes for these cats; try pastel purples and creams for a softer look or neon accents for a playful twist.

You can make a miniature keychain version by using thinner yarn and a smaller hook to create tiny, portable cats.

To create a larger, cuddlier version, use bulky yarn and increase hook size — the hat and body will become more huggable.

I often swap the buckle color to metallic embroidery thread or a little button for a different focal point.

Try embroidering different facial expressions: a tiny smile, whisker shapes, or closed eyes to change the personality.

Adding a small piece of wire inside the hat tip lets you pose the hat into fun shapes; just be sure to secure the wire ends safely inside the stuffing.

Make a whole family of cats by changing ear shapes, paw colors, or hat styles — each adjustment makes a new character.

I sometimes add felt accessories like tiny stars, moons, or a ribbon band around the hat for extra charm.

For a spooky effect, embroider or add small felt eyes and a tiny embroidered mouth, or try black yarn for a classic witch-cat look.

You can personalize gifts by sewing a small initial or date inside the hat brim or on the base using contrasting thread.

Common Mistakes & How to Fix Them

✗ Using a larger hook than recommended will make the toy too big and the stitches loose; use the suggested 1.75 mm or adjust yarn/hook together to keep tight stitches. ✗ Not using stitch markers during rounds can cause missed increases or decreases; place a marker at the start of each round to maintain correct stitch counts. ✗ Overstuffing the body and limbs can distort the shape and make sewing difficult; stuff gradually, checking shape as you go and adding small amounts of fiberfill. ✗ Skipping the step of aligning tail stitches side-by-side will prevent a neat finished tail shape; straighten the tail and close the open end with 4 sc across as instructed.

Halloween cats Amigurumi Pattern

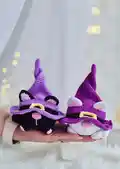
Make two adorable witch-hat cats perfect for Halloween decor or sweet handmade gifts. This pattern guides you through all pieces — body, ears, nose, paws, tail, hat and buckle — with clear step-by-step rounds and photos. You will enjoy assembling charming little cats with a playful hat and tiny details that give each one personality.

Intermediate 5-7 Hours

Materials Needed for Halloween cats Amigurumi Pattern

— Main Fabric

  • 01
    Sport weight/4ply Yarn Art Jeans (50g/160m) - Color 72 purple (amount as desired)
  • 02
    Sport weight/4ply Yarn Art Jeans (50g/160m) - Color 88 yellow (for buckle detail)
  • 03
    Sport weight/4ply Yarn Art Jeans (50g/160m) - Color 36 pink (nose and paw pads)
  • 04
    Sport weight/4ply Yarn Art Jeans (50g/160m) - Color 74 light pink (ear inner)
  • 05
    Sport weight/4ply Alize Cotton Gold (100g/330m) - Color 55 white (main body)
  • 06
    Sport weight/4ply Alize Cotton Gold (100g/330m) - Color 60 black (alternate body and hat band)
  • 07
    Polyester fiberfill for stuffing

— Tools Required

  • 01
    Crochet hook - 1.75 mm (or any type you prefer)
  • 02
    Fiberfill / polyester stuffing
  • 03
    Scissors
  • 04
    Needle for embroidery and sewing pieces
  • 05
    Pins for attaching details
  • 06
    Stitch markers
  • 07
    Yarn needle for weaving in ends

Progress Tracker

0% Complete

— Body :

Info :

Start crocheting with white thread. Stuff with fiberfill in the process.

Round 1 :

8 sc in MR

Round 2 :

8 inc (16)

Round 3 :

(1 sc, inc) * 8 (24)

Round 4 :

1 sc, inc, (2 sc, inc) * 7, 1 sc (32)

Round 5 :

(3 sc, inc) * 8 (40)

Round 6 :

2 sc, inc, (4 sc, inc) * 7, 2 sc (48)

Round 7 :

(5 sc, inc) * 8 (56)

Round 8 :

3 sc, inc, (6 sc, inc) * 7, 3 sc (64)

Round 9-21 :

64 sc (13 rounds)

Round 22 :

3 sc, dec, (6 sc, dec) * 7, 3 sc (56)

Round 23 :

(5 sc, dec) * 8 (48)

Round 24 :

2 sc, dec, (4 sc, dec) * 7, 2 sc (40)

Round 25 :

(3 sc, dec) * 8 (32)

Round 26 :

1 sc, dec, (2 sc, dec) * 7, 1 sc (24)

Round 27 :

(1 sc, dec) * 8 (16)

Round 28 :

8 dec (8)

Info :

Cut the yarn, fasten off, sew the hole and hide the yarn tail inside the detail. (photo 1)

— Ears (make 2) :

Info :

1 PART (make 2). Start crocheting with light pink thread. Work in rows.

Round 1 :

4 sc in MR, ch 1, turn

Round 2 :

4 inc (8), ch 1, turn

Round 3 :

1 sc, inc, 1 sc, (hdc, dc, hdc in one stitch), (1 sc, inc) * 2 (13)

Info :

Change color to white.

Round 4 :

Ch 1, turn, 2 sc, inc, 3 sc, (hdc, dc, hdc in one stitch), 2 sc, inc, 3 sc (17)

Info :

Cut the yarn, fasten off.

Info :

2 PART (make 2). Start crocheting with white thread. Work in rows.

Round 1 :

4 sc in MR, ch 1, turn

Round 2 :

4 inc (8), ch 1, turn

Round 3 :

1 sc, inc, 1 sc, (hdc, dc, hdc in one stitch), (1 sc, inc) * 2 (13), ch 1, turn

Round 4 :

2 sc, inc, 3 sc, (hdc, dc, hdc in one stitch), 2 sc, inc, 3 sc (17)

Info :

(photo 2) Don't cut the thread. Now put two parts together and crochet SL ST in the round. Cut the yarn, fasten off, leaving a long thread for sewing. (photo 3, 4)

— Nose :

Info :

Start crocheting with pink thread. Make chain 6, start to crochet on the second chain from the hook:

Round 1 :

4 sc, 3 sc in the last loop on the other side off the chain: 3 sc, inc (12)

Round 2 :

12 sc

Round 3 :

6 dec (6)

Info :

Fill in with fiberfill. Cut the yarn, fasten off, sew the hole and leaving a long thread for sewing. (photo 5)

— Paws (make 2) :

Info :

Start crocheting with light pink thread. Make chain 4, start to crochet on the second chain from the hook:

Round 1 :

2 sc, 3 sc in the last loop on the other side off the chain: 1 sc, inc (8)

Info :

Change color to white.

Round 2 :

inc, 1 sc, 3 inc, 1 sc, 2 inc (14)

Round 3 :

1 sc, inc, 1 sc, (1 sc, inc) * 3, 1 sc, (1 sc, inc) * 2 (20)

Round 4-5 :

20 sc (2 rounds)

Round 6 :

(3 sc, dec) * 4 (16)

Round 7 :

8 dec (8)

Info :

Fill in the paws lightly with fiberfill. Cut the yarn, fasten off, leaving a long thread for sewing. (photo 6)

— Tail :

Info :

Start crocheting with white thread. Stuff slightly with fiberfill in the process.

Round 1 :

6 sc in MR

Round 2 :

6 inc (12)

Round 3 :

(1 sc, inc) * 6 (18)

Round 4-6 :

18 sc (3 rounds)

Round 7 :

(1 sc, dec) * 6 (12)

Round 8-10 :

12 sc (3 rounds)

Round 11 :

(2 sc, dec) * 3 (9)

Round 12-18 :

9 sc (7 rounds)

Info :

Straighten your tail and align the stitches side by side. Close the open end with a hook 4 sc across. Cut the yarn, fasten off, leaving a long thread for sewing. (photo 7)

Info :

Sew the ears to the body between 3rd and 10th Rounds with 5 sc between them. (photo 8, 9)

Info :

Sew the nose in the center between 10th and 11st Rounds. (photo 10)

Info :

Sew the paws symmetrically on the sides to between 21st and 22th Rounds. (photo 11)

Info :

Sew the tail on the side to between 19th and 22th Rounds. (photo 12, 13)

— Hat :

Info :

Start crocheting with purple thread.

Round 1 :

6 sc in MR

Round 2 :

6 sc (6)

Round 3 :

6 inc (12)

Round 4-7 :

12 sc (4 rounds)

Round 8 :

(3 sc, inc) * 3 (15)

Round 9-11 :

15 sc (3 rounds)

Round 12 :

(2 sc, inc) * 5 (20)

Round 13-14 :

20 sc (2 rounds)

Round 15 :

(1 sc, inc) * 10 (30)

Round 16 :

30 sc

Round 17 :

inc, 29 sc (31)

Round 18 :

inc, 30 sc (32)

Round 19 :

32 sc

Round 20 :

(3 sc, inc) * 8 (40)

Round 21 :

(3 sc, dec) * 8 (32)

Round 22 :

(inc, 15 sc) * 2 (34)

Round 23 :

(inc, 16 sc) * 2 (36)

Round 24 :

(inc, 17 sc) * 2 (38)

Round 25 :

(inc, 18 sc) * 2 (40)

Round 26 :

(inc, 19 sc) * 2 (42)

Round 27 :

(inc, 6 sc) * 6 (48)

Round 28 :

(inc, 7 sc) * 6 (54)

Round 29-30 :

54 sc (2 rounds)

Round 31 :

(inc, 8 sc) * 6 (60)

Round 32 :

(inc, 9 sc) * 6 (66)

Info :

(photo 14)

Round 33 :

20 sc, ch 10, skip 10 stitch, 5 sc, ch 10, skip 10 stitch, 21 sc (66)

Info :

(photo 15-17)

Round 34 :

66 sc (photo 18)

Round 35 :

(inc, 10 sc) * 6 (72)

Round 36-37 :

72 sc (2 rounds)

Info :

Change color to black.

Round 38-41 :

72 sc (4 rounds) (photo 19)

Info :

Change color to purple.

Round 42 :

FLO: (2 sc, inc) * 24 (96)

Round 43 :

(3 sc, inc) * 24 (120)

Round 44-46 :

120 sc (3 rounds)

Info :

Cut the yarn, fasten off, weave in the ends. (photo 20, 21)

— Buckle :

Info :

Start crocheting with yellow thread. Make Ch 22. Making sure that the ch is not twisted, sl st into the first ch to join. (photo 22)

Round 1 :

(7 sl st, 3 sl st in one stitch, 2 sl st, 3 sl st in one stitch) * 2

Info :

Cut the yarn, fasten off, leaving a long thread for sewing. (photo 23)

Info :

Sew the buckle to the hat. (photo 24)
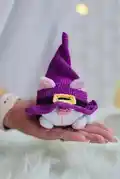
Info :

Put the hat on the cat. (photo 25)

Info :

Your the Halloween cats are ready!

Assembly Instructions

  • Sew the ears to the body between 3rd and 10th rounds with approximately 5 single crochet stitches between them for even spacing and symmetry.
  • Sew the nose in the center between the 10th and 11th rounds, securing firmly and hiding the yarn tail inside the piece.
  • Sew the paws symmetrically on the sides between the 21st and 22nd rounds so the cat sits balanced and stable.
  • Sew the tail on the side between the 19th and 22nd rounds, aligning the tail base and securing with small stitches for durability.
  • Sew the yellow buckle to the hat in the center front, then place and adjust the hat on the cat to find the best fit before final stitching.
  • When joining ear parts, place two ear pieces together and crochet slip stitches around the edge, fasten off leaving a long tail for sewing to the head.

Important Notes

  • 💡Choose the correct hook size which is appropriate for the yarn you are going to use; changing hook size will alter final toy dimensions.
  • 💡Use a stitch marker to mark the beginning of each round for convenient counting and to avoid misaligned rounds.
  • 💡Stuff all pieces as you go, firmly (unless otherwise stated), gradually adding small portions of stuffing and forming necessary shapes of pieces.
  • 💡These materials are recommended to help you recreate the toy as shown; using different yarn types or hook sizes will change the final look.

This cute pair of Halloween cats is designed to brighten your season with handmade charm. Bring them to life with your favorite yarn and a cozy seat on your shelf. They make lovely gifts or seasonal decor for friends and family. 🧶🎃

You ask,

we answer.

FAQs

What size will the finished piece be?

The finished cat measures approximately 5.51 inches (14 cm) in height when made with the recommended sport-weight yarn and a 1.75 mm hook.

Can I use different yarn weights for this pattern?

Yes, you can use different yarn weights, but this will affect the final size and stitch tension; choose an appropriate hook for the yarn and expect size variation.

Do I need prior crochet experience for this pattern?

This pattern is rated intermediate, so familiarity with single crochet, increases, decreases, half double and double crochet is recommended.

How long does this project typically take to complete?

Most crafters complete one cat (body and accessories) in about 5-7 hours, though time may vary based on experience and speed.