🧢 Beautiful ✨ Detailed πŸ’ Adorable

Bag with beads Amigurumi Pattern

Bag with beads Amigurumi Pattern
4.4β˜… Rating
5-7 Hours Time Needed
3.6K Made This
βœ‚οΈ

Beginner Friendly Level

Perfect for those just starting their crochet journey, with clear instructions and simple techniques

⏱️

Weekend Treat

Takes 5-7 hours, making it an enjoyable project to finish over a couple of days.

🏑

Cozy Accent

A warm touch for your space that transforms ordinary corners into inviting nooks filled with handmade charm.

About This Bag with beads Amigurumi Pattern

This pattern creates a beaded crochet tote bag made from cord and wooden beads. You will learn a repeating paired-row technique that places beads in every other double crochet for a textured surface. The pattern includes clear step-by-step instructions for the base, bead rows, and reinforced handles.

Bag with beads Amigurumi Pattern crochet pattern - detailed view of completed project

Perfect for beginners ready to try beadwork without complicated shaping. The finished bag measures approximately 12x14 inches with a 22-inch handle.

Why You'll Love This Bag with beads Amigurumi Pattern

I absolutely love this pattern because it turns simple cord and beads into a stunning, wearable accessory that feels both modern and handmade. I enjoy how repeating rows create a rhythmic, meditative crochet process while the beads add a tactile, decorative element. The handles are designed to be sturdy yet elegant, and I appreciate how the pattern is accessible to beginners while producing professional results. Making this bag feels rewardingβ€”each bead placement visibly transforms the fabric and makes the piece unique.

Bag with beads Amigurumi Pattern step 1 - construction progress Bag with beads Amigurumi Pattern step 2 - assembly progress Bag with beads Amigurumi Pattern step 3 - details and accessories Bag with beads Amigurumi Pattern step 4 - final assembly and finishing

Switch Things Up

I like to experiment with different cords and beads to change the look; try a colorful cord with neutral beads for contrast.

You can make a smaller version by using thinner cord and a 2.5 mm hook to create a mini beaded purse or keychain accessory.

If you want a chunkier, more dramatic tote, use a bulky cord and larger beads and increase hook size for a more open fabric.

I often add a lining to my bag for durability and to protect delicate items; sew a simple fabric liner and stitch it in place before finishing the handles.

Try metal or glass beads instead of wood for a dressier effect and be sure their hole fits your cord comfortably.

I sometimes embroider initials or a small motif on the lining to personalize the bag as a gift for someone special.

For a shoulder-friendly strap, add a padded fabric strip between the handle layers before stitching them closed.

You can create color blocks by swapping cord color every few bead rowsβ€”this gives a fun gradient or striped effect.

If you want more structure, insert a thin plastic canvas at the base or between handle layers to help the bag keep its shape when loaded.

I recommend practicing the ECS row on a small swatch first to get comfortable with bead spacing before starting the full bag.

Common Mistakes & How to Fix Them

βœ— Skipping the required second loop at the start can reduce stitch count and distort the base; always work the first series of single crochets into the second loop from hook to maintain the correct foundation. βœ— Not stringing enough beads before beginning will interrupt your rhythm and force you to add beads mid-row; pre-string at least the number of beads recommended (950) or ensure extra beads are available. βœ— Forgetting to hide thread ends as instructed causes loose tails and an untidy finish; bury ends along the stitches and trim flush for a clean look. βœ— Working with inconsistent tension makes bead rows sit unevenly and can change bag dimensions; maintain steady tension and check gauge frequently to match the pattern measurements.

Bag with beads Amigurumi Pattern

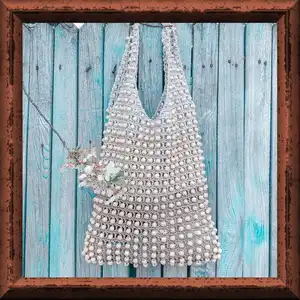
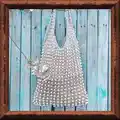
Make a stylish, textured bag embellished with wooden beads using simple crochet techniques. This pattern guides you through creating the base, adding beads row-by-row, and crocheting reinforced handles for durability. Perfect for gifting or elevating your wardrobe with a handmade accessory, the result is a wearable, sculptural tote with beautiful bead detail.

Beginner Friendly 5-7 Hours

Materials Needed for Bag with beads Amigurumi Pattern

β€” Main Fabric

  • 01
    Any cord 2-3 mm, 230 m/100 g, 2-3 skeins of 230 m each (example uses Maccaroni Knit & Shine).
  • 02
    Wooden beads D10 mm with 3 mm hole β€” approximately 950 beads required.
  • 03
    Optional additional 50 g of cord for reinforcement or trimming.

β€” Tools Required

  • 01
    Crochet hook size 3 mm
  • 02
    Scissors
  • 03
    Wooden beads D10 mm, hole 3 mm (approx. 950)
  • 04
    Stitch markers (optional)
  • 05
    Tapestry/yarn needle for hiding ends
  • 06
    Measuring tape
  • 07
    Surface to lay the bag base flat while creating handles

Progress Tracker

0% Complete

β€” Crochet the bag base :

Info :

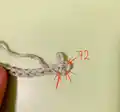
Crochet chain of the 72CH

Round 1 :

With the second loop from the hook crochet 69SC, in 1st CH crochet 3SC. In reverse crochet 69SC. In 71st CH crochet 2SC. In 72nd CH crochet SlSt (143). ECS.

Info :

Next, crochet the same, repeating pairs of rows:

Round 2 :

(1CH, skip the loop of previous row, 1DC with bead, 1CH, skip the loop of previous row, 1DC without bead)*36, SlSt. CH. There must be 36 beads in one row.

Round 3 :

143 SC: (1SC under CH of previous row, 1SC in DC with bead, 1SC under CH of previous row, 1SC in DC without bead)*35, 1SC under CH of previous row, SlSt (143). ECS.

Info :

Repeat 18-20 pairs of rows. In this example - 20 pairs.

Info :

Last row ends SlSt, cut the thread and hide its end along the stitches.

β€” Crochet the handles :

Right handle (P1) :

Put the base of the bag on a flat surface. Find the side DC without bead on the right side. Insert the hook over the right DC without the bead, pull the loop on the right side. Crochet 3CH with two threads together. Bend the end of the thread. Next, proceeds crocheting with one thread. Hide its end along the stitch. (CH, DS with bead, CH, DS without bead)*7. CH, SlSt above DS with bead of the previous row. Turn over.

Round 1 :

30SC, turn over, ECS.

Round 2 :

(CH, DC with bead, CH, DC without bead)*6. CH, SlSt over DC without bead of the previous row. Turn over. 26SC, turn over, ECS.

Round 3 :

(CH, DC with bead, CH, DC without bead)*5. CH, SlSt over DC without bead of previous row. Turn over. 22SC, turn over, ECS.

Round 4 :

(CH, DC with bead, CH, DC without bead)*4. CH, SlSt over DC without bead of previous row. Turn over. 18SC, turn over, ECS.

Round 5 :

(CH, DC with bead, CH, DC without bead)*3. CH, SlSt over DC without bead of previous row. Turn over. 14SC, turn over, ECS.

Round 6 :

(CH, DC with bead, CH, DC without bead)*3. Turn over. CH. 11SC, turn over, ECS.

Info :

Repeat 6th pair of rows 8 times. Cut the thread and hide its end along the stitches.

Left handle (P1) :

Find the side DC without beads on the left side. Counting to the right 8 beads. Insert the hook over the DC with 8th bead, pull the loop on the right side. Crochet 1CH with two threads together, 1DC over DC without bead of previous row. Bend the end of the thread. Next, proceed crocheting with one thread. Hide its end along the stitch. (CH, DS with bead, CH, DS without bead)*7. CH. Turn over.

Round 1 :

28SC (last SC crochet over 1st DC without bead of previous row). Turn over.

Round 2 :

CH, DC, (CH, DC with bead, CH, DC without bead)*6. CH. Turn over. 24SC (last SC crochet over 1st DC without bead of previous row). Turn over.

Round 3 :

CH, DC, (CH, DC with bead, CH, DC without bead)*5. CH. Turn over. 20SC (last SC crochet over 1st DC without bead of previous row). Turn over.

Round 4 :

CH, DC, (CH, DC with bead, CH, DC without bead)*4. CH. Turn over. 16SC (last SC crochet over 1st DC without bead of previous row). Turn over.

Round 5 :

CH, DC, (CH, DC with bead, CH, DC without bead)*3. CH. Turn over. 12SC, turn over, ECS.

Round 6 :

(CH, DC with bead, CH, DC without bead)*3. CH. Turn over. 11SC, turn over, ECS.

Info :

Repeat 6th pair of rows 8 times. Cut the thread and hide its end along the stitches.

Info :

Turn over the bag to the other side and crochet again left and right handles.

Info :

Then, fold left and right handles face to face. Crochet 11SC on both handles. Repeat it for the 2nd pair of handles.

Info :

Cut the thread and hide its end along the stitches.

Info :

Congratulations! Your bag is ready!

Assembly Instructions

  • Fold left and right handles face to face and crochet 11 SC along the joined edges to secure them together.
  • After completing handle rows on one side, turn the bag to the other side and repeat the handle crochet sequence to create a second reinforced layer for each handle.
  • When the handle panels are completed, fold each pair of handle pieces together and sew or crochet 11 SC across both layers to join them into a single reinforced strap.
  • Cut any remaining thread and hide each end along the stitches by weaving them through adjacent loops to keep the finish tidy and secure.
  • Ensure bead rows line up evenly when folding and joining handles so beads are visible and symmetrical on both sides of the finished bag.

Important Notes

  • πŸ’‘Use the second loop from the hook when working the foundation single crochets to match the pattern gauge and base shape.
  • πŸ’‘Pre-string enough beads before starting bead rows to avoid stopping mid-row; the pattern uses approximately 950 beads.
  • πŸ’‘Hide and secure thread ends along the stitches as you go to avoid bulky areas and ensure a neat finish.
  • πŸ’‘Maintain consistent tension throughout bead and non-bead rows to keep the bag dimensions even and matching the stated measurements.

This beaded crochet bag makes a stunning, handcrafted accessory that elevates any outfit. The pattern is beginner-friendly and full of detail to help you succeed every step of the way. Whether you make it for yourself or as a thoughtful gift, it will brighten someone's day and wardrobe. 🧢✨

You ask,

we answer.

FAQs

What size will the finished piece be?

The finished bag measures approximately 12x14 inches (30.5x35.5 cm) with a handle length of 22 inches (55 cm) using the recommended cord and hook.

Can I use different yarn or cord weights for this pattern?

Yes, you can change cord thickness but it will affect the final size and bead fit; choose beads with holes large enough for your cord and adjust hook size accordingly.

Is this pattern suitable for beginners?

Yes, this pattern is labeled beginner friendly but requires patience with bead placement and paired-row repetition; basic knowledge of SC, DC, CH, and SlSt is helpful.

How many beads do I need and what size?

You will need approximately 950 wooden beads sized D10 mm with a 3 mm hole for the example shown in the pattern.