🧢 Beautiful ✨ Detailed πŸ’ Adorable

Hammerhead Shark Friend Amigurumi Pattern

Hammerhead Shark Friend Amigurumi Pattern
3.9β˜… Rating
2-4 Hours Time Needed
3.9K Made This
βœ‚οΈ

Intermediate Level

Ideal for those with basic crochet experience, featuring slightly more advanced stitches and techniques to expand your skills.

⏱️

Bite-Sized Project

Finishes in 2-4 hoursβ€”perfect for an afternoon of creative relaxation.

🧸

Cute Companion

An adorable friend to cherish, handcrafted with love to bring comfort and joy for years to come.

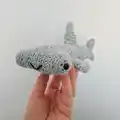
About This Hammerhead Shark Friend Amigurumi Pattern

This pattern creates a small, happy hammerhead shark amigurumi with a simple, flattened head and cute fins. You will work a compact head and a joined body, then add a large dorsal fin and smaller side fins. Techniques used include working in rounds, back loop only stitches and simple decreases for shaping. The pattern includes photos and tips to help you place eyes and attach fins for the best finished look.

Hammerhead Shark Friend Amigurumi Pattern crochet pattern - detailed view of completed project

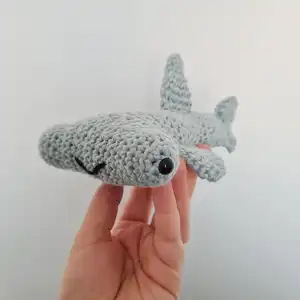
Recommended for crocheters comfortable with single crochet, increases and decreases, with options to use different yarn weights. The instructions include helpful notes about hook sizing, stuffing, and finishing touches like a sewn smile.

Why You'll Love This Hammerhead Shark Friend Amigurumi Pattern

I absolutely love this pattern because it turns simple stitches into a character full of personality. I enjoy how a few carefully placed decreases and a tiny smile can make such a friendly face. The pattern is flexible so I can experiment with yarn weight and hook size to create different sizes and textures. I also appreciate that it comes together quickly, making it perfect for gifting or practicing shaping techniques. Seeing the finished shark in photos always makes me smile and inspires new color variations.

Hammerhead Shark Friend Amigurumi Pattern step 1 - construction progress Hammerhead Shark Friend Amigurumi Pattern step 2 - assembly progress Hammerhead Shark Friend Amigurumi Pattern step 3 - details and accessories Hammerhead Shark Friend Amigurumi Pattern step 4 - final assembly and finishing

Switch Things Up

I love how easily this pattern adapts to different yarns; try pastel greys or blues for a softer, nursery-friendly shark or vivid teals for a lively ocean-inspired friend.

Want a tiny keychain version? Use fingering weight yarn and a much smaller hook to create a miniature shark perfect for attaching to bags or keys.

Make a giant plush by using bulky or super bulky yarn and a large hook β€” you will also need extra stuffing but the result is delightfully squishy.

I often change eye styles: safety eyes for a polished look, embroidered eyes for baby-safe toys, or tiny felt circles for a craftier finish.

Try adding stripes or a belly in a contrasting color by changing yarn between rounds β€” this can give your shark more personality with simple colorwork.

I sometimes sew on tiny accessories like a crochet bow or a tiny felt tag to personalize each shark and make it gift-ready.

If you want posable fins, consider inserting a small piece of florist wire into the fin before sewing it closed; bend gently to pose.

For textured skin, experiment with surface crochet or a few slipped stitches to create subtle ridges along the back.

I recommend testing your stitch tension on a swatch so the final piece feels correct; changing hook size by half-millimeters can make a big difference in the finished size.

Don’t be afraid to mix yarn types for fun effects β€” a fuzzy yarn for the dorsal fin or a cotton body with a sparkly yarn accent can create a unique and charming shark.

Common Mistakes & How to Fix Them

βœ— Skipping the instruction about stitch totals in brackets can cause confusion later; always check the number in brackets at the end of each round and count your stitches after each round. βœ— Using a hook that is too large will make loose stitches and stuffing show through; go down 0.5mm-1.0mm from the recommended size or adjust until you obtain a tight fabric. βœ— Forgetting to insert safety eyes in the specified beginning/end spaces will mean you have to reopen seams; place the eyes before closing the head and check spacing against the photo. βœ— Not decreasing at the edge stitches when instructed will change the shape of the head/body; if decreases are not sitting at the edge, adjust your stitch placement so one decrease occurs on each side as described. βœ— Overstuffing early can distort shaping as you continue; start stuffing gradually and add more as you shape the body to ensure smooth, even filling.

Hammerhead Shark Friend Amigurumi Pattern

Make a charming hammerhead shark amigurumi to brighten your day. This pattern walks you through each round with clear, friendly instructions so you can crochet a cuddly little shark. It uses DK yarn and a 4mm hook for a squishy finish, with options to adapt yarn and hook size. Perfect for gifting or keeping as a delightful handmade friend.

Intermediate 2-4 Hours

Materials Needed for Hammerhead Shark Friend Amigurumi Pattern

β€” Main Fabric

  • 01
    Grey yarn (main color) - suggested DK weight cotton yarn (used in sample)
  • 02
    Cotton DK yarn recommended with 4mm hook (sample yarn/weight)
  • 03
    Chunky yarn (optional) - for a larger, squishier version (use 5mm hook)

β€” Tools Required

  • 01
    Crochet hook 4mm (recommended)
  • 02
    Crochet hook 3mm (optional - for smaller DK result)
  • 03
    Crochet hook 5mm (optional - for chunky yarn larger result)
  • 04
    2 x safety eyes
  • 05
    Stuffing
  • 06
    Craft glue (small dollop optional to secure smile)

Progress Tracker

0% Complete

β€” Pattern notes :

Info :

The number in brackets at the end of each round indicates the total number of stitches. You can use whatever method you like to start your amigurumi, I prefer to chain 2 and work into the first stitch but if you like a magic circle you go right ahead. I used cotton DK yarn and a 4mm hook for this shark, but I've also made them using chunky yarn for an extra squishy pal. You can use whatever yarn you have to hand, I'd suggest sizing down your hook 0.5mm - 1.0mm from the recommended size to ensure your stitches are tight. DK yarn and a 3mm hook will result in a smaller item and chunky yarn and a 5mm hook will obviously be larger. But remember, all sharks are beautiful. I sometimes use a little dollop of craft glue to keep the smile in place. Now, hammerheads have a surprising amount of fins. This guy is quite little so I think a lot of fins overwhelm him and personally, I think less is more. However, if you want him to be more anatomically correct, you go right ahead and make as many fins as you like.

Info :

Supplies. Grey yarn. 2 x safety eyes. Stuffing.

Info :

Abbreviations. This pattern is written in US crochet terms. CH: Chain. SC: Single crochet. DC: Double crochet. SS: Slip stitch. DEC: SC the next 2 ST together. ST: Stitch/es. FO: Fasten off. TR: Treble crochet. HDC: Half double crochet. *___*: Repeat instructions from * to * as many times as stated. INC: 2SC in the next ST.

β€” Head :

Info :

Chain 2, 6sc into second chain from hook.

Round 1 :

*inc* x 6 (12)

Round 2 :

*BLO sc* (12)

Round 3-5 :

*sc* (12)

Info :

Begin working in rows

Info :

Ch1 & turn

Round 6-14 :

sc x 10, ch1, turn

Round 15 :

sc x 10, ch 2, do not turn, continue working in first st of row 15

Round 16 :

sc x 10 and in both ch spaces (12)

Round 17-18 :

*sc* (12)

Round 19 :

*BLO dec* x 6 (6)

Info :

FO.

Info :

Insert safety eyes in beginning/ end spaces.

Info :

This is how your head should look after fastening off.

Info :

For the following section, you want the decreases to be in the edge stitches as pictured. If you find you're not decreasing at the edges, just change the stitch arrangement making sure to decrease once on each side.

β€” Body :

Info :

Join in fifth st from corner as shown in the photo.

Round 1 :

Sc in each row edge, corner and ch sp around (28)

Round 2 :

*sc*

Round 3 :

8sc, dec, 12sc, dec, 4sc (26)

Round 4 :

8sc, dec, 11sc, dec, 3sc (24)

Round 5 :

7sc, dec, 10sc, dec, 3sc (22)

Round 6 :

7sc, dec, 9sc, dec, 2sc (20)

Round 7 :

7sc, dec, 8sc, dec, 1sc (18)

Info :

Start stuffing as you go

Round 8 :

*sc* (18)

Round 9 :

6sc, dec, 8sc, dec (16)

Round 10 :

*sc* (16)

Round 11 :

6sc, dec, 6sc, dec (14)

Round 12-15 :

*sc* (14)

Round 16 :

Dec, 5sc, dec, 5sc (12)

Round 17-18 :

*sc* (12)

Round 19 :

Dec, 4sc, dec, 4sc (10)

Round 20 :

*sc* (10)

Info :

Stuff firmly

Round 21 :

Sc closed (5)

Info :

Ch1, turn

Info :

(Sc, hdc, dc, dc, tr, tr) in next st. Ch4, sc in next 2 stitches. (Sc, hdc, dc dc) in next st, ch 2, sc in last st.

β€” Big fin :

Info :

Make 1

Info :

Chain 2, 6 sc in second chain from hook.

Round 1-2 :

*sc* (6)

Round 3 :

*sc, inc* x 3 (9)

Round 4 :

*sc* (9)

Round 5 :

*2 x sc, inc* x 3 (12)

Round 6 :

*sc* (12)

Info :

Sc closed and fasten off.

β€” Small fin :

Info :

Make 2 - 5

Info :

Chain 2, 6 sc in second chain from hook.

Round 1-2 :

*sc* (6)

Round 3 :

*sc, inc* x 3 (9)

Round 4-5 :

*sc* (9)

Info :

Sc closed and fasten off.

Info :

Attach fins to the body using the photo as a guide. Use black yarn to sew on a smile and you're done! Feel free to sell your finished items but please credit me as the designer. Remember to tag me on social media @manatee_squares because I love to see these little guys pop up! Please do not recreate this pattern in any way.

Assembly Instructions

  • Insert the 2 safety eyes into the beginning/end spaces of the head before closing the head completely, referencing the photo for spacing.
  • Join the head to the body by aligning the edges and sewing evenly so the head sits smoothly on top of the body opening.
  • Attach the big dorsal fin along the top center of the body and position the small fins on either side using the photographs as a guide; sew them securely with matching yarn.
  • Use black yarn to embroider a smile on the shark's face and optionally add a small dollop of craft glue to keep the smile in place if needed.
  • Stuff the body gradually while shaping and after completing decreases; stuff firmly before closing and then close the final stitches securely.

Important Notes

  • πŸ’‘The number in brackets at the end of each round indicates the total number of stitches so always verify your count after each round.
  • πŸ’‘If you prefer a smaller or firmer fabric, use a smaller hook than recommended or a tighter tension; conversely, use a larger hook for a chunkier shark.
  • πŸ’‘Start stuffing early and stuff gradually to maintain smooth shaping; overstuffing too soon can distort the piece.

This little Hammerhead Shark Friend is a sweet, quick make that adds a splash of handmade charm to any shelf or gift pile. Make it in DK cotton for a neat finish or try chunky yarn for a cuddly, huggable version. Share your creation and tag @manatee_squares so the designer can see your adorable sharks pop up! 🧢🐬

You ask,

we answer.

FAQs

What size will the finished piece be?

The finished amigurumi measures approximately the size shown in the photos when using DK yarn and a 4mm hook; exact size will vary with yarn and hook choices.

Can I use different yarn weights for this pattern?

Yes, you can use different yarn weights; a 3mm hook with DK yarn will make a smaller shark and a 5mm hook with chunky yarn will make a larger one β€” adjust expectations for final size.

Do I need prior crochet experience for this pattern?

This pattern is rated intermediate, so basic knowledge of single crochet, increases, decreases and working in rows and rounds is recommended.

How long does this project typically take to complete?

Most crocheters complete this project in 2-4 hours, though time may vary based on experience level and whether you make extra fins or details.

Where should I place the safety eyes?

Insert safety eyes in the beginning/end spaces of the head as indicated in the head instructions and check spacing against the photo before securing.