🧢 Beautiful ✨ Detailed πŸ’ Adorable

Handsome Dog Amigurumi Pattern

Handsome Dog Amigurumi Pattern
4.0β˜… Rating
5-7 Hours Time Needed
1.9K Made This
βœ‚οΈ

Intermediate Level

Ideal for those with basic crochet experience, featuring slightly more advanced stitches and techniques to expand your skills.

⏱️

Weekend Treat

Takes 5-7 hours, making it an enjoyable project to finish over a couple of days.

🧸

Cute Companion

An adorable friend to cherish, handcrafted with love to bring comfort and joy for years to come.

About This Handsome Dog Amigurumi Pattern

This pattern creates a sweet little dog amigurumi with a rounded head, floppy ears, a tiny snout and a pair of overalls. It combines simple single crochet rounds with shaping techniques to achieve a lovable silhouette. Detailed step-by-step rounds and photos help you place eyes, sew parts and finish with charming details.

Handsome Dog Amigurumi Pattern crochet pattern - detailed view of completed project

You will make the head, legs, arms, ears, nose and tail separately and sew them together for a neat finish. The overalls and pocket details are crocheted flat and sewn on for easy customization.

Why You'll Love This Handsome Dog Amigurumi Pattern

I absolutely love this pattern because it turns simple stitches into a character full of personality and charm. I enjoy how the color changes and small details like the nose tip and overalls bring the little dog to life. The construction is satisfying β€” you make discrete pieces and then join them for a polished final toy. It is versatile too; I often modify colors or add tiny accessories to make each dog unique.

Handsome Dog Amigurumi Pattern step 1 - construction progress Handsome Dog Amigurumi Pattern step 2 - assembly progress Handsome Dog Amigurumi Pattern step 3 - details and accessories Handsome Dog Amigurumi Pattern step 4 - final assembly and finishing

Switch Things Up

I love customizing this pattern by changing colors to create different personalities; try pastel shades for a softer look or bright tones for a playful pup.

To make a larger version, I switch to bulkier yarn and a larger hook; this gives a chunky, huggable dog perfect for cuddles.

If I want a tiny keychain, I use finer yarn and a smaller hook and reduce stuffing to keep the toy lightweight and portable.

I often add embroidered eyebrows or a little mouth to change the expression and mood of the dog; subtle moves make a big difference.

Swap the overalls for a dress or a sweater by adjusting the overalls rounds and shaping for a quick outfit redesign.

Add tiny accessories like a crocheted scarf, a felt hat, or a miniature toy bone to add character and gifting appeal.

I sometimes use safety joints for posable limbs β€” insert small toy joints or wire inside limbs to create a movable figure.

Try different eye types: glossy safety eyes for shine, embroidered eyes for a softer, child-safe finish, or French knots for a tiny look.

Change the ear shape or length to create different dog breeds β€” longer ears for bassets, shorter rounded ears for terriers, and so on.

I like to add texture by using surface slip stitches or working a few rows in BLO to create an edge or cuff on sleeves and overalls for extra detail.

Common Mistakes & How to Fix Them

βœ— Skipping placement of safety eyes too late can make positioning awkward; install the safety eyes between rounds 15-16 and check symmetry before securing. βœ— Not stuffing as you go can lead to lumps and misshapen areas; stuff gradually and firmly while shaping each section to maintain an even silhouette. βœ— Forgetting to leave long threads for sewing will make assembly difficult; always leave the long tail at the final fasten off to sew pieces neatly into place. βœ— Crocheting too tightly in color changes can distort the edge between colors; keep even tension and use the recommended hook size to maintain smooth transitions.

Handsome Dog Amigurumi Pattern

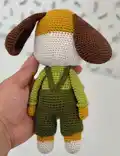
Create a charming Handsome Dog amigurumi with this detailed crochet pattern. You will work in simple rounds to shape the head, body, limbs, ears and tail, then assemble the pieces and add adorable details. The pattern uses clear round-by-round instructions and helpful photos to guide you through every step. Perfect for gifting or keeping as a sweet handmade companion.

Intermediate 5-7 Hours

Materials Needed for Handsome Dog Amigurumi Pattern

β€” Main Fabric

  • 01
    Yarn (recommended sport or DK weight) - Main Color Mustard (A) - approx 50g
  • 02
    Yarn - White (B) - approx 50g
  • 03
    Yarn - Light Green (C) - approx 50g
  • 04
    Yarn - Dark Green (D) - approx 50g
  • 05
    Yarn - Brown (E) - approx 25-50g for ears, nose and tail

β€” Tools Required

  • 01
    Crochet hook size 2.5 mm (or a size that fits your yarn)
  • 02
    Safety eyes (6-8 mm) to suit your preference
  • 03
    Scissors
  • 04
    Polyester stuffing
  • 05
    Tapestry/yarn needle for sewing pieces
  • 06
    Stitch markers
  • 07
    Pins for assembly
  • 08
    Small buttons for overalls (optional)

Progress Tracker

0% Complete

β€” Abbreviations & Materials :

Infos :

Abbreviation/US terminology : blo - back loop, ch - chain, cr - crochet, dc - double crochet, dc3tog - double crochet three together, dec - decrease, flo - front loop, hdc - half double crochet, FO - Fasten Off, inc - increase, rnd(s) - round(s), sc - single crochet, sc3tog - single crochet three together, slst - slip stitch, st - stitch, tr - treble stitch, (...) - number in parentheses indicates the number of stitches at the end of the round, [...] - repeat instructions x times or to the end of the round, (...) - work the stitches all into the same stitch.

Infos :

Materials: - Yarn - 2.5 mm hook size or a size that fits your yarn - Scissors, stuffing, tapestry needle, stitch marker and pins. Main Color: Mustard A; White B; Light Green C; Dark Green D; Brown.

Infos :

FINISHED SIZE Around 20 cm in circumference, about 10 cm in length. You are welcome to sell items made from this pattern. I would be happy if you link back to my shop and give credit to me as the designer.

β€” Head :

Rnd 1 :

6 sc in a magic ring

Rnd 2 :

6 sc inc(12 sc)

Rnd 3 :

(6 times)1 sc into sc next inc(18 sc)

Rnd 4 :

(6 times)2 sc into sc next inc(24 sc)

Rnd 5 :

(6 times)3 sc into sc next inc(30 sc)

Rnd 6 :

(6 times)4 sc into sc next inc(36 sc)

Rnd 7 :

(6 times)5 sc into sc next inc(42 sc)

Rnd 8 :

(6 times)6 sc into sc next inc(48 sc)

Rnd 9-17 :

(9 ring)sc into sc(48 sc) Install the safety eyes between rnd 15-16. There will be 9 sc in between.

Rnd 18 :

12 sc into sc (9 sc inc)6 sc into sc (9 sc inc)12 sc into sc(66 sc)

Info :

Switch to A Color

Rnd 19-26 :

(8 ring)sc into sc(66 sc)

Info :

Stuff the head tightly. Keep filling as you go.

Rnd 27 :

(6 times)9 sc into sc next dec(60 sc)

Rnd 28 :

(6 times)8 sc into sc next dec(54 sc)

Rnd 29 :

(6 times)7 sc into sc next dec(48 sc)

Rnd 30 :

(6 times)6 sc into sc next dec(42 sc)

Rnd 31 :

(6 times)5 sc into sc next dec(36 sc)

Rnd 32 :

(6 times)4 sc into sc next dec(30 sc)

Rnd 33 :

(6 times)3 sc into sc next dec(24 sc)

Rnd 34 :

Sc into sc (24 sc)fo. Leave a long thread for sewing.

β€” Legs :

Info :

A Color - Make 2

Rnd 1 :

6 sc in a magic ring

Rnd 2 :

6 sc inc(12 sc)

Rnd 3 :

(6 times)1 sc into sc next inc(18 sc)

Rnd 4 :

only in flo sc into sc(18 sc)

Rnd 5-8 :

(4 ring)sc into sc (18 sc)

Info :

Switch to Main Color

Rnd 9-20 :

(12 ring)sc into sc(18 sc)

Rnd 21 :

Bring the legs together. make 4 ch in between.

Rnd 22 :

18 sc into sc 4 ch into sc 18 sc into sc ch next ring 4 sc(44 sc)

Rnd 23-29 :

(7 ring)sc into sc(44 sc)

Rnd 30 :

(6 times)6 sc into sc next dec(38 sc)

Info :

Switch to B Color

Rnd 31-37 :

(7 ring)sc into sc(38 sc)

Rnd 38 :

(6 times)4 sc into sc next dec(32 sc)

Rnd 39 :

2 times)14 sc into sc next dec(30 sc)

Rnd 40-43 :

(4 ring)sc into sc(30 sc)fo.

β€” Arms :

Info :

Main Color - Make 2

Rnd 1 :

6 sc in a magic ring

Rnd 2 :

6 sc inc(12 sc)

Rnd 3-6 :

(4 ring)sc into sc (12 sc)

Rnd 7 :

Only in flo sc into sc(12 sc)

Info :

Switch to B Color

Rnd 8-22 :

(15 ring)sc into sc(12 sc)

Rnd 23 :

Flatten the needle in both layers. 6 sc fo. Do not fill the sleeves.

Info :

Arms Detail - Only in blo sc into 3 ch fo.

β€” Overalls :

Info :

C Color - Make 2

Rnd 1 :

20 ch

Rnd 2 :

20 ch into sc(20 sc)

Rnd 3-11 :

(9 ring)sc into sc(20 sc)fo.

Rnd 12 :

Bacakları birleştirin. sc into sc(40 sc)

Rnd 13-22 :

(10 ring)sc into sc (40 sc)

Rnd 23 :

24 sc into sc turn

Rnd 24 :

8 sc into sc turn

Rnd 25 :

8 sc into sc fo.

Info :

Hangers - Make 2. 18 ch 18 ch into 18 sc fo. Leave a long thread for sewing.

β€” Pockets :

Info :

C Color - Make 2

Rnd 1 :

5 ch .5 ch into 5 sc turn

Rnd 2 :

sc into sc(5 sc)turn

Rnd 3 :

sc into sc (5 sc)fo.

Info :

Leave a long thread for sewing

β€” Nose and Nose Tip :

Info :

NOSE TIP - D Color

Rnd 1 :

2 ch into 2 sc turn

Rnd 2 :

1 sc inc 2 sc into sc (3 sc)turn

Rnd 3 :

1 sc inc 3 sc into sc(4 sc)turn

Rnd 4 :

1 sc inc 4 sc into sc(5 sc)turn

Rnd 5 :

1 sc inc 5 sc into sc(6 sc)fo.

Info :

Leave a long thread for sewing.

Info :

NOSE - A color

Rnd 1 :

5 ch ch into sc(10 sc)

Rnd 2 :

1 sc inc 4 sc into sc 1 sc inc(12 sc)

Rnd 3 :

1 sc inc 5 sc into sc 1 sc inc (14 sc)

Rnd 4 :

1 sc inc 6 sc into sc 1 sc inc(16 sc)

Rnd 5 :

1 sc inc 7 sc into sc 1 sc inc(18 sc)fo.

Info :

Fill the nose, leave a long thread for sewing. Sew the nose between the 2 eyes between Rnd 16-20. fo.

β€” Ears :

Info :

D COLOR - MAKE 2

Rnd 1 :

6 sc in a magic ring

Rnd 2 :

6 sc inc(12 sc)

Rnd 3 :

(6 times)1 sc into sc next inc(18 sc)

Rnd 4 :

(6 times)2 sc into sc next inc(24 sc)

Rnd 5 :

(6 times)3 sc into sc next inc(30 sc)

Rnd 6-10 :

(5 ring)sc into sc(30 sc)

Rnd 11 :

(6 times)3 sc into sc next dec(24 sc)

Rnd 12-15 :

(4 ring)sc into sc (24 sc)

Rnd 16 :

(6 times)2 sc into sc next dec(18 sc)

Rnd 17-21 :

(5 ring)sc into sc(18 sc)

Rnd 22 :

Flatten the needle in both layers. 9 sc fo. Leave a long thread for sewing.

β€” Queue :

Info :

D Color

Rnd 1 :

6 sc in a magic ring

Rnd 2 :

6 sc inc(12 sc)

Rnd 3 :

(3 times)3 sc into sc next inc(15 sc)

Rnd 4-6 :

(3 ring)sc into sc(15 sc)

Rnd 7 :

(3 times)3 sc into sc next dec(12 sc)

Rnd 8-12 :

(5 ring)sc into sc(12 sc)

Rnd 13 :

(4 times)1 sc into sc next dec(8 sc)

Rnd 14-15 :

(2 ring)sc into sc(8 sc)

Rnd 16 :

Flatten the needle in both layers. 4 sc fo. Leave a long thread for sewing.

β€” Details :

Info :

Follow photos for placement of overalls, pockets, nose and ears. Use pins to hold pieces before sewing to ensure correct placement and symmetry.

Assembly Instructions

  • Sew the head to the body opening using the long tail left at Rnd 34 of the head; center the head on top of the body and use a whipstitch to attach securely, weaving the tail through the body stitches to hide the seam.
  • Position and sew the legs at the bottom of the body where the leg joining round was made (joined at Rnd 21-22), spacing legs evenly and securing with mattress stitch or whipstitch for stability.
  • Attach arms to the body on either side between the rounds where the sleeves end (after Rnd 23 of the arms). Flatten the arm opening and sew through both layers to create a neat seam; do not stuff sleeves.
  • Sew ears to the top sides of the head using the long thread left at Rnd 22 of each ear; pin them in place first so the floppy ear hangs as in the photos.
  • Sew the nose (A color) between the eyes, placing it between rounds 16-20 as instructed, then attach the nose tip (D color) and embroider or attach a small nose stem as shown.
  • Attach the tail (queue) to the back lower body, using the long tail left after finishing; flatten tail layers and sew through both layers for a firm attachment.
  • Sew the overalls onto the body: align the joined legs and body top, sew straps and hangers in place, and attach pockets and buttons where shown in photos.

Important Notes

  • πŸ’‘Install safety eyes between rounds 15 and 16 and ensure there are 9 stitches between the eyes to achieve the correct facial placement.
  • πŸ’‘Stuff the head tightly and keep stuffing as you go to avoid gaps and preserve the shape; check firmness frequently before closing.
  • πŸ’‘Leave a long thread when you fasten off each finished piece so you can sew parts together without having to join new yarn.
  • πŸ’‘When instructed to flatten the needle in both layers before finishing (ears, arms, tail), do so to create a clean edge and easier sewing.
  • πŸ’‘Use stitch markers to mark the beginning of rounds and to keep track of increases and decreases for consistent shaping.

This Handsome Dog amigurumi is designed to be a cozy, endearing companion with lots of charming details and personality. Make it in the suggested colors or swap them for your own playful palette to create a truly unique toy. Perfect for gifting, display, or a special handmade keepsake β€” happy crocheting! 🧢🐢✨

You ask,

we answer.

FAQs

What size will the finished piece be?

The finished amigurumi measures around 20 cm in circumference and about 10 cm in length using the recommended yarn and a 2.5 mm hook.

Can I use different yarn weights for this pattern?

Yes, you can change yarn weight, but your finished size will vary; choose an appropriate hook for the yarn and adjust stuffing and eye size accordingly.

Do I need prior crochet experience for this pattern?

This pattern is rated Intermediate; familiarity with single crochet, increases, decreases and working in the round is recommended for best results.

How long does this project typically take to complete?

Most crocheters complete this project in 5-7 hours, depending on experience, assembly time and added details like overalls and pockets.

When should I place the safety eyes?

Place the safety eyes between rounds 15 and 16 of the head, leaving 9 single crochet stitches between them for correct positioning.