🧢 Beautiful ✨ Detailed πŸ’ Adorable

Hermione Granger Amigurumi Pattern

Hermione Granger Amigurumi Pattern
4.1β˜… Rating
5-7 Hours Time Needed
1.3K Made This
βœ‚οΈ

Intermediate Level

Ideal for those with basic crochet experience, featuring slightly more advanced stitches and techniques to expand your skills.

⏱️

Weekend Treat

Takes 5-7 hours, making it an enjoyable project to finish over a couple of days.

🧸

Cute Companion

An adorable friend to cherish, handcrafted with love to bring comfort and joy for years to come.

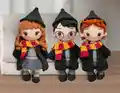
About This Hermione Granger Amigurumi Pattern

This pattern creates a detailed Hermione Granger amigurumi complete with hair strands, a school jacket, scarf, skirt and tiny book. You will work in spiral rounds to shape the legs, body, head, and hair with clear round-by-round instructions. The pattern includes small accessories like a neck piece and tie to finish the look.

Hermione Granger Amigurumi Pattern crochet pattern - detailed view of completed project

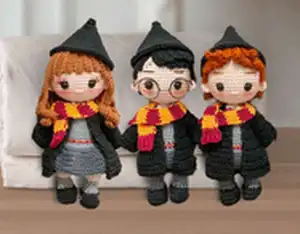
Techniques include magic ring, working in BLO/FLO, and creating hair strands over stitches for a realistic style. Finished project makes a lovely handmade gift for Harry Potter fans.

Why You'll Love This Hermione Granger Amigurumi Pattern

I absolutely love this pattern because it captures Hermione's character in a small, thoughtful amigurumi. I enjoy the hair-strand technique that creates lifelike curls and bangs, and the layered clothing pieces add so much charm. The construction is cleverβ€”legs join into the body and the head is shaped seamlesslyβ€”making assembly satisfying. I also love that the scarf and tiny book give you options for personalization and playful finishing touches.

Hermione Granger Amigurumi Pattern step 1 - construction progress Hermione Granger Amigurumi Pattern step 2 - assembly progress Hermione Granger Amigurumi Pattern step 3 - details and accessories Hermione Granger Amigurumi Pattern step 4 - final assembly and finishing

Switch Things Up

I love experimenting with colors β€” try pastel shades for a soft, whimsical Hermione or deep tones for a more realistic school uniform.

Swap the cotton thread for a slightly thicker yarn and larger hook to create a chunkier, cuddlier version of the doll.

I often change the hair color to create other characters or a custom doll with the same base pattern.

You can embroider different facial expressions to change personality β€” a small smile, a surprised mouth, or raised eyebrows all look great.

For posable limbs, consider adding thin wire inside the arms and legs so you can pose the doll on shelves.

Add accessories like a tiny wand, glasses, or a name tag sewn onto the jacket for extra character and personalization.

Mix and match scarf colors to show house pride β€” try green and silver for Slytherin or blue and silver for Ravenclaw variations.

Make a set of school friends by adjusting hair, skin tone, and clothing colors while keeping the same basic body pattern.

Try adding a loop to the hat or jacket to turn this into a keychain or bag charm for a portable keepsake.

If you want a smaller keyring version, use fine thread and a 0.75–1.00 mm hook and scale the accessory sizes accordingly.

Common Mistakes & How to Fix Them

βœ— Skipping stitch markers when joining legs to body can cause misalignment; place markers at the joins and count stitches to line legs up correctly. βœ— Forgetting to leave the second leg's tail connected will make body construction difficult; do not cut the thread of the second leg so you can continue seamlessly into the body. βœ— Overstuffing small parts like arms and legs can distort the shape; stuff lightly in small increments and shape as you go to keep proportions even. βœ— Changing colors without securing ends neatly results in messy joins; weave in or crochet over color tails and switch colors at the indicated rounds to keep edges tidy. βœ— Not counting stitches after increases or decreases leads to incorrect shaping; count your stitches every few rounds, especially after increases and decreases, to ensure correct stitch counts.

Hermione Granger Amigurumi Pattern

Create a charming Hermione Granger amigurumi with clear, picture-guided instructions designed to help you craft a delightful Harry Potter-inspired doll. You'll love the detailed assembly steps, hair strand technique, and clothing pieces that bring her character to life. Perfect for gifting, collecting, or displaying on a bookshelf.

Intermediate 5-7 Hours

Materials Needed for Hermione Granger Amigurumi Pattern

β€” Main Fabric

  • 01
    Cotton thread - peach (skin tone) - quantity as needed
  • 02
    Cotton thread - black - quantity as needed
  • 03
    Cotton thread - yellow - small amount for scarf or details
  • 04
    Cotton thread - red - small amount for scarf or details
  • 05
    Cotton thread - dark gray - quantity as needed for skirt/jacket
  • 06
    Cotton thread - gray - quantity as needed for clothing
  • 07
    Cotton thread - white - small amount for neck and book pages
  • 08
    Cotton thread - brown - small amount for hair or book
  • 09
    Fiberfill - polyester stuffing - enough to fill head, body, arms and legs
  • 10
    Embroidery threads - red and yellow - for tie and small details
  • 11
    Button - 1 small button for book or clothing accent
  • 12
    Safety eyes - size as desired (pair)

β€” Tools Required

  • 01
    Crochet hook size 1.10 mm
  • 02
    Fiberfill for stuffing
  • 03
    Safety eyes (pair)
  • 04
    Tapestry needle
  • 05
    A small button
  • 06
    Embroidery threads (red and yellow)

Progress Tracker

0% Complete

β€” Arms :

Info :

Start with peach color

Round 1 :

5 sc in a MR (5)

Round 2 :

5 sc (5)

Round 3-8 :

5 sc (5)

Info :

Change to gray color. Do not stuff. Close with 2 sc.

β€” Legs :

Info :

With black color. Change to gray color, then to peach color as indicated. Stuff lightly. Make 2 legs. Do not cut the thread of second leg; continue with the body.

Round 1 :

6 sc in a MR (6)

Round 2 :

6 sc (6)

Round 3-4 :

6 sc (6)

Round 5-6 :

6 sc (6)

β€” Body :

Round 1 :

Continue with peach color: Ch 4, 6 sc (first leg), 4 sc over the ch, 6 sc (second leg) (20)

Round 2 :

20 sc (20)

Round 3 :

7 sc, 1 dec, 8 sc, 1 dec, 1 sc (18)

Info :

Change to gray color.

Round 4 :

6 sc, 1 dec, 8 sc, 1 dec (16)

Round 5 :

BLO; 6 sc (6)

Round 6-7 :

6 sc (6)

Round 8 :

Attaching the arms: 1 sc (body and arm), 5 sc in body only, 2 sc (body and arm), 7 sc in body only, 1 sc (body and arm) (16). Stuff.

Round 9 :

2 sc, 1 dec, [1 dec, 2 sc] x 3 (12)

Info :

Change to peach color.

β€” Head :

Round 1 :

2 sc, 1 dec (8)

Round 2 :

Inc x 9 (18)

Round 3 :

1 sc, 1 inc (27)

Round 4 :

2 sc, 1 inc (36)

Round 5 :

3 sc, 1 inc (45)

Round 6-10 :

45 sc (45)

Info :

SAFETY EYES: between rounds 8 and 9, separated by 6 or 7 stitches.

Round 11 :

7 sc, 1 dec (40)

Round 12 :

8 sc, 1 dec (36)

Round 13 :

4 sc, 1 dec (30)

Round 14 :

3 sc, 1 dec (24)

Round 15 :

2 sc, 1 dec (20)

Round 16 :

1 sc, 1 dec (12)

Round 17 :

6 dec (6)

Info :

Embroider the eyebrows.

β€” Ears :

Item Name (P1) :

3 sc in a MR (3). Sew them between rounds 7 and 9.

β€” Hair :

Round 1 :

With brown color: 6 sc in a MR (6)

Round 2 :

6 inc (12)

Round 3 :

BLO: 1 sc, 1 inc (18)

Info :

Now we are working each strand over the stitches of round 3. When you finish each strand move to the next stitch of the round 3 with a slst.

Round 1-5 :

Ch 6: from the third ch: 4 hdc (4)

Round 6-18 :

Ch 18: from the second ch: inc of sc x 4, 8 sc, 5 hdc (21)

Info :

Work now in FLO of round 2, the same way.

Round 1-12 :

Ch 12: 12 sc (12)

Info :

Strands 1-5 go on the forehead. The others cover the head.

β€” Jacket :

BACK PART x 1 :

With black color, working in turning rounds, ch1 at the beginning. Ch 9: from the second ch, 8 sc (8). Rounds 2 to 10: 8 sc (8).

FRONT PART x 2 :

With black color, working in turning rounds, ch1 at the beginning. Ch 4: from the second ch, 3 sc (3). Rounds 2 to 10: 3 sc (3).

Info :

Sew the shoulders of the back and the front part (only 3 stitches on each shoulder). Sew the side part only 6 stitches (the rest of stitches are the armhole). Make an edge with sc.

β€” Sleeves :

Info :

Working on the armhole.

Round 1 :

[2 sc, 1 inc] x 3, 1 sc (13)

Round 2-3 :

13 sc (13). Cut.

β€” Book :

Info :

Brown part x 2: in turning rounds with ch1 at the beginning.

Round 1 :

Ch 5: 4 sc (4)

Round 2-5 :

4 sc (4). Cut.

Info :

White part: in turning rounds with ch1 at the beginning.

Round 1 :

Ch 5: 4 sc (4)

Round 2-10 :

4 sc (4). Cut.

Info :

Fold in half the white part, put it between both brown parts, sew them finishing the book.

β€” Scarf :

Info :

Start with red color and then change to yellow every other 2 rounds. Working in turning rounds, ch1 at the beginning.

Round 1 :

Ch 3: from the second ch, 2 sc (2)

Round 2 :

2 sc (2). Change to yellow color.

Round 3-4 :

2 sc (2). Change to red color.

Info :

Continue to round 42 (finishing with red color).

β€” White neck :

Round 1 :

With white color: Ch 18: from the third ch: 1 inc of hdc, 14 sc, 1 inc of hdc (18).

β€” Tie :

Round 1 :

Work with two strands of embroidery threads yellow and 2 red, together. Ch 5: from the second ch, 3 sc, inc of 5 hdc, 3 sc on the other side of the ch. Cut.

β€” Skirt :

Info :

Join dark gray color in FLO of round 4 of the body.

Round 1 :

[3 sc, inc] x 4 (20)

Round 2 :

[4 sc, inc] x 4 (24)

Round 3-4 :

24 sc (24). Cut.

β€” Final details :

Info :

Sew or glue the White neck around the neck of the amigurumi. Put her the tie.

Assembly Instructions

  • Sew the two legs into the body as one piece: keep the second leg thread attached and chain across to join legs, then continue the body rounds seamlessly.
  • Position and attach arms on either side at the armholes created in body round 8; sew the arms with a whipstitch through the body and arm seams and stuff before finishing.
  • Sew ears between head rounds 7 and 9 following the placement note, ensuring symmetry on both sides of the head.
  • Sew the back and front jacket pieces at the shoulders (3 stitches each) and sew the sides leaving 6 stitches for the armhole; finish the edge with single crochet.
  • Place hair strands starting with strands 1-5 on the forehead and continue around the head according to the pattern, attaching each strand by slip stitch into the round 3 stitches.
  • Fold the book white pages and sandwich them between the two brown parts, then sew the edges to close and position the book in the hand or attach to the body as shown.

Important Notes

  • πŸ’‘All pieces are worked in a spiral unless otherwise indicated; use a stitch marker to mark the beginning of each round.
  • πŸ’‘Place safety eyes between rounds 8 and 9, separated by 6 or 7 stitches as noted for accurate facial placement.
  • πŸ’‘Work hair strands over the indicated stitches and move to the next stitch with a slip stitch to keep strand placement neat and even.
  • πŸ’‘Stuff firmly but not overfilled; small pieces like arms and legs should be lightly stuffed to maintain correct proportions.

This Hermione Granger amigurumi pattern brings a beloved character to life with small, detailed pieces and charming accessories. 🧢πŸͺ„ Follow the step-by-step rounds and assembly notes to build her outfit, hair, and tiny book with confidence. βœ¨πŸ“š Perfect for gifting to Harry Potter fans or adding to your handmade doll collection.

You ask,

we answer.

FAQs

What size will the finished piece be?

The finished amigurumi measures approximately 18 cm tall when using the recommended cotton thread and 1.10 mm hook; exact size may vary slightly with yarn and tension.

Can I use different yarn weights for this pattern?

Yes, you can use different yarn weights but the final size will change; use an appropriate hook for your yarn and adjust safety eye size and stuffing accordingly.

Do I need prior crochet experience for this pattern?

This pattern is rated intermediate, so basic knowledge of crochet stitches, working in spiral, and simple shaping is recommended for best results.

How long does this project typically take to complete?

Most crocheters complete this project in 5-7 hours, though time may vary depending on experience level and how much time you spend on hair and accessories.

Where do I place the safety eyes?

Place the safety eyes between rounds 8 and 9 of the head, separated by 6 or 7 stitches as indicated in the pattern for correct facial spacing.