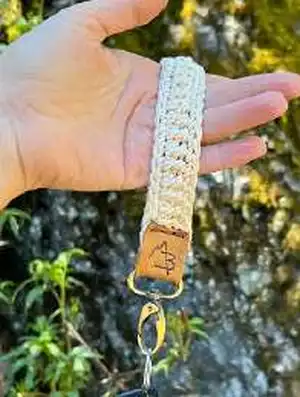
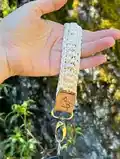
Make a stylish, practical Highline Wristlet Keychain you can finish quickly and personalize with color or a leather wrap. This easy pattern uses basic stitches, a cone stitch texture, and a long-tail foundation chain for a neat edge. Perfect for gifts, market inventory, or using yarn scraps—youll be making these on repeat!
Progress Tracker
0% Complete
— Materials :
Info :
Worsted (4 wt.) 100% Cotton. Shown In: Lion Brand Yarns 24/7 Cotton (186yds/3.5oz/170m/100g) in Amber, Ecru, Bay Leaf, & Jade. Approximate amount 10-11 yds/5.5-6 g. Crochet Hook G6 - 4.00 mm. Yarn Needles. Tape measure & scissors. Standard Version: Swivel hook with 1/2-inch ring. Leather wrapped version: Swivel hook with 1 inch ring, 2.5 x 1 inch leather tag, and leather hole punch tool or awl.
— Abbreviations :
Infos :
YO = yarn over. St(s) = stitch(es). Ch(s) = chain(s). Sc = Single Crochet. Sc2tog = Single Crochet two stitches together. Cone st = Cone Stitch. RS/WS = right side/wrong side (of work).
— Gauge :
Info :
16 sts X 19 rows = 4 inch square in Sc
Info :
Notes: I use a 4.00mm hook to get gauge. Changing hook size or tension are common ways to adjust gauge. A smaller hook or tighter tension will increase the number of sts and rows that will fit into a 4-inch square. A larger hook or looser tension will have the opposite effect. Gauge is not overly critical for this project, so if you skip the swatch, just know that the length of the foundation ch should be about 8 inches, and after Row 1, the length should be about 8-3/4 to 9 inches long.
— Construction Notes :
Info :
The Highline Wristlet Keychain is crocheted in a total of 4 rows. The ends are seamed while adding in the 1/2-inch swivel hook for the standard version. For the leather wrapped version, the ends are first joined together, then the leather is threaded through the 1-inch opening of the swivel hook and the ends of the tag are sewn to the keychain. This shortens the opening of the wristlet by about 1/2 inch, but it will be a little stretchy, so it shouldn't make it too tight around the hand or wrist. If you need a shorter or longer version of the wristlet, you can add or subtract chains when making the foundation ch. Any number of chs can be used but note that changes in the number will affect the yardage requirements.
Info :
A multi-colored version of the wristlet can be made by simply fastening off and changing colors when starting a new row. The picture and chart on pg. 2 offer up some 2 and 3 color combination ideas. You'll need between about 5 yds of each color the 2-colors or about 3-4 yds for the 3-color options.
— Special Stitches :
Info :
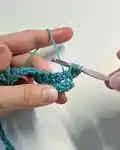
Cone Stitch (Cone St)- A Cone st combines a regular st with a spike stitch as follows. YO and insert hook under both loops of the indicated st, YO and pull up a loop. YO and insert hook in the same st, but 2-rows below, YO and pull up a loop. Pull to adjust the 5 loops on hook to the same height, YO and pull through all 5 loops on hook. See photos below.
Info :
Photo (left), the arrows show the insertion points for the first indicated st of the row and the same st but 2 rows below. Photo (right) shows the YO needed to pull up a loop after the first YO and insertion.
Info :
Photo (left) shows the Cone st before the final YO and pull through the 5 loops on the hook. Note that all 5 loops have been pulled up to the same height before making the final YO and pull through. Photo (right) shows the first 3 completed Cone sts of Row 3.
Info :
Single Crochet 2 together (SC2tog) - Insert hook in indicated st, YO and pull up a loop. Insert hook in next st, YO and pull up a loop. YO and pull through all 3 loops on hook. Note that for the standard version, when joining the ends of the wristlet and connecting them to the 1/2-inch swivel hook, you will be working through sts on both ends of wristlet and also in the ring on the swivel hook when making the SC2tog st. The pattern instructions will provide specific details on how to do this. For the leather wrapped version, work regular Sc2tog sts when joining the two ends of the wristlet together.
Info :
Long Tail Foundation Chains - A long tail foundation ch is recommended for the wristlet because it provides an even and stretchy foundation on the leading edge. A traditional foundation of regular ch sts can be used as an alternative, but may not be as stretchy. The long tail foundation ch is made as follows. A photo tutorial is provided below the written explanation.
Info :
From the end of the yarn, measure out a length that is 3 times that of the desired ch length and then add another 3-4 inches for a tail to weave. For this project, measure out about 27 inches (24 inches + 3 inches for the tail) to target a foundation ch that is about 8 inches in length. Make a slip knot at the 27-inch mark and place the slip knot on hook making sure it is not too tight and slides easily up and down the barrel of the hook. Hold and tension the working yarn as normal. Wrap the long tail loosely over the hook from front to back, pinching the long tail and slip knot under the hook, YO with the working yarn and pull through the 2 loops on hook to complete the first foundation ch st. For the rest of the ch sts, repeat the steps to make the first ch, pulling down on the tail and the previously made chs before making the final pull through with the working yarn. Keep the ch sts fairly loose to prevent the chs from twisting excessively and to make them easy to work into in completing Row 1.
— Instructions :
Infos :
Instructions below assume you are making the one-color version of the wristlet. See note below on modifying to make a multi-color version. Note that both rows 3 & 4 are worked on the RS of the work. This makes the wristlet Row 1 and 4 visually the same. The Ch st at the beginning or end of a row does not count as a st, unless otherwise indicated. A number inside a set of parentheses '(' ')' at the end of a row indicates the number of sts you will have after completing that row. You may weave in your tails as you go, or wait to the end and weave in the tails. I prefer to weave as I go as a time saver. When laid flat and unstretched, the finished and joined wristlet will measure about 4-3/4-5" in length from the join to the fold. It will have an opening of about 9.5 inches. The version with the leather wrap will overlap the joined end by about 1/2 inch.
Infos :
Note on multi-colored versions: To make a multi-colored wristlet, follow the color combination chart in the Construction Notes section on pg. 2 indicating which color will be used in each row. Before making each color change, I recommend you fasten off and weave the ends. Always weave your tail into the matching color in the wristlet for a clean appearance. For color changes at the beginning of Row 2 or 4, join the new color with a standing Sc in the first st of the row (it will count as a st). For a color change at the beginning of row 3, join the yarn to the first st with a slip st (does not count as a st) and begin making your Cone sts starting in the first st where you joined.
— Standard Wristlet Keychain with 1/2-inch swivel hook ring (No Leather) :
Info :
Create a Long Tail Foundation Ch (See Special Stitches Section on pg. 4-5) for a total of 32 chs (see instructions and photo tutorial in Special Stitches section). Alternatively, you may place a slip knot on your hook leaving a 3-4 inch tail for weaving, and ch 32.
Round 1 :
Row 1 (RS) : Ch 1. Flip the long tail foundation ch over so that you will be working into the backside (working under 2 loops) of each foundation st. (Note: if you used a regular foundation ch, you will work into the back bump of each ch starting with the 2nd ch from the hook). Work 1 Sc into each st across row. Ch 1 and turn your work. (32)
Round 2 :
Row 2 (WS) : Sc in each st across row. Ch 1 and turn your work. (32)
Round 3 :
Row 3 (RS) : Work a Cone st (See Special Stitches section on pg. 3) into each st across row. Ch 1 and fasten off. Do not turn your work. (32)
Round 4 :
Row 4 (RS) : Place a slip knot on your hook and join to the first st with a standing Sc (counts as a st). Work a Sc into each remaining st in row. Do not fasten off. (32)
Info :
Seam wristlet ends together and attach swivel hook as follows (see photos on next page): Turn work so that the RS of the end of Row 4 is facing you. Fold the wristlet under in half so the WSs are together and the ends are aligned at the top. You will be making a total of 3 sts to seam the ends and attach the swivel hook. These sts should be worked with a little tighter tension than normal to keep the connection tight.
First Seam St :
Work the first 1st half of a Sc2tog by inserting hook into the side of the final st just made at the end of Row 4 and in the side of the first st of Row 4 on the other end, YO and pull up a loop through both layers (2 loops on hook). Insert hook again into both layers in the space between the first insertion point and the center point of the wristlet ends, place swivel hook ring on the hook with the clasp hanging down, YO and pull up a loop (catching the ring of the swivel hook), YO and pull through all 3 loops on hook.
Second Seam St :
Working into the side of the Cone sts at the ends of Row 3, work 1 Sc through both layers and also through the ring of the swivel hook.
Third Seam St :
Work the first 1st half of a Sc2tog by inserting hook into both layers in the space between the Second Seam St and the end sts from Row 1 and also through the swivel hook ring, YO and pull up a loop (2 loops on hook). Now insert hook into the end sts of Row 1 on both layers (do not insert through the swivel hook ring), YO and pull through all 3 loops on hook. Ch 1 and fasten off. Weave in all tails.
Info :
Photo (left) shows how the wristlet is folded in half to bring the two ends together with WS facing each other. Photo (right) shows how to work through both layers and the ring in the second half of the first SC2tog.
Info :
Photo (left) fastening off after seaming and attaching swivel hook. Photo (right) working the tail through the final st on ring before weaving in to pull it closer to the other sts on the ring and look more polished.
— Leather Wrapped Wristlet Keychain with 1-inch swivel hook ring :
Info :
Complete Rows 1-4 of the wristlet following instructions for the standard version on pg. 6.
Info :
Seam wristlet ends together as follows. Turn work so that the RS of the end of row 4 is facing you. Fold the wristlet under in half so the WSs are facing each other, and the ends are together at the top. You will be making a total of 3 sts to seam the ends together.
First Seam St :
Work a Sc2tog by inserting hook into the side of the final st just made at the end of Row 4 and in the side of the first st of Row 4 on the other end, YO and pull up a loop through both layers (2 loops on hook). Now insert hook through both layers in the space between the first insertion point and the center point of the wristlet ends, YO and pull up a loop, YO and pull through all 3 loops on hook.
Second Seam St :
Working into the side of the Cone sts at the ends of Row 3, work 1 Sc through both layers.
Third Seam St :
Work a Sc2tog by inserting hook into both layers in the space between the Second Seam St and the end sts from Row 1, YO and pull up a loop (2 loops on hook). Now insert hook into the end sts of Row 1 for both layers, YO and pull through all 3 loops on hook. Ch 1 and fasten off. Weave in all tails.
Info :
Attach Swivel hook with 1-inch ring using leather : Use a leather tag or strip of leather that is 2.5 inches long, by 1 inch wide. Leather with a thickness of about 2mm or a little thicker works well, but not so thick that it is hard to bend. Using a leather hole punch or awl, make four holes across the 1-inch ends of the strip to be used as sewing holes. Attach a 10-inch length of yarn to the WS of the wristlet near the seamed edges as shown (see photo).
Info :
Photo (left) Cut and punched leather strip. Leather tool can be found at craft stores or my Amazon Affiliate Storefront (see link at end of pattern). Photo (right) Yarn attached near edge on WS 1/4 inch from seam and ready to sew on through the leather wrap.
Info :
Thread the leather strip through the 1-inch ring of swivel hook and wrap the ends of the leather around the seamed ends of the wristlet. Sew through the holes of both layers working back and forth through all of the holes to attach. Knot off on the WS of the work and weave in tail to finish.
Info :
Photo (left) First two stitches are sewn. Photo (right) Working across sewing through both layers and the pre-punched holes on the leather strip.
Info :
Your Highline Wristlet Keychain is now complete! Enjoy!
This Highline Wristlet Keychain pattern is a quick, satisfying make that transforms scraps into something functional and beautiful. Personalize it with color stripes, a leather wrap, or a charm to make it uniquely yours. Perfect for gifts, markets, or a little handmade treat for yourself. 🧶✨