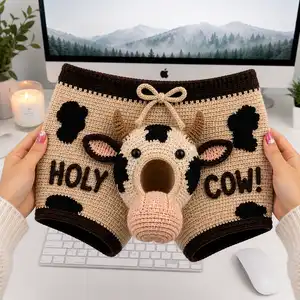
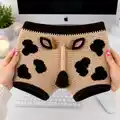
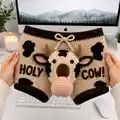
A cheeky, wearable crochet shorts design with a 3D cow face pouch centered on the front. The shorts feature a contrasting brown waistband and leg cuffs, playful black cow spots, embroidered "HOLY COW!" text, and a tubular snout that forms the front opening. This pattern is made in pieces (shorts body, cow head, snout tunnel, ears, horns, spots, drawstring) and sews together for a durable, comfortable novelty garment.
Progress Tracker
0% Complete
— Head (Cow Face Ring) :
Round 1 :
6 sc in magic ring (6)
Round 3 :
(1 sc, inc) x 6 (18)
Round 4 :
(2 sc, inc) x 6 (24)
Round 5 :
(3 sc, inc) x 6 (30)
Round 6 :
(4 sc, inc) x 6 (36)
Round 7 :
(5 sc, inc) x 6 (42)
Round 8 :
(6 sc, inc) x 6 (48)
Info :
At this stage the head is the base sphere size for the face area. Use the same main beige/tan yarn used for the shorts to help the head blend slightly into the garment. Keep tension consistent for a smooth, dense fabric.
Round 9 :
1 sc in each st (48)
Round 10 :
1 sc in each st (48)
Round 11 :
1 sc in each st (48)
Round 12 :
1 sc in each st (48)
Info :
Place safety eyes between rounds 12-13 approximately 12-14 stitches apart depending on desired expression. Mark the exact stitches with stitch markers. If using embroidered eyes, mark positions now and plan embroidery later.
Round 13 :
(6 sc, inc) x 6 (54)
Round 14 :
1 sc in each st (54)
Round 15 :
1 sc in each st (54)
Round 16 :
(7 sc, inc) x 6 (60)
Round 17 :
1 sc in each st (60)
Info :
At round 16-17 the head is reaching full width for the cow face. You may add small black facial patches by changing to black yarn and doing surface crochet or small appliques—note placement around the eyes and top center of the head.
Round 18 :
1 sc in each st (60)
Round 19 :
1 sc in each st (60)
Round 20 :
(7 sc, dec) x 6 (54)
Round 21 :
(6 sc, dec) x 6 (48)
Info :
Begin light stuffing into the head now. Stuff firmly but leave enough room for the snout tunnel to be sewn into the center front opening. Stuff more around the cheeks and sides, but keep the center front area more open to accept the snout tube.
Round 22 :
(5 sc, dec) x 6 (42)
Round 23 :
(4 sc, dec) x 6 (36)
Round 24 :
(3 sc, dec) x 6 (30)
Info :
Round 24 is where the head is shaped towards the base that will meet the shorts. Keep stitch markers at primary seams for attachment alignment later. Finish stuffing more firmly now to help maintain a flat back where the head will be sewn to the garment.
Round 25 :
(2 sc, dec) x 6 (24)
Round 26 :
(1 sc, dec) x 6 (18)
Round 28 :
Fasten off leaving a long tail for sewing to the shorts. Do not close completely — we will flatten and sew this edge onto the shorts' front opening.
Info :
If you plan to add an inner lining behind the head (for comfort or coverage) you can crochet a flat circle now: ch 2, 6 sc in 2nd ch, then (1 sc, inc)x3 to reach 9 sc and continue until you have a disc about 10-12 rows across, then fasten off and reserve for later lining attachment.
— Snout / Tunnel (Front Pouch Tunnel) :
Info :
The snout forms a tunnel projecting from the cow face to create the pouch opening. Work this piece in a firm stitch using a slightly smaller hook than your shorts for structure. This tunnel is worked in continuous rounds to form a tube with a reinforced opening ring.
Round 1 :
6 sc in magic ring (6)
Round 3 :
(1 sc, inc) x 6 (18)
Round 4 :
(2 sc, inc) x 6 (24)
Round 5 :
(3 sc, inc) x 6 (30)
Round 6 :
(4 sc, inc) x 6 (36)
Info :
By round 6 the tunnel mouth radius is established; measure against the head opening to ensure it will fit snugly. If you need a larger or smaller opening, add or remove increase rounds accordingly (each increase round adds 6 sts).
Round 7 :
1 sc in each st (36)
Round 8 :
1 sc in each st (36)
Round 9 :
1 sc in each st (36)
Round 10 :
1 sc in each st (36)
Info :
Work the next 12-18 rounds in the tube to reach desired tunnel length (measured from head face out approximately 8-12 cm depending on preference). Keep the fabric dense; consider using a 3.0mm hook here.
Round 11 :
1 sc in each st (36)
Round 12 :
1 sc in each st (36)
Round 13 :
1 sc in each st (36)
Round 14 :
1 sc in each st (36)
Round 15 :
1 sc in each st (36)
Round 16 :
1 sc in each st (36)
Round 17 :
1 sc in each st (36)
Round 18 :
1 sc in each st (36)
Round 19 :
1 sc in each st (36)
Info :
At around round 18-20 start testing tunnel length by holding near the head to ensure proportions are pleasing. The outermost rounds should be slightly tapered to create a sewn seam that sits flush against the head opening.
Round 20 :
(4 sc, dec) x 6 (30)
Round 21 :
1 sc in each st (30)
Round 22 :
1 sc in each st (30)
Round 23 :
(3 sc, dec) x 6 (24)
Round 24 :
1 sc in each st (24)
Round 25 :
(2 sc, dec) x 6 (18)
Round 26 :
(1 sc, dec) x 6 (12)
Round 28 :
Fasten off leaving long tail to sew into the center front of the head. This small end will sit inside the head — do not stuff tightly into the closed end; instead flatten and sew shut after attachment.
Info :
For a reinforced mouth ring: before final closing, insert a small, circular plastic ring or wrapped wire ring between rounds 7-9 (inside the tube) and whip stitch the tube over the ring to secure. This gives a stable, non-collapsing opening.
— Snout Tip (Rounded Nose) :
Round 1 :
6 sc in magic ring (6)
Round 3 :
(1 sc, inc) x 6 (18)
Round 4 :
(2 sc, inc) x 6 (24)
Round 5 :
1 sc in each st (24)
Round 6 :
(2 sc, dec) x 6 (18)
Round 7 :
(1 sc, dec) x 6 (12)
Round 9 :
Fasten off leaving tail to sew onto the outer end of the snout tube. Lightly stuff the tip to achieve the rounded nostril look; the pink yarn will create a softer nose contrast.
Info :
Work the snout tip in a slightly softer yarn (pink) to make it visually distinct. Sew to the tube's end with an invisible whipstitch, centering the tip and matching stitch counts for a neat join.
— Ears (Make 2) :
Round 1 :
6 sc in magic ring (6)
Round 3 :
(1 sc, inc) x 6 (18)
Round 4 :
1 sc in each st (18)
Round 5 :
(2 sc, dec) x 4, 2 sc (14)
Round 6 :
1 sc in each st (14)
Round 7 :
Fold ear flat and sl st across to create a curved ear shape, then change to pink for inner ear: join pink in center and sc around inner oval for 3 rounds (optional)
Info :
Make the ear border in dark brown to match patches seen on the shorts. Sew the ears to the head between rounds 11-13 of the head so they sit slightly to the sides and forward-facing. Ears should be slightly cupped.
Round 8 :
Fasten off leaving long tails for sewing
— Horns (Make 2) :
Round 1 :
6 sc in magic ring (6)
Round 3 :
1 sc in each st (12)
Round 4 :
(2 sc, dec) x 3 (9)
Round 5 :
1 sc in each st (9)
Round 6 :
(1 sc, inc) x 3 (12)
Round 7 :
1 sc in each st (12)
Round 8 :
(2 sc, inc) x 3 (15)
Round 9 :
1 sc in each st (15)
Round 10 :
(2 sc, dec) x 3 (12)
Round 11 :
(1 sc, dec) x 4 (8)
Round 12 :
Fasten off leaving tail for sewing. Make two matching horns and stuff lightly; horns should be firm at the base and tapering toward the top.
Info :
Sew horns to the top of the head about 6-8 stitches apart (depending on head width). Angle slightly outward and forward for a natural cow horn position. Use pins to test placement before sewing.
— Shorts Body (Worked in the Round — Waist to Cuffs) :
Info :
The shorts are worked in continuous rounds to create a tubular fabric. Start with a small magic ring and increase each round by 6 stitches until you reach 96 stitches (common for a small adult waist). Adjust final circumference by adding or subtracting increase rounds (each full increase round adds 6 sts).
Round 1 :
6 sc in magic ring (6)
Round 3 :
(1 sc, inc) x 6 (18)
Round 4 :
(2 sc, inc) x 6 (24)
Round 5 :
(3 sc, inc) x 6 (30)
Round 6 :
(4 sc, inc) x 6 (36)
Round 7 :
(5 sc, inc) x 6 (42)
Round 8 :
(6 sc, inc) x 6 (48)
Round 9 :
(7 sc, inc) x 6 (54)
Round 10 :
(8 sc, inc) x 6 (60)
Round 11 :
(9 sc, inc) x 6 (66)
Round 12 :
(10 sc, inc) x 6 (72)
Round 13 :
(11 sc, inc) x 6 (78)
Round 14 :
(12 sc, inc) x 6 (84)
Round 15 :
(13 sc, inc) x 6 (90)
Round 16 :
(14 sc, inc) x 6 (96)
Round 17-26 :
1 sc in each st (96)
Info :
Rounds 17-26 form the main waist/hip area. Try the garment on (or measure circumference) at this point to ensure comfortable fit. If you need a longer torso, work additional even rounds before beginning leg separation.
Round 27 :
BLO 1 sc in each st around for textured band (96)
Round 28 :
Switch to dark brown yarn: 1 sc in each st BLO (96)
Round 29-32 :
1 sc in each st (96) — working in dark brown to create the visible waistband. For a finished elastic look, work one or two rounds of hdc if you want a thicker band.
Info :
To create a slightly cinched waistband, use a row of sc in BLO before changing to the brown, then decrease 6 sts evenly around the next round in brown to tighten slightly if preferred. For true elasticity, insert elastic band into the waistband tunnel after finishing.
Round 33 :
Change to beige/tan yarn: 1 sc in each st (96)
Round 34-40 :
1 sc in each st (96)
Info :
Rounds 34-40 are the front face area. Mark the center front and the desired vertical position for the cow head using pins so you know where the head will attach. This area will later be cut (or we will create an aperture) for the snout tunnel insertion—see assembly steps for exactly how to cut and reinforce the opening.
Round 41 :
Work next round in BLO to create a subtle ridge where the leg openings will be separated (96)
Round 42 :
Begin dividing for leg openings: for the left leg work 48 sts, then place a removable marker and skip 0 ch (we will split the fabric). Continue working the next 48 sts in the round — you will now create two leg tubes by working back and forth in rows over each half of the stitches.
Info :
This method keeps the shorts seamless around the waist. Alternatively you may flatten the tube and seam the front and back to make a traditional shorts silhouette. The method below forms two legs directly from the tube for a smooth finish.
Round 43-58 (Each Leg Tube — worked separately) :
Work each leg in rows turning at the end of the 48-st panel: Row 1: ch1, sc48 across (48); Row 2-16: sc48 across (48). Repeat on second leg. After reaching desired leg length, rejoin both leg panels to a continuous round around both leg openings by placing all 96 sts back on the hook in order and joining with sl st. (96)
Info :
Leg length in the photo is short (boxer-brief style). Adjust leg length by working more or fewer row rounds before rejoining. Keep the fabric dense — sc throughout. For the cuffs, switch to dark brown yarn when you have 6 rounds remaining.
Round 59-60 :
Change to dark brown: 1 sc in each st (96)
Round 61 :
BLO sc around to create a neat cuff ridge (96)
Round 62 :
1 sc in each st (96)
Info :
Fasten off and weave tails inside the waistband and cuffs. For a cleaner finish, add a round of sl st in contrasting color along the cuff edges if desired. Leave the front center marked for the cow head attachment location.
— Spots and Appliques (Multiple Small Pieces) :
Info :
Make several irregular-shaped black appliques to stitch onto the shorts body. Each applique is worked flat in rounds to create organic patches. Make 6 patches of varying sizes to match the photo.
Patch A (Larger) Round 1 :
6 sc in magic ring (6)
Round 3 :
Sc around but occasionally add an extra sc (surface bulge) to create an irregular shape (12)
Round 4 :
Continue sc around and on 3 points add (1 sc, inc) to form lobes (15)
Round 5 :
Sc around keeping edges slightly uneven (15)
Round 6 :
Fasten off leaving long tail for sewing. Make 5-6 patches in different sizes using this logic; do not worry about exact counts, keep them organic to emulate cow spots.
Info :
Pin appliques to the shorts in a balanced pattern: two on the front near the cow head, two on the bottom hem, and one near the back or side. Sew with mattress stitch or whipstitch. For extra security, surface crochet around the applique edge after sewing.
— Letters (HOLY COW!) Surface Embroidery :
Info :
Use dark brown yarn and a yarn needle to embroider letters on the left and right front panels. Mark letter positions with pins. Use backstitch or chain stitch for bold letters. Each letter occupies approximately 10-12 stitches height in the finished fabric — plan spacing accordingly.
Step :
Trace letter shapes lightly with a removable fabric marker or with pins, then stitch through the fabric using tightly pulled yarn to ensure letters are visible against the crocheted texture. Make sure stitches catch both loops to anchor firmly.
Info :
To get a raised look like in the photo, embroider letters more than once or add a small chain-stitched border before filling. Keep embroidery secure as the shorts may stretch during wear.
— Drawstring Cord and Bow :
Info :
Make a drawstring by chaining to the measured waist width (leaving slack for tie) and working 1 sc in each chain back along the chain to create a sturdy cord. Alternatively, use an i-cord or braided yarn cord. Work two ends and tie into a bow at the center front above the head.
Cord :
Ch 80 (or length to fit waistband width plus 20 cm for tying); sc back into each ch for firm cord; fasten off and weave ends. Make a looped bow and stitch to the waistband at the front center. Hide tails neatly inside the waistband tunnel.
Info :
For durability, run the drawstring through a small tunnel inside the waistband (create by folding top rounds inward and stitching) so the cord can be adjusted without wearing the fabric. Add cord stops if desired.
— Assembly & Finishing Prep :
Info :
Before sewing any pieces together, block the shorts gently by pinning to shape and allowing fabric to relax. Pin the head to the marked center front making sure the snout tube aligns with the head front opening. The head back will be nearly flat to sit against the shorts.
Step :
Sew black patches and letters to shorts first, then pin and sew the cow head around the snout opening. Use the long tail left on the snout tunnel and head to whipstitch them together from the inside and outside, creating a neat seam. Weave in all ends and trim.
Info :
Optional: Add a small inner lining disc behind the head before sewing for extra comfort and to protect skin from seams and safety eyes. If using safety eyes, either remove them or replace them with embroidered eyes for children’s apparel or washable pieces.
This playful crochet pattern brings a silly, clever twist to wearable craft — a pair of comfortable shorts with a 3D cow face pouch that is sure to get laughs! The thoughtful construction balances fun and function: sturdy waistband, reinforced snout ring, and securely attached appliques. Sewing the pieces together is a satisfying finishing step that brings the character to life. 🧶 Make one for party gifts or keep it as a whimsical wardrobe piece — you'll love the smiles it creates! 😄