🧢 Beautiful ✨ Detailed πŸ’ Adorable

Hoodie Can Koozie Pattern

Hoodie Can Koozie Pattern
4.0β˜… Rating
1-2 Hours Time Needed
2.9K Made This
βœ‚οΈ

Beginner Friendly Level

Perfect for those just starting their crochet journey, with clear instructions and simple techniques

⏱️

Quick Make

Complete in under 2 hoursβ€”lightning fast fun for instant gratification and quick gifts.

β˜•

Warm Welcome

A comforting piece for home or gifts that brings handmade warmth to everyday moments and special occasions.

About This Hoodie Can Koozie Pattern

This pattern creates a hoodie-style can koozie with an attached hood, small sleeves and a front pocket, designed to fit standard 12 oz cans and a slim alternative for bottles. It uses U.S. crochet terminology and simple stitches to shape the cozy and hood. The instructions include both the main koozie rounds and separate pieces with clear assembly directions.

Hoodie Can Koozie Pattern crochet pattern - detailed view of completed project

You'll find step-by-step rounds for the main koozie, hood (standard and slim versions), sleeves and pocket, plus assembly steps to finish the piece. The pattern pictured uses a variegated worsted weight yarn for a colorful result.

Why You'll Love This Hoodie Can Koozie Pattern

I absolutely love this pattern because it turns a simple cozy into a tiny handmade outfit, complete with a hood and sleeves that make ordinary cans charming. I enjoy how quick it is to work up β€” you get a finished, gift-ready project in a short time. The construction is satisfying and intuitive, so I can relax and crochet without constant counting. Finally, I love that it has a slim alternative so you can outfit different drink sizes with the same pattern.

Hoodie Can Koozie Pattern step 1 - construction progress Hoodie Can Koozie Pattern step 2 - assembly progress Hoodie Can Koozie Pattern step 3 - details and accessories Hoodie Can Koozie Pattern step 4 - final assembly and finishing

Switch Things Up

I like to change up the colors to match party themes; try bright variegated yarns for a fun, festive look.

I often make the koozie larger by using thicker yarn and a bigger hook for a chunkier, warmer cozy.

To create a mini keychain version, use fingering weight yarn and a smaller hook for a tiny, portable cozy.

I sometimes add buttons or a little pom-pom to the hood for extra personality and charm.

You can embroider a small face or initials on the pocket to personalize each koozie for gifts.

Consider lining the pocket with a small piece of felt for structure and a neat interior finish.

I recommend trying contrasting trim around the hood edge to make it pop and give a more finished look.

Want a more secure fit? Add a small elastic band inside the top row to snug the koozie to the can.

I like to experiment with different sleeve lengths and pocket sizes to change the overall silhouette of the hoodie.

Try using sparkly or metallic yarn for holiday versions to make festive drink accessories that stand out.

Common Mistakes & How to Fix Them

βœ— Not joining your initial chain correctly can result in a twisted base; join with a slip stitch to the first chain and check that the chain is not twisted before working around. βœ— Forgetting to follow the alternate stitch counts for the slim version will cause sizing issues; always use the numbers in brackets and the blue-font alternatives when making slim sizes. βœ— Skipping the instruction to fasten off and weave in ends can leave loose tails; fasten off at the indicated point and weave in ends immediately to secure your work. βœ— Sewing the hood to the wrong edge can make the seam awkward; align the hood to the indented (non-round) edge and whip stitch carefully along that edge for a neat finish.

Hoodie Can Koozie Pattern

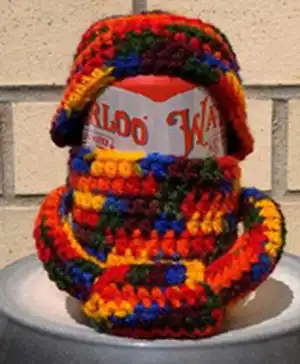
Make a fun, wearable can koozie with a cozy hood, pocket and little sleeves β€” perfect for gifting or jazzing up your drinks. This pattern includes instructions for both standard 12 oz cans and a slim version for bottles and slim seltzers. Clear, step-by-step rounds and simple assembly make this a quick and satisfying crochet project you can finish in one sitting.

Beginner Friendly 1-2 Hours

Materials Needed for Hoodie Can Koozie Pattern

β€” Main Fabric

  • 01
    Medium size 4 (worsted) yarn - approximately 100 yards (Pictured: Loops & Threads Impeccable Yarn in Rainbow Bright)
  • 02
    Use enough contrast or matching yarn for hood, pocket and sleeves as desired
  • 03
    Standard 12 oz can fit instructions included; slim version for spiked seltzers and bottles

β€” Tools Required

  • 01
    Crochet hook size 4 mm (US G/6)
  • 02
    Sewing needle (yarn needle) for assembly
  • 03
    Scissors
  • 04
    Stitch markers (recommended for rounds)
  • 05
    Tapestry needle for weaving in ends

Progress Tracker

0% Complete

β€” Main Koozie :

Info :

Instructions are written for standard cans with the slim alternative shown in blue font.

Info :

Ch 35 /30, join with sl to first ch. Be careful not to twist.

Round 1 :

1 sc in each st around [35 /30]

Rounds 2-10 /Rounds 2-12 :

1 hdc in each st around [35 /30]

Info :

Fasten off and weave in ends.

β€” Hood (Standard Can Version) :

Info :

Note: every round and row from this point on ends in ch 1 and turn

Round 1 :

6 sc in magic ring [6], sl to 1st st

Round 2 :

(inc) repeat 6 times [12], sl to 1st st

Round 3 :

(sc in next st, inc) repeat 6 times [18], sl to 1st st

Round 4 :

(sc in next 2 st, inc) repeat 6 times [24], sl to 1st st

Round 5 :

(sc in next 3 st, inc) repeat 6 times [30], sl to 1st st

Round 6 :

1 sc in each st around [30], sl to 1st st

Round 7 :

(sc in next 4 st, inc) repeat 6 times [36], sl to 1st st

Round 8-13 :

1 sc in next 30 st, making an incomplete round

Info :

Fasten off, leaving a tail for sewing.

β€” Hood (Slim Version) :

Round 1 :

6 sc in magic ring [6], sl to 1st st

Round 2 :

(inc) repeat 6 times [12], sl to 1st st

Round 3 :

(sc in next st, inc) repeat 6 times [18], sl to 1st st

Round 4 :

(sc in next 2 st, inc) repeat 6 times [24], sl to 1st st

Round 5 :

1 sc in each st around [24], sl to 1st st

Round 6 :

(sc in next 3 st, inc) repeat 6 times [30], sl to 1st st

Round 7-8 :

1 sc in each st around [30], sl to 1st st

Round 9-13 :

1 sc in next 24 st, making an incomplete round

Info :

Fasten off, leaving a tail for sewing.

β€” Sleeves (Make 2) :

Info :

Same for both sizes

Item Name (P1) :

Ch 17

Row 1 :

Starting in 2nd ch from hook, 1 sc in next 16 ch

Rows 2-6 :

1 sc in each st across [16]

Info :

Fasten off, leaving a long tail for sewing. Whip stitch the long edges together.

β€” Front Pocket :

Info :

Same for both sizes. Leaving a "~8" tail for sewing, ch 8

Row 1 :

Starting in 2nd ch from hook, 1 sc in next 7 st

Row 2 :

1 sc in each st across [7]

Row 3 :

inc in 1st st, 1 sc in next 5 st, inc in last st [9]

Row 4 :

1 sc in each st across

Row 5 :

inc in 1st st, 1 sc in next 7 st, inc in last st [11]

Row 6 :

1 sc in each st across [11]

Info :

Fasten off, leaving a tail for sewing.

β€” Assembly :

Round 1 :

Whip stitch the hood along the indented (non-round) edge to the top row of the main koozie.

Round 2 :

With the smaller edge of the pocket toward the top, whip stitch the top and bottom edges of the pocket to the "belly" of the main koozie. Leave sides open.

Round 3 :

Whip stitch the two sleeves to the "shoulder" areas. Stuff the sleeve ends into the pocket if you wish.

Round 4 :

Weave in all ends.

Assembly Instructions

  • Whip stitch the hood along the indented (non-round) edge to the top row of the main koozie.
  • With the smaller edge of the pocket toward the top, whip stitch the top and bottom edges of the pocket to the belly of the main koozie, leaving the sides open.
  • Whip stitch the two sleeves to the shoulder areas; you may stuff the sleeve ends into the pocket for a finished look.
  • Weave in all ends thoroughly to secure seams and tidy the finished koozie.

Important Notes

  • πŸ’‘Note that every round and row from the hood instructions point on ends in ch 1 and turn; follow that convention for correct shaping.
  • πŸ’‘Be careful not to twist the foundation chain when joining with a slip stitch at the start of the main koozie.
  • πŸ’‘Fasten off and weave in ends at the indicated points to prevent unraveling and ensure a neat finish.
  • πŸ’‘When sewing pieces together, align edges and pin or hold in place before whip stitching to ensure even placement.

This Hoodie Can Koozie pattern turns ordinary cans into playful, handmade companions with a hood, pocket and tiny sleeves. Whether you make one for a party or as a cute handmade gift, it adds personality to any drink. Try bright variegated yarns or solid colors for different looks. 🧢✨

You ask,

we answer.

FAQs

What size will the finished piece fit?

The pattern includes instructions for standard 12 oz cans (most beer and soda cans) and a slim version for spiked seltzers and beer bottles; follow the standard or slim stitch counts provided.

Can I use a different yarn weight or hook?

Yes, you can change yarn weight, but this will change the final size; choose an appropriate hook for your yarn and expect size variation if you deviate from the recommended worsted weight and 4 mm hook.

Is this pattern suitable for beginners?

Yes, the pattern is rated beginner-friendly and uses basic stitches like single crochet and half double crochet with clear round-by-round instructions.

How long will this project take?

Most crafters can complete this quick project in under 2 hours, though time may vary based on experience and any customizations you make.