🧢 Beautiful ✨ Detailed πŸ’ Adorable

Hopeful Owls Amigurumi Pattern

Hopeful Owls Amigurumi Pattern
4.7β˜… Rating
2-3 Hours Time Needed
3.0K Made This
βœ‚οΈ

Intermediate Level

Ideal for those with basic crochet experience, featuring slightly more advanced stitches and techniques to expand your skills.

⏱️

Bite-Sized Project

Finishes in 2-4 hoursβ€”perfect for an afternoon of creative relaxation.

🧸

Cute Companion

An adorable friend to cherish, handcrafted with love to bring comfort and joy for years to come.

About This Hopeful Owls Amigurumi Pattern

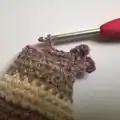
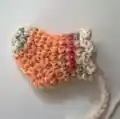
This pattern creates a small, striped Hopeful Owl amigurumi complete with ear tufts, button eyes and a tiny stocking to hang from a stick or tree. The design uses DK weight yarn and simple UK double crochet shaping to build a neat body shape. Small accessories like a loop, little feet and a lobster-clip option make this pattern versatile for ornaments or bag charms.

Hopeful Owls Amigurumi Pattern crochet pattern - detailed view of completed project

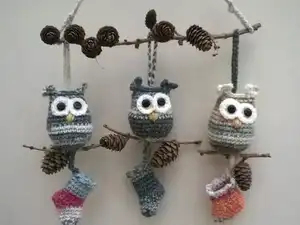
Clear round-by-round instructions guide shaping and finishing, with optional wings and a small stocking pattern included. You can easily adapt colours and finishes to create unique keepsakes or quick gifts.

Why You'll Love This Hopeful Owls Amigurumi Pattern

I absolutely love this pattern because it combines simple construction with charming details that really bring the little owl to life. I enjoy experimenting with colour mixes and watching each stitch settle into place to create personality in every piece. The small size makes them quick to make yet very giftable, and I love that one ball of DK can make several owls. The addition of a tiny stocking or a lobster clip gives the design versatility and makes finishing options fun.

Hopeful Owls Amigurumi Pattern step 1 - construction progress Hopeful Owls Amigurumi Pattern step 2 - assembly progress Hopeful Owls Amigurumi Pattern step 3 - details and accessories Hopeful Owls Amigurumi Pattern step 4 - final assembly and finishing

Switch Things Up

I love how easy it is to customize these owls by simply changing colours and yarn types; try a pastel palette for a nursery theme or bold stripes for a modern look.

Want a bigger owl? Use a chunkier DK or worsted yarn and a larger hook to scale the entire pattern up proportionally.

To make a tiny keychain version, use fingering weight yarn and a small hook, then attach a keyring instead of a stick or loop.

I often swap the button eyes for embroidered eyes or safety eyes (if appropriate) to change the expression and final look.

Try different yarn textures like tweed or a boucle for extra character and surface interest across the body and stockings.

Make seasonal variations: bright reds and greens for Christmas stockings, or soft florals for spring decorations.

For a posable version, add thin craft wire into the feet or body and wrap carefully to keep a natural silhouette.

Add tiny accessories like a crocheted scarf, hat, or miniature gift inside the stocking to make each owl feel unique.

I sometimes embroider eyelids or eyebrows to alter the expression and personality of each owl β€” it’s a subtle change that makes a big difference.

If you make the bag charm version, experiment with different swivel clips and charms to suit different bags and tastes.

Try mixing yarn brands for subtle striping effects and to use up yarn scraps for a scrappy, charming look.

Common Mistakes & How to Fix Them

βœ— Skipping a stitch marker when working continuous rounds results in losing track of the round start; always place a marker at the first stitch and move it each round. βœ— Overstuffing the body makes shaping difficult and distorts ear tufts and the top edge; stuff gradually and not too firmly to keep the owl neat. βœ— Placing eyes too low or unevenly will change the owl's expression; measure and space the button eyes carefully before sewing and check placement against the photo. βœ— Failing to sew the heel seam of the stocking securely will make it come apart with handling; press the heel edges together and sew firmly with the yarn tail before tidying ends.

Hopeful Owls Amigurumi Pattern

Make a charming Hopeful Owl amigurumi you can hang on a branch or turn into a cute bag charm. This pattern uses DK yarn and a 3.5mm hook to create small striped owls with button eyes, a little stocking and optional wings. The instructions are designed to be friendly while giving you shaping details for a neat finish. Perfect for using up yarn scraps and making quick, giftable projects.

Intermediate 2-3 Hours

Materials Needed for Hopeful Owls Amigurumi Pattern

β€” Main Fabric

  • 01
    Sirdar Crofter DK yarn (50g balls) - variegated colour mixes recommended; one ball will make several owls
  • 02
    Soft yellow/beige DK yarn - small amount for beak and feet
  • 03
    Cream DK yarn - small amount for eye discs
  • 04
    Contrast DK yarn scraps - small quantities for stockings and wings

β€” Tools Required

  • 01
    Crochet hook size 3.5mm
  • 02
    Stitch marker
  • 03
    Dark buttons 1cm (for eyes) - polished coconut shell recommended
  • 04
    Stick, cinnamon stick or lobster clip to hang the owl
  • 05
    Ribbon (optional)
  • 06
    Polyester stuffing
  • 07
    Yarn needle
  • 08
    Needle and thread to attach buttons

Progress Tracker

0% Complete

β€” Owl body :

Round 1 :

make a Magic Circle of 6dc (6)

Round 2 :

2dc in each stitch (12sts)

Round 3 :

(1dc, 2dc in the next st) x 6 (18sts)

Round 4 :

(2dc, 2dc in the next st) x 6 (24sts)

Round 5 :

(3dc, 2dc in the next st) x 6 (30sts)

Round 6-11 :

30dc around (30sts)

Round 12 :

(3dc, dc2tog) x 6 (24sts)

Round 13 :

24dc around (24sts)

Round 14 :

(6dc, dc2tog) x 3 (21sts)

Round 15 :

(5dc, dc2tog) x 3 (18sts)

Round 16 :

18dc around (18sts)

Round 17 :

(7dc, dc2tog) x 2 (16sts)

Info :

Do not fasten off yet. Stuff your owl, not too firmly.

Ear tufts (P1) :

To make the ear tufts, slst into the next stitch and make 6ch, now press the top of your owl flat and slst into the same stitch and through into the one behind. Make another 6ch and slst in the same place. Now double crochet along the top of your owl joining the back and front together (this is 6dc for me) until you have only one stitch left (front and back). Slip stitch into the last stitch and make 6 ch, slst into the same place and make another 6ch, slst into the same place again. Fasten off and leave enough yarn to tidy up neatly.

β€” Stocking :

Info :

Picture 1 – shows the completed stocking. Picture 2 – shows the placement of the stitch marker and sewing the heal. Picture 3 – shows the same as pic 2 but from a different angel.

Round 1 :

Make a Magic Circle of 6dc (6sts)

Round 2 :

2dc in every stitch (12sts)

Round 3-5 :

12dc around (12sts)

Round 6 :

12dc around (mark the next stitch with a stitch marker) 1ch turn

Info :

You are now making the heal and will work in rows from R1 to 3.

Row 1 :

6dc, 1ch turn

Row 2 :

6dc, 1ch turn

Row 3 :

6dc and fasten off leaving a 15cm length of yarn.

Info :

Press together the back of heal and sew up the seam with the yarn, tidy away all the ends.

Info :

Begin a new round from the marked stitch

Round 1 :

With a knot on your hook and a 15cm yarn tail, make 1dc in the marked stitch and then 5dc (6sts). Continue with 7 more dc around the heel, spaced evenly. Start you next round in the first dc of this round. (13sts)

Round 2 :

work 13dc around (13sts)

Round 3-5 :

work 13dc around (13sts)

Info :

Now dc about another 10 or 11 stitches until you are at the centre back of your stocking and from here you finish the top edge as follows: Slip stitch into the next stitch and make 2ch, slip stitch into the next 2 stitches and make another 2ch, repeating this pattern around the top edge. When you reach the back of stocking again with 2ch on your hook, slst into your first slst and made 16ch. (This is for your loop, but do not create loop yet)

Info :

Fasten off leaving a 15cm length of yarn. Tidy away any loose ends and use the yarn tail to tidy any gapping you may get when re-joining your yarn after sewing up the heal.

β€” Eyes :

Round 1 :

Make a Magic circle of 6dc (6sts)

Round 2 :

2dc in each stitch, slst into the next st. (12sts) Fasten off leaving 10cm.

Info :

Repeat and make another disc leaving a 25cm length of yarn when you fasten off.

Info :

Use the shorter piece of yarn to stitch the discs together encompassing 3 stitches. Sew a button in the centre of each disc, or offset a little to get your owl to look in different directions. Use the long piece of yarn to stitch the eyes to your owl. I like to catch the stitches at the back of the eye discs so that you cannot see them and this helps them to stand out too.

β€” Beak :

Info :

Use a little yellow/beige yarn to stitch on a beak. I do a V with two stitches and fill in with about another 3 stitches.

β€” Feet :

Info :

Use the same yellow/beige yarn to attach your owl to the stick. Work just offset from the centre bottom of your owl and run stitches right through the owl and around the stick 3 times to make one foot and then wrap the yarn twice around the top of the foot between the owl and the stick and do the same again for the other foot further along the stick. Secure the yarn end.

β€” Attach Stocking :

Info :

Run the chain end of the stocking right between the feet of your owl with a yarn needle and secure to the back of the stocking. Tidy away the end.

β€” Top Loop :

Info :

Make another length of 30 chain for a loop and attach to the top of your owl just below the top stitches at the back. You could use a piece ribbon if you prefer.

β€” Owl Bag Charm :

Info :

For the bag charm you will need to add a lobster clip to the top of your owl. Secure the clip within the two centre dc when closing up the top of your owl. There are 6dc on the top edge so it will be st3 and st4 and include the swivel part of the clip. Or simply stitch on afterwards. Instead of a stick you could make some little feet on the owl itself as in the picture.

β€” Optional Wings :

Round 1 :

Magic circle of 6dc (6sts)

Round 2 :

make 2dc in each st (12sts)

Round 3 :

Slst into the next 10sts, 3ch, dc in 2nd chain from hook, treble into the next chain, miss the next dc and slst into the one after. Fasten off with 15cm piece of yarn to stitch to your owl.

Info :

The Bag Charm Owl also has the little wings in the picture on the previous page.

Assembly Instructions

  • Stitch the two eye discs together encompassing three stitches, sew a 1cm button in the centre of each disc and use the long yarn tail to attach the finished eyes to the front of the owl, catching stitches at the back of the discs so the stitches are hidden.
  • Sew the heel seam of the stocking by pressing the heal edges together and stitching neatly with the yarn tail; tidy away ends and then run the chain end between the owl’s feet and secure to the back of the stocking.
  • Attach ear tufts by following the ear tuft instructions and tidy the yarn tails into the top of the owl so the tufts sit proudly on either side of the head.
  • Wrap the yellow/beige yarn through the base of the owl and around the stick three times to form the feet, then wrap twice around the top of the foot to secure; repeat for the second foot and secure ends.
  • Create a 30-chain loop and secure at the top back of the owl just below the top stitches for hanging, or replace with ribbon if preferred.
  • To make a bag charm, tuck the lobster clip into the two centre dc when closing the top edge of the owl and finish closing so the swivel is included or stitch the clip on afterwards for security.

Important Notes

  • πŸ’‘You will be working in continuous rounds; use a stitch marker to mark the start of the round and move it each round for accuracy.
  • πŸ’‘Stuff the owl gradually and not too firmly to keep the shape neat and to allow the ear tufts and top edge to close cleanly.
  • πŸ’‘Press and sew the stocking heel seam securely and tidy away ends to prevent gaps when hanging or filling the stocking.
  • πŸ’‘Use long yarn tails provided in the pattern to sew pieces together and to tidy any gaps after re-joining yarn following the heel seam.

These Hopeful Owls are small, sweet and endlessly customizable β€” perfect as ornaments, bag charms or little gifts. Make them from scraps or in coordinated colourways for a set to hang from a branch or a wreath. Each owl comes with a tiny stocking and optional wings for extra charm. 🧢✨🎁

You ask,

we answer.

FAQs

What size will the finished piece be?

The finished amigurumi measures approximately 6-8 cm tall depending on yarn thickness and tension when using recommended DK yarn and 3.5mm hook.

Can I use different yarn weights for this pattern?

Yes, you can use different yarn weights; using thicker yarn and a larger hook will create a larger, chunkier owl, while thinner yarn will make a smaller, more delicate version.

Do I need prior crochet experience for this pattern?

This pattern is rated intermediate because it uses continuous rounds, increases and decreases and small finishing techniques, so basic crochet experience is recommended.

How long does this project typically take to complete?

Most crocheters complete one owl in about 2-3 hours, depending on experience, customization and the number of accessories you choose to add.