🧢 Beautiful ✨ Detailed πŸ’ Adorable

Hoppy Baby Bunny Slippers Pattern

Hoppy Baby Bunny Slippers Pattern
4.6β˜… Rating
2-4 Hours Time Needed
3.8K Made This
βœ‚οΈ

Intermediate Level

Ideal for those with basic crochet experience, featuring slightly more advanced stitches and techniques to expand your skills.

⏱️

Bite-Sized Project

Finishes in 2-4 hoursβ€”perfect for an afternoon of creative relaxation.

πŸ‘•

Casual Chic

Relaxed style with a modern twist, perfect for everyday wear while maintaining that handcrafted uniqueness.

About This Hoppy Baby Bunny Slippers Pattern

These Hoppy Baby Bunny Slippers are a sweet crochet pattern for baby sizes 0-6 months and 6-12 months. The pattern includes full round-by-round instructions for the sole, upper, ears, face details, and pom-pom tails. Youll use worsted weight yarn and either an E or F hook depending on the size, and learn a half-treble stitch for the ear shaping.

Hoppy Baby Bunny Slippers Pattern crochet pattern - detailed view of completed project

Finished slippers are soft, cushioned, and trimmed with tiny bows and pom-poms for an extra cute finish. Clear photos and step notes help you work the rounds and assemble everything neatly.

Why You'll Love This Hoppy Baby Bunny Slippers Pattern

I absolutely love this pattern because it turns basic stitches into a charming, wearable baby accessory that feels special. I adore how the half-treble shaped ears stand up and add real personality to the slippers. The construction makes a sturdy sole and a cozy upper so the slippers hold their shape well through wear. I also love that it includes clear counts for two sizes, so you can make the perfect fit for a tiny newborn or an older baby. Sewing on the ears and adding pom-poms is my favorite finishing step because it brings the whole bunny to life.

Hoppy Baby Bunny Slippers Pattern step 1 - construction progress Hoppy Baby Bunny Slippers Pattern step 2 - assembly progress Hoppy Baby Bunny Slippers Pattern step 3 - details and accessories Hoppy Baby Bunny Slippers Pattern step 4 - final assembly and finishing

Switch Things Up

I love customizing these slippers by changing yarn colors to match nursery themes; try pastel pinks, blues, greys, or speckled yarn for a fun look.

I sometimes use a bulky yarn and a larger hook to make a cuddly, oversized slipper perfect for newborn photo props.

I also make minis for keychains by using fingering weight yarn and a very small hook to create tiny charm versions.

I often embroider different facial expressions to give each pair a unique personality β€” a smile, sleepy eyes, or winking face work great.

I like to swap the pom-poms for tiny crocheted flowers or little felt hearts for seasonal variations or gifts.

I sometimes add non-slip dots to the sole with fabric paint if these are for walkers or older babies to improve traction.

I recommend trying a contrast color for the inner ear to make them pop and add a delicate detail to the slippers.

I often change the bow color or replace the bow with a small button or charm for a handmade boutique feel.

I have added a thin elastic across the heel inside the slipper for a snugger fit if the slippers feel a bit loose on active babies.

I sometimes make coordinating hats or mittens using the same yarn and color scheme to create a complete gift set that looks super polished.

Common Mistakes & How to Fix Them

βœ— Starting each round in the wrong stitch causing lopsided slippers; make sure you always start each round in the center back joining stitch as instructed so the slipper keeps its correct shape. βœ— Not working through both the slip stitch and back loop when instructed for Round 5 which results in a flimsy sole; work through both the slip stitches and back loops as shown to create a thicker, sturdier sole. βœ— Counting the turning chain as a stitch at the beginning of rounds which throws off totals; do not count the chain stitch as a stitch unless explicitly stated in the pattern. βœ— Failing to check gauge and hook size which makes sizing inconsistent; make the sole and measure length, then change hook size if the sole is too large or too small to match the listed sizes.

Hoppy Baby Bunny Slippers Pattern

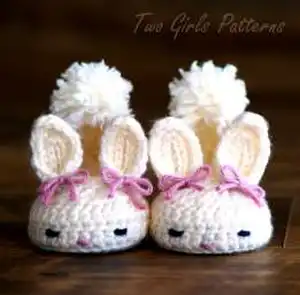
Create adorable baby bunny slippers that are soft, snuggly, and full of charm. This pattern walks you through each round with clear instructions so you can make a perfect pair for baby showers or keepsakes. Youll shape the sole, build a cozy upper, add cute ears, and finish with pom-pom tails and bows. Perfect for gifting or dressing up tiny feet with handmade love.

Intermediate 2-4 Hours

Materials Needed for Hoppy Baby Bunny Slippers Pattern

β€” Main Fabric

  • 01
    3.5 oz ball of worsted weight yarn (approximate amount shown in pattern photo)
  • 02
    Bernat Giggles worsted weight yarn (pictured booties)
  • 03
    Little dab of black yarn for eyes (small amount)
  • 04
    Little dab of pink yarn for face and bows (small amount)

β€” Tools Required

  • 01
    Crochet hook size E / 3.5 mm (recommended for 0-6 months)
  • 02
    Crochet hook size F / 3.75 mm (recommended for 6-12 months)
  • 03
    Yarn needle for sewing and finishing
  • 04
    Scissors to cut yarn and pom-poms
  • 05
    Fingers (wrap yarn around two fingers to make pom-poms)
  • 06
    Optional: stitch markers to mark start of rounds

Progress Tracker

0% Complete

β€” Materials :

Info :

3.5 oz ball of worsted weight yarn. Size E or 3.5 mm Hook (0-6 months). Size F or 3.75mm Hook (6-12 months). Pictured booties made from "Bernat Giggles" worsted weight yarn. Little dab of black and pink yarn for face and bows. :o)

β€” Abbreviations :

Info :

Ch Chain. Sc Single crochet. Sc2tog Single crochet decrease. Hdc Half double crochet. Hdc2tog Half double crochet decrease. Dc Double crochet. Dc2tog Double crochet decrease. Sl st Slip stitch. Htr Half treble crochet.

β€” Notes :

Info :

1. Pattern is written from center back of the heel. You should start each round in the joining stitch which should be in the center back of the heel. If your joining stitch strays to one side, try to adjust accordingly when starting next round. Make sure that you start each round in the center back or the slipper will become lopsided. Sole is already adjusted for tension, only do this for the upper.

Info :

2. Do not count the chain stitch as a stitch at the beginning of a round - throughout pattern.

Info :

3. When joining at end of round, always join to the top of the chain stitch you began the round with - throughout pattern.

β€” How to do a half treble crochet :

Info :

Yarn over two times, insert hook in stitch, yarn over, draw loop through stitch, yarn over, draw through two loops on hook, yarn over, then draw through all three loops on hook.

β€” How to read pattern :

Infos :

A. When there is a number followed by a stitch, that stitch needs to be worked over that number of stitches. Example : "10 sc, 2 sc in next stitch" that is 1 sc in each of the next 10 stitches, then put 2 sc in the next stitch. B. When you see Brackets [] in the pattern that means that you work everything in them as a set or together. For example if you see [sc2tog, 2 sc] 3 times, that means to repeat everything in the brackets three times total as a set.

β€” Gauge :

Info :

5 sc stitches to 1 inch using E 3.5mm hook. 4.5 sc stitches to one inch using F 3.75 hook. Change hook size if necessary to obtain gauge.

Info :

Instead of a gauge swatch I think it is easier to make the sole and see where you stand. If it is too big, then size down your hook. If it is too small, size up your hook. And if it is just right, Awesome! :o)

β€” Sizes: Numbers in Parenthesis () :

Info :

0-6 months- 3.75 inches long. 6-12 months- 4.50 inches long. 0-6 is the first number of stitches in pattern made with an E hook and 6-12 months is the 2nd number in the parenthesis ( ) made with an F hook.

β€” Sole :

Round 1 :

With color A ch 13 (15), 2 sc in 2nd ch from hook, 7(8) sc, 3 (4) hdc, 4 hdc in last ch, 3 (4) hdc down the other side of foundation ch, 7 (8) sc, 2 sc in last ch that already has 2 sc in it. Join with sl st. At end of round you should have 28 (32) total stitches.

Round 2 :

Ch 1 , 2 sc in each of the first two stitches, 6 (7) sc, 4 (5) hdc, 2 hdc in each of the next 4 stitches, 4 (5) hdc, 6 (7) sc, 2 sc in each of the last two stitches. Join with sl st. 36 (40) total stitches in round.

Round 3 :

Ch 2, 1 hdc, 2 hdc in next stitch, 10 hdc, 2 (4) dc, 2 dc in each of the next 8 stitches, 2 (4) dc, 10 hdc, 2 hdc in next stitch, 1 hdc. Join with sl st. 46 (50) total stitches in round.

Round 4 :

Sl st all the way around sole through back loops only. Join with sl st. 46 (50) total stitches in round. (See picture A)

β€” Upper Shoe :

Round 5 :

Note: In this round you will basically be working back over what you just did. You will need to work through both the slip stitches and the back loops that you just worked. (See Pictures B and C). This makes for a thick round and gives body to the bottom of the shoe.

Round 5 :

As stated, working through both the slip stitch and back loops of previous round, Ch 2, 6 hdc, 6 (8) sc, 3 hdc, 16 dc, 3 hdc, 6 (8) sc, 6 hdc, Join with sl st. 46 (50) total stitches in round.

Round 6 :

Ch 2, 6hdc, 6 (8) sc, 3 hdc, 16 dc, 3 hdc, 6 (8) sc, 6 hdc. Join with sl st. 46 (50) total stitches in round.

Round 7 :

Ch 2, 2hdc, hdc2tog, 2 hdc, 6 (8) sc, sc2tog, [hdc2tog] 2 times, [dc2tog] 5 times, [hdc2tog] 2 times, sc2tog, 6 (8) sc, 2 hdc, hdc2tog, 2 hdc, Join with sl st. 33 (37) total stitches in round.

Round 8 :

Ch 2, 5 hdc, 6 (8) sc, [sc2tog] 2 times, 3 dc, [sc2tog] 2 times, 6 (8) sc, 5 hdc. Join with sl st. 29 (33) total stitches in round.

Round 9 :

Sl st all the way around shoe. 29 (33) total stitches in round.

β€” Ears :

Info :

Make 4.

Item Name (P1) :

With E size crochet hook chain 9 (10), 1 htr in 4th ch from hook, 1 (2) htr, 2 dc, 1 hdc, 4 hdc in last chain, (working back down foundation chain) 1 hdc, 2 dc, 2 (3) htr, ch 3, sl st to first ch 3 space. Now sl stitch along the side of foundation ch. Up and back down turning at end of foundation chain. (See Pictures D and E) This gives the ears a little body so that they stand up..... And it makes them cuter. :) Directions for how to do a half treble crochet are on the first page of pattern.

β€” Bunny Face :

Info :

Find center front. With pink yarn make one stitch over center double crochet post almost at bottom of shoe. Count over to 3rd crochet from center and make one stitch with black yarn for each eye. I placed mine right under the top of the first row of double crochets. (I found less and lower was better for the bunny face, but you can do whatever you like.) : ) Thread pink yarn through base of ears and tie a bow on both. (These are great because they cover up the stitching) (See picture G)

β€” Pom Poms :

Item Name (P1) :

Make 2. Wrap yarn around two fingers 20 times. Remove from fingers and tie yarn around center. Cut the loops on the ends. Fluff it up to make it pretty and attach to center-back of bunny so she is pretty from front to back. :o)

β€” Finishing :

Info :

Thread Yarn needle with yarn and attach ears. Stitch ears to slipper several times at center bottom of each ear. Then pull needle and yarn through both sides of ear (See Picture F) and pull together. Stitch ears the rest of the way to body of shoe.

Info :

Weave in ends and you're done!

Assembly Instructions

  • Thread a yarn needle and attach each ear to the slipper by stitching several times at the center bottom of the ear, then pull the needle and yarn through both sides of the ear and pull together to shape before stitching the rest of the ear to the body of the shoe.
  • Find the center front of the slipper and make a pink stitch over the center double crochet post almost at the bottom of the shoe for the nose, then place the black eye stitches at the third crochet from center as described for symmetrical facial placement.
  • Tie a small pink bow through the base of each ear and position it so it covers the seam stitching and adds a neat decorative finish to the face area.
  • Make two pom-poms by wrapping yarn around two fingers 20 times, tie around the center, cut loops, fluff, and sew one pom-pom to the center-back of each slipper as the bunny tail.
  • Weave in all yarn ends neatly on the inside of the slipper to hide them and secure all attachments with extra stitches for durability.
  • Before final stitching, pin ears and bows in place to check symmetry and spacing so both slippers match and appear balanced.

Important Notes

  • πŸ’‘Start each round in the joining stitch at the center back of the heel to avoid lopsided slippers.
  • πŸ’‘Do not count the turning chain as a stitch unless the pattern explicitly instructs you to do so.
  • πŸ’‘When joining at the end of a round, always join to the top of the chain stitch you began the round with to keep the edge tidy.
  • πŸ’‘Work through both slip stitches and back loops when instructed (Round 5) to make a thicker, sturdier sole.

These little bunny slippers are a delightful handmade gift that add instant charm to tiny outfits. Theyre quick to make and packed with sweet details like standing ears, tiny bows, and fluffy pom-pom tails. Make a matching pair for baby showers, new arrivals, or keepsakes youll treasure. 🐰🧢

You ask,

we answer.

FAQs

What size will the finished piece be?

The finished slippers measure approximately 3.75 inches long for the 0-6 months size and 4.50 inches long for the 6-12 months size when using the recommended yarn and hook sizes.

Can I use different yarn weights for this pattern?

Yes, you can use different yarn weights, but this will affect the final size; adjust your hook size accordingly and check the sole length to match the intended size.

Do I need prior crochet experience for this pattern?

This pattern is rated intermediate and includes half treble and shaping techniques, so basic knowledge of single crochet, half double crochet, double crochet, and decreases is recommended.

How long does this project typically take to complete?

Most crocheters complete a pair in 2-4 hours depending on experience and speed; following the round-by-round instructions will help you finish efficiently.