🧢 Beautiful ✨ Detailed πŸ’ Adorable

Layla the Llama Amigurumi Pattern

Layla the Llama Amigurumi Pattern
4.9β˜… Rating
8-10 Hours Time Needed
2.0K Made This
βœ‚οΈ

Advanced Level

Designed for experienced knitters, these patterns involve intricate designs and complex techniques to challenge and inspire.

⏱️

All-Day Adventure

Requires 8-10 hours, ideal for a full day of immersive knitting.

🧸

Cute Companion

An adorable friend to cherish, handcrafted with love to bring comfort and joy for years to come.

About This Layla the Llama Amigurumi Pattern

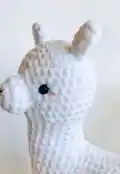
This delightful Layla the Llama pattern creates an 11-inch tall amigurumi friend that's perfect for any space. The pattern features advanced techniques including waistcoat stitching for the colorful saddle blanket and precise shaping for the llama's distinctive long neck and legs. With detailed photo references and video tutorials, you'll master complex construction methods while creating this charming no-drama llama.

Layla the Llama Amigurumi Pattern crochet pattern - detailed view of completed project

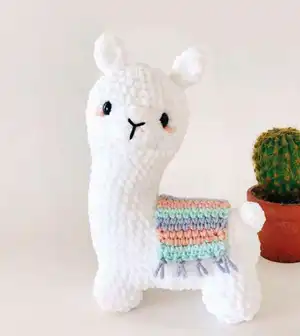
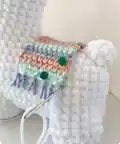
The finished llama showcases beautiful texture work with a plush white body and vibrant striped blanket complete with handmade tassels. This pattern challenges your skills while rewarding you with an incredibly huggable and photogenic result.

Why You'll Love This Layla the Llama Amigurumi Pattern

I absolutely love how this pattern combines technical challenge with pure charm! The waistcoat stitch technique creates such beautiful texture on the saddle blanket, and watching Layla come together piece by piece is incredibly rewarding. The advanced construction methods taught here will elevate your amigurumi skills, while the adorable result makes every stitch worth it. Plus, who can resist that sweet llama face and those perfect little ears?

Layla the Llama Amigurumi Pattern step 1 - construction progress Layla the Llama Amigurumi Pattern step 2 - assembly progress Layla the Llama Amigurumi Pattern step 3 - details and accessories Layla the Llama Amigurumi Pattern step 4 - final assembly and finishing

Switch Things Up

I love how versatile this llama pattern can be with just a few creative modifications! You could easily swap out the traditional striped blanket for a solid color version, or even create seasonal themes - imagine a Christmas llama with red and green stripes, or a spring version with pastel rainbow colors.

For a completely different look, try making the llama in different base colors like cream, tan, or even fun fantasy shades like lavender or mint green. The saddle blanket offers endless possibilities too - you could add embroidered details, use variegated yarn for an ombre effect, or even create a geometric pattern instead of stripes.

Another fun variation would be to adjust the size by changing your yarn weight and hook size - make a tiny keychain version with sport weight yarn, or go even bigger with jumbo yarn for a large huggable friend. You could also add accessories like a little hat, bow tie, or even tiny saddlebags for extra personality!

Common Mistakes & How to Fix Them

βœ— Forgetting to place stitch markers before starting legs - mark each 9-stitch section carefully to avoid confusion βœ— Stuffing too firmly in the neck area - keep it soft enough to maintain the llama's graceful neck curve βœ— Misaligning the saddle blanket placement - always pin in place before sewing to ensure even positioning across the back βœ— Rushing through waistcoat stitches on the blanket - take time to insert hook correctly into the center post for proper texture

Layla the Llama Amigurumi Pattern

Create your own adorable Layla the Llama with this detailed amigurumi pattern! This charming 11-inch tall llama features a fluffy white body, colorful striped saddle blanket with tassels, and the sweetest expression. Perfect for home dΓ©cor, gifts, or as a cuddly companion. The pattern includes step-by-step instructions for the body, legs, ears, tail, and decorative saddle blanket to bring this no-drama llama to life.

Advanced 8-10 Hours

Materials Needed for Layla the Llama Amigurumi Pattern

β€” Main Fabric

  • 01
    Super bulky (weight 6) plush yarn in white (Premier Parfait Chunky recommended)
  • 02
    Worsted weight (weight 4) yarn in three colors for saddle blanket (pink, lavender, and blue suggested)
  • 03
    Light pink yarn for blush details
  • 04
    White worsted yarn for sewing blanket attachment

β€” Tools Required

  • 01
    5.5mm crochet hook
  • 02
    3.5mm crochet hook (optional for tassels)
  • 03
    Stitch markers (8)
  • 04
    Scissors
  • 05
    Yarn needle
  • 06
    Sewing pins
  • 07
    12mm black safety eyes
  • 08
    Black embroidery thread
  • 09
    Polyester stuffing

Progress Tracker

0% Complete

β€” Nose :

R1 :

sc6 in MR (6 sts)

R2 :

inc x6 (12 sts)

R3-4 :

sc around (12 sts)

Info :

Cut yarn, leaving a long tail for sewing. FO. Stuff with Polyester stuffing.

β€” Head & Body :

R1 :

sc6 in MR (6 sts)

R2 :

inc x6 (12 sts)

R3 :

(sc, inc) x6 (18 sts)

R4 :

(sc2, inc) x6 (24 sts)

R5 :

(sc3, inc) x6 (30 sts)

R6 :

(sc4, inc) x6 (36 sts)

R7-12 :

(6 rds): sc around (36 sts)

R13 :

(sc4, dec) x6 (30 sts)

R14 :

(sc3, dec) x6 (24 sts)

R15-18 :

(4 rds): sc around (24 sts)

Info :

Place a stitch marker at the front of the head between rounds 9-10 (this will help with eye placement later on)

R19-20 :

(Counts as 2 rds in total) sc22, (there should be 2 unworked sc), ch10. Turn and work sc9 down the chain, sl st into the base sc. Move the stitch marker to the end of the ch (marks the beginning/end of new rounds).

Info :

Starting at the 2 un-worked sc sts, Sc around the neck and the back of the ch. (43 sts)

R21 :

inc, sc20, inc, sc20, inc (46 sts)

R22 :

inc, sc43, inc2 (49 sts)

R23 :

inc, sc47, inc (51 sts)

R24-27 :

(4 rds): sc around (51 sts)

Info :

Move your stitch marker 1 stitch to the left and sc1. Stuff the head and neck. Do not FO

β€” Legs :

Info :

Before you begin crocheting the legs, section the areas using stitch markers. Each leg will be 9 stitches across with 6 stitch-spaces between the front and back legs. Arrange the stitch markers so there is a 1 stitch-space between the front legs, and a 2 stitch-space between the back legs.

R1 :

sc9, ch9, sl st into the first sc with the stitch marker (18 sts)

R2-4 :

(3 rds): sc around (18sts)

R5 :

sc2, (sc2, dec) x4 (14 sts)

R6 :

sc2 (sc, dec) x4 (10 sts)

Info :

Sl st, FO, close the leg with the yarn tail. Hide the tail inside the llama's leg. Repeat this step for the other three legs.

β€” Belly Strap :

Info :

In the 6-stitch space between the front and back legs (front of the llama only)

R1 :

inc, sc4, inc, ch1 & turn work

R2-10 :

sc8, ch1 & turn work (9 rows)

Info :

FO, leaving a very long tail for sewing (long enough to sew the belly and all four legs.)

β€” Ears :

Info :

Make 2

R1 :

sc4 in MR (4 sts)

R2 :

(sc, inc) x2 (6 sts)

R3 :

(sc2, inc) x2 (8 sts)

R4-5 :

(2 rds): sc around (8 sts)

Info :

FO, leaving a long tail for sewing. Weave the yarn through the bottom of the ear to close it

β€” Tail :

R1 :

sc6 in MR (6 sts)

R2 :

(sc, inc) x3 (9 sts)

R3 :

sc around (9 sts)

Info :

FO, leaving a long tail for sewing. Stuff with polyester stuffing.

β€” Saddle Blanket :

R1 :

Ch10

R2-22 :

Ws (waistcoat st) across, ch1, turn (change yarn color every 2 rows)

Info :

FO, hide yarn tails. Add tassels.

β€” Tassels :

Info :

Cut ten 3-inch pieces of yarn. Use a small crochet hook (3.5 mm) to pull the yarn through the blanket. Make a loop and pull the yarn through with the hook. (Repeat the step every other stitch - 5 tassels on each end of the blanket) Trim the tassels to the same length.

Assembly Instructions

  • Sew on the nose between rounds 8-13 and place safety eyes between rounds 9-10, about 7 stitches apart
  • Sew on a mouth using black embroidery thread and add pink blush below the eyes
  • Fold the belly strap across the llama and whip stitch in each stitch across the 6-stitch space between front and back legs
  • Connect the first leg to the strap by sewing halfway down the shorter side, then sew legs together
  • Stuff the llama's neck and legs, then sew the second pair of legs to the belly strap
  • Sew the ears to the llama's head between rounds 3-5, about 11 stitches apart
  • Sew the tail on the back of the llama and secure all yarn ends

Important Notes

  • πŸ’‘Use stitch markers to track rounds and mark leg sections before beginning construction
  • πŸ’‘Stuff firmly but not too tightly, especially in the neck area to maintain graceful curves
  • πŸ’‘Pin the saddle blanket in place before sewing to ensure even positioning
  • πŸ’‘Pull apart large chunks of stuffing into smaller pieces for even distribution
  • πŸ’‘Use sewing pins to secure nose, ears, and tail before final attachment

This adorable Layla the Llama pattern combines advanced amigurumi techniques with irresistible charm! The detailed instructions guide you through creating this 11-inch tall no-drama llama complete with a colorful waistcoat-stitched saddle blanket and hand-made tassels. Perfect for challenging your crochet skills while creating a huggable masterpiece that will bring joy to any space. πŸ¦™ Happy crocheting! 🧢✨

You ask,

we answer.

FAQs

What skill level is required for this pattern?

This is an advanced pattern, especially when crocheting the back legs and waistcoat stitch blanket. Previous amigurumi experience is recommended.

How big will the finished llama be?

The finished llama is approximately 11 inches (29 cm) tall, though size may vary depending on yarn weight and hook size used.

Can I use different yarn weights?

The pattern is designed for super bulky weight 6 plush yarn. Using different weights will change the final size and may require adjusting hook size and stitch counts.

What is waistcoat stitch and why is it used?

Waistcoat stitch creates a beautiful textured fabric by inserting the hook into the center post of stitches. It's used for the saddle blanket to create an authentic woven appearance.

Are there video tutorials available?

Yes! The pattern includes links to helpful video tutorials for complex techniques like the neck construction and leg assembly.