About This Indigo Coat Pattern
This pattern creates a relaxed, oversized Indigo Coat worked mostly in stocking stitch with a wide garter stitch border band. It includes full schematics, row-by-row instructions, and a clear abbreviations table to guide you through each step. The coat is designed in one size with shaping for armholes, shoulders and neck to give a tailored yet roomy silhouette.
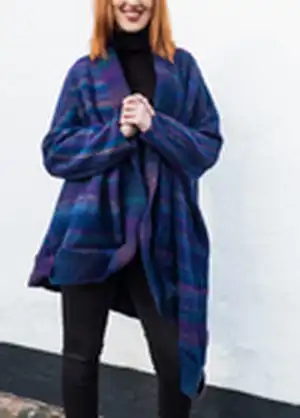
The pattern uses James C. Brett Marble DK to create a subtly variegated finish and includes instructions for marking twists in the long border band. Finish by joining shoulders, side seams and stitching the band with corner twists for a neat edge.
Why You'll Love This Indigo Coat Pattern
I absolutely love this pattern because it combines simple stocking stitch knitting with clever shaping to create a coat that is both comfortable and elegant. The long garter-stitch border band with specified twists gives the design a unique, finished look that I find endlessly satisfying to sew on. I appreciate how the pattern includes clear schematics and row counters so you always know exactly where you are. Working this coat is calming and rewarding — the fabric drapes beautifully and the color pooling of the Marble DK yarn is a delightful surprise. Making this coat feels like slow craft therapy, and I always enjoy seeing how each finished piece is uniquely textured by the yarn.
Switch Things Up
I love how easily this pattern can be customized by changing yarn colours — swap the Marble DK for a solid or heather to change the look entirely.
If you want a chunkier, warmer coat try using a bulkier yarn and correspondingly larger needles to create a more textured, oversized silhouette.
For a lighter, more delicate coat, use a finer yarn and smaller needles and consider shortening the border band for a sleeker finish.
You can alter the length of the coat by working fewer or more rows before the shaping begins; measure as you go so the proportions stay balanced.
Try adding pockets by picking up stitches at the side seam before seaming, or sew on patch pockets after finishing for practicality and style.
To create a more fitted look, decrease a few stitches evenly across the body sections before sleeve and armhole shaping to reduce overall width.
I often experiment with contrasting border colours — knit the band in a solid shade and the body in variegated yarn for a modern contrast.
Add decorative buttons or toggles to one front side for a closure option; mark positions while the coat is on a dress form to get the placement right.
You can also embroider small motifs on the border band or cuffs for a personalized touch — use duplicate stitch or surface embroidery for best results.
Finally, consider blocking the finished coat gently to even out stitches and enhance drape; pin the border band carefully when attaching to ensure the twists sit perfectly.
Common Mistakes & How to Fix Them
✗ Not completing a sample swatch first can lead to incorrect sizing; knit a swatch to check stitch and row gauge and adjust needle size to match the stated tension.
✗ Failing to mark the specified MK points will make matching border twists and corners difficult; use waste yarn to mark each twist point as instructed for precise alignment.
✗ Skipping the row counter steps or not tracking RC values causes confusion during shaping; use a row counter or tally sheet and update it exactly as you work each Rc.
✗ Joining the border band without twisting at the corners makes the edge lie poorly; when you reach each corner, twist the band over and continue the seam on the opposite side to ensure a flat finish.