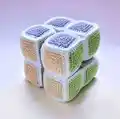
About This Infinity Cube Amigurumi Pattern
This pattern teaches you to crochet an Infinity Cube — a soft, twistable fidget toy made from small crocheted cubes. You will make 48 squares in six colors, assemble them into 8 cubes, then join the cubes into two parts and sew them together for the final toy. The pattern uses US terms and clear instructions for sewing and finishing so you can create a neat, functional cube.
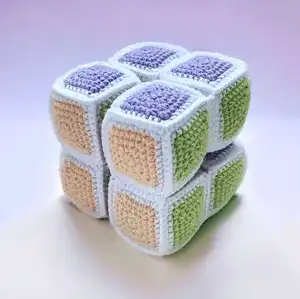
Suitable for crocheters who know basic stitches, this design emphasizes assembly and shaping for the best movement. The finished toy measures approximately 10 cm using the recommended materials.
Why You'll Love This Infinity Cube Amigurumi Pattern
I absolutely love this pattern because it turns simple crochet squares into a playful, interactive object that kids and adults enjoy twisting and exploring. I enjoy the meditative rhythm of making many identical squares and then watching them come together as you assemble the cubes. The assembly and finishing steps let me practice neat sewing and shaping techniques, which always feels satisfying. I also love the color play — using pastel combinations gives the cube a soft, modern look I keep returning to.
Switch Things Up
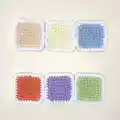
I love how easy it is to change the look of this cube by swapping colors for each square; try a monochrome palette for a modern look or contrasting brights for playfulness.
I sometimes use a thicker yarn and larger hook to make a chunky, squishier version that is great as a baby toy; conversely, choose thinner yarn for a mini keychain-sized cube.
I often add embroidered symbols or felt shapes to the face centers to create a learning cube for toddlers that teaches colors and shapes.
I like swapping the white edge color for a contrasting trim to make the cube faces pop; try black or a metallic thread for a graphic effect.
To make the cube quieter or more tactile, try adding a small bell or rattle inside one cube before final closing for sensory variety.
I sometimes sew on a small loop or keyring to turn one cube into a functional keychain or bag charm while keeping the twistable feature.
For gifting, I add tiny crocheted accessories like a mini bow or ribbon around one cube to personalize it for a recipient.
I recommend experimenting with different seaming methods — mattress stitch gives a flat seam whereas whipstitch can be slightly raised; choose what you prefer for movement.
I also test stuffing amounts: slightly less stuffing yields softer folds, while a bit more gives a firmer cube; always avoid overstuffing to preserve mechanics.
I sometimes alternate the stitch used for edging (hdc instead of sc) to get a different edge texture and slightly different seam appearance.
Finally, I encourage you to create sets of cubes in matching color families for a coordinated collection — they look lovely displayed together and are fun to play with.
Common Mistakes & How to Fix Them
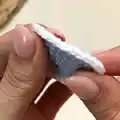
✗ Not hiding thread tails as you go leads to visible loose ends in the seams; weave and hide ends inside as you finish each square or cube.
✗ Overstuffing the cubes makes the toy rigid and deformed; stuff lightly and shape the cube with your hands after assembly to keep a soft and flexible finish.
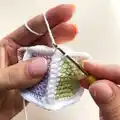
✗ Skipping counts when working increases (inc3) will distort the square corners; count stitches after each row and mark corners to ensure inc3 are placed correctly.
✗ Sewing cubes with mismatched face orientations causes the toy not to fold correctly; follow the color orientation photos and double-check directions before sewing parts together.
✗ Using inconsistent tension across squares produces uneven cube faces and poor seams; maintain even tension and block or steam lightly to even out faces before assembly.