๐Ÿงถ Beautiful โœจ Detailed ๐Ÿ’ Adorable

Island Time Blanket Pattern

Island Time Blanket Pattern
4.7โ˜… Rating
12-15 Hours Time Needed
2.0K Made This
โœ‚๏ธ

Intermediate Level

Ideal for those with basic crochet experience, featuring slightly more advanced stitches and techniques to expand your skills.

โฑ๏ธ

Multi-Day Project

A rewarding 12+ hour journeyโ€”perfect for dedicated crafters who love detailed work.

๐Ÿค—

Soft Hug

Gentle, plush, and full of warmth, creating a sense of comfort and coziness wherever they find a home.

About This Island Time Blanket Pattern

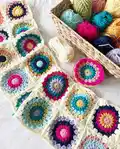
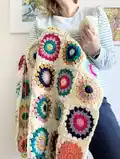
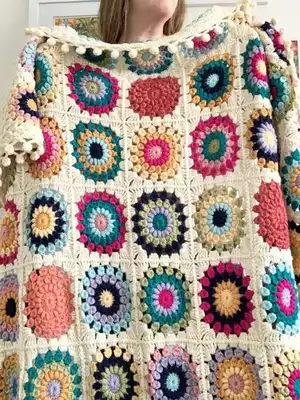
This pattern creates a colourful 9x11 sunburst blanket composed of 99 large sunburst motifs joined using a Continuous Join-As-You-Go (CJAYG) technique. It features puff stitches, 4 and 5 double crochet cluster stitches, and an optional seam-first Round 5 if you prefer seaming motifs separately. The pattern includes a numbered colour combo chart to place motifs exactly as shown and a pom-pom border to finish the blanket with playful texture.

Island Time Blanket Pattern crochet pattern - detailed view of completed project

Detailed motif rounds, assembly instructions, and a full border guide are provided to help you complete the blanket. A clear yarn list with yardages ensures you can plan purchases and match colours accurately.

Why You'll Love This Island Time Blanket Pattern

I absolutely love this pattern because the sunburst motifs feel joyful and celebratory every time I stitch a new square. I enjoy how the numbered colour chart lets me plan and balance colours across the whole blanket so it reads cohesive when complete. The CJAYG joining method creates a neat continuous seam that saves time and looks beautifully integrated with the motif design. I also love that the pom-pom border adds a playful finish that turns a simple square blanket into a statement piece that families will treasure.

Island Time Blanket Pattern step 1 - construction progress Island Time Blanket Pattern step 2 - assembly progress Island Time Blanket Pattern step 3 - details and accessories Island Time Blanket Pattern step 4 - final assembly and finishing

Switch Things Up

I love swapping colours to create different moods; try pastel shades for a soft nursery blanket or bold brights for a modern throw.

You can change the yarn weight and hook size to make a larger or smaller blanket; bulky yarn with a larger hook makes a chunky, cozy version.

If you prefer a sleeker look, use a fingering or sport weight yarn and a smaller hook to create a delicate lapghan or bed runner.

I sometimes replace the pom-pom border with a simple crab stitch or reverse single crochet for a neater edge that still frames the motifs nicely.

Consider alternating the neutral join colour for rows to create subtle stripes in the background without changing the motif colours.

I often add sewn-on buttons, embroidery, or tiny crocheted motifs to a few squares to personalize the blanket for a gift recipient.

For a modern graphic look, limit your palette to three colours plus Cloud and repeat a single combo across the grid for intentional patterning.

Try seaming the squares with a contrasting colour for visible seams that become part of the design instead of blending into the background.

If you want more texture, add an extra round of clusters before joining or use a popcorn stitch round to make the sunbursts pop even more.

I recommend blocking motifs lightly before joining if youre chasing perfect square edges; this helps achieve a more even final layout and easier joining.

Common Mistakes & How to Fix Them

โœ— Skipping the gauge check can cause your finished blanket to be much larger or smaller; check the 4-round sunburst gauge and adjust hook size to meet measurements before starting. โœ— Ignoring yarn quantity notes may leave you short of a colour near the end of the project; purchase the full recommended quantities or extra skeins of the same dye lot to ensure consistent colour and enough yarn. โœ— Failing to lay out motifs according to the numbered colour chart will produce an unbalanced colour arrangement; follow the provided 9x11 chart and number mapping to place motifs in the intended order. โœ— Not securing joins during CJAYG can cause weak seams and shifting; follow the continuous join instructions carefully and do not fasten off when instructed so the border can be worked seamlessly afterward.

Island Time Blanket Pattern

Make a bright, sunburst-inspired crochet blanket that combines colorful motifs with a cozy neutral border. This pattern guides you through creating large sunburst squares, joining them using Continuous Join-As-You-Go (CJAYG), and finishing with a charming pom-pom border. Youll love the clear colour chart and detailed motif instructions that make assembly straightforward. Perfect for gifting or brightening your own home.

Intermediate 12-15 Hours

Materials Needed for Island Time Blanket Pattern

โ€” Main Fabric

  • 01
    WeCrochet Wool of the Andes Worsted (110yds/50g) - Cloud (1481yds/673g) 14 skeins
  • 02
    WeCrochet Wool of the Andes Worsted (110yds/50g) - Blossom Heather (216yds/98g) 2 skeins
  • 03
    WeCrochet Wool of the Andes Worsted (110yds/50g) - Dragonfruit (246yds/112g) 3 skeins
  • 04
    WeCrochet Wool of the Andes Worsted (110yds/50g) - Caution (233yds/106g) 3 skeins
  • 05
    WeCrochet Wool of the Andes Worsted (110yds/50g) - Creme Brulee (229yds/104g) 3 skeins
  • 06
    WeCrochet Wool of the Andes Worsted (110yds/50g) - Green Tea Heather (235yds/107g) 3 skeins
  • 07
    WeCrochet Wool of the Andes Worsted (110yds/50g) - Wonderland Heather (235yds/107g) 3 skeins
  • 08
    WeCrochet Wool of the Andes Worsted (110yds/50g) - Marina (249yds/113g) 3 skeins
  • 09
    WeCrochet Wool of the Andes Worsted (110yds/50g) - Solstice Heather (246yds/112g) 3 skeins
  • 10
    WeCrochet Wool of the Andes Worsted (110yds/50g) - Haze Heather (227yds/103g) 3 skeins
  • 11
    WeCrochet Wool of the Andes Worsted (110yds/50g) - Conch (132yds/60g) 2 skeins
  • 12
    WeCrochet Wool of the Andes Worsted (110yds/50g) - Papaya Heather (103yds/47g) 1 skein

โ€” Tools Required

  • 01
    US 5.00 mm crochet hook
  • 02
    Needle for weaving in ends
  • 03
    Scissors

Progress Tracker

0% Complete

โ€” Pattern Large Sunburst Motif :

Round 1 :

Ch 5, sl st into 5th chain from hook to create centre ring. Ch 2, work 15 DC into centre of ring (16 sts). Join with sl st to the top of the first DC (not the ch 2), Fasten off.

Round 2 :

Join new colour into top of any st. Ch 1, puff into same st, ch 1. [Puff, ch 1] into each st around (16 puffs). Sl st into the ch-1 sp between the first two puff sts (not into the top of the first puff st), Fasten off.

Round 3 :

Join new colour into any ch-1 sp. Ch 2, into same sp work a [4 DC cl, ch 2]. Work [4 DC cl, ch 2] into each ch-1 sp around (16 cl sts). Sl st into the ch-2 sp between the first two cls (not into the top of the cl st), Fasten off.

Round 4 :

Join new colour into any ch-2 sp. Ch 2, into the same sp work a [5 DC cl, ch 3]. Work [5 DC cl, ch 3] into each ch-2 sp around (16 cl sts). Sl st into the ch-3 sp between the first two cl sts (not into the top of the first cluster st). Fasten off.

Info :

**Only Complete the following Round 5 IF you do not plan on using the CJAYG to join the motifs. Round 5 is written out for anyone who wishes to seam their squares together separately at the end of their project.

Round 5 :

Join Colour Cloud into any ch-3 sp and ch 3. [3 tr, ch 2, 4 tr] into same sp (1st corner). *4 DC into next ch-3 sp. 4 HDC into next ch-3 sp. 4 DC into next ch-3 sp. [4 tr, ch 2, 4 tr] into next ch-3 sp.* Repeat from * to * 2 more times. 4 DC into next ch-3 sp. 4 HDC into next ch-3 sp. 4 DC into next ch-3 sp. Join rnd with sl st into top of first tr (not the ch 3), Fasten off.

โ€” Assembling Motifs with Continuous Join-As-You-Go (CJAYGO) :

Infos :

With RS of sunbursts face up, lay out all motifs in the arrangement from the colour graph above. Using colour Cloud, start in top right-hand corner to join squares across the rows. Example: First row will be joined from square number 9 across to square number 1. The second row will start with square number 18 and be worked across to square number 10. Following along with the video tutorial, crocheting squares together until blanket is complete. Once back to the start of the blanket (in the top right-hand corner)- DO NOT FASTEN OFF. You are now ready to start border Round 1.

โ€” Border :

Round 1 :

Sl st over the next 2 sts, into the ch-2 corner space. Ch 2; work [3 DC, ch 2, 4 DC] into the corner sp (completes 1st corner of blanket). Continue working 4 DC into each sp between granny clusters of the squares. Into each join (where two squares meet); work 3 DC on either side. In blanket corners work [4 DC, ch 2, 4 DC]. To join border rnd: sl st into the top of the first DC (not into the ch 2), Do not fasten off.

Round 2 :

Repeat rnd 1 (in between the granny clusters of "3 DC" from previous round, work 4 DC), Do not fasten off.

Round 3 :

Work pom-pom border all the way around blanket. Sl st into beginning st to join rnd. Fasten off, weave in all ends.

Assembly Instructions

  • With the right side of sunbursts facing up, lay out all motifs according to the 9x11 colour graph to plan final placement before joining.
  • Using Colour Cloud, begin joining in the top right-hand corner and work across the first row (square 9 to square 1), then continue row-by-row as the example indicates.
  • When using CJAYG, crochet squares together until the entire blanket is joined and, upon returning to the starting corner, do not fasten off so you can begin the border seamlessly.
  • If not using CJAYG, complete Round 5 on each motif and seam your squares together at the end of the project following the numbered layout for accurate placement.
  • Work the border after joining: Round 1 builds the corner blocks and fills joins with 3 DC on each side; continue Round 2 then add the pom-pom border in Round 3 and weave in all ends.

Important Notes

  • ๐Ÿ’กGauge will affect yarn quantities, so adjust your hook size to meet the gauge of 4 rounds = 4.75 inches unblocked.
  • ๐Ÿ’กCh 2 counts as DC throughout the pattern and ch 3 counts as tr, so treat these as full stitches for shaping and counts.
  • ๐Ÿ’กThis blanket is constructed using CJAYG; if you choose a different joining method, yarn quantities and finishing will differ.
  • ๐Ÿ’กPlease pay attention to yarn quantities listed โ€” some skeins were used nearly in full for the sample blanket, so purchase enough of each colour.
  • ๐Ÿ’กThe Colour Legend provides generic colour names to help you find alternatives, but the actual yarn names are listed in the materials section.

This colourful sunburst blanket pattern is designed to brighten any room and be treasured for years. The mix of puff stitches and cluster rounds gives beautiful texture and depth to each motif. Follow the CJAYG method for a neat continuous join and finish with the playful pom-pom border for a charming flair. ๐Ÿงถโœจ

You ask,

we answer.

FAQs

What size will the finished piece be?

The finished blanket measures approximately 48" x 61" after blocking when using the recommended yarn and US 5.00 mm hook.

Can I use different yarn weights for this pattern?

Yes, but using a different yarn weight will change the finished size significantly; adjust your hook and yarn amounts accordingly and check gauge before committing.

Do I need prior crochet experience for this pattern?

This pattern is rated intermediate and uses cluster stitches, puff stitches, and CJAYG joiningโ€”basic crochet experience and comfort with reading pattern rounds are recommended.

How long does this project typically take to complete?

Most crocheters complete this project in 12-15 hours spread over multiple sessions; actual time varies based on experience and how fast you work.