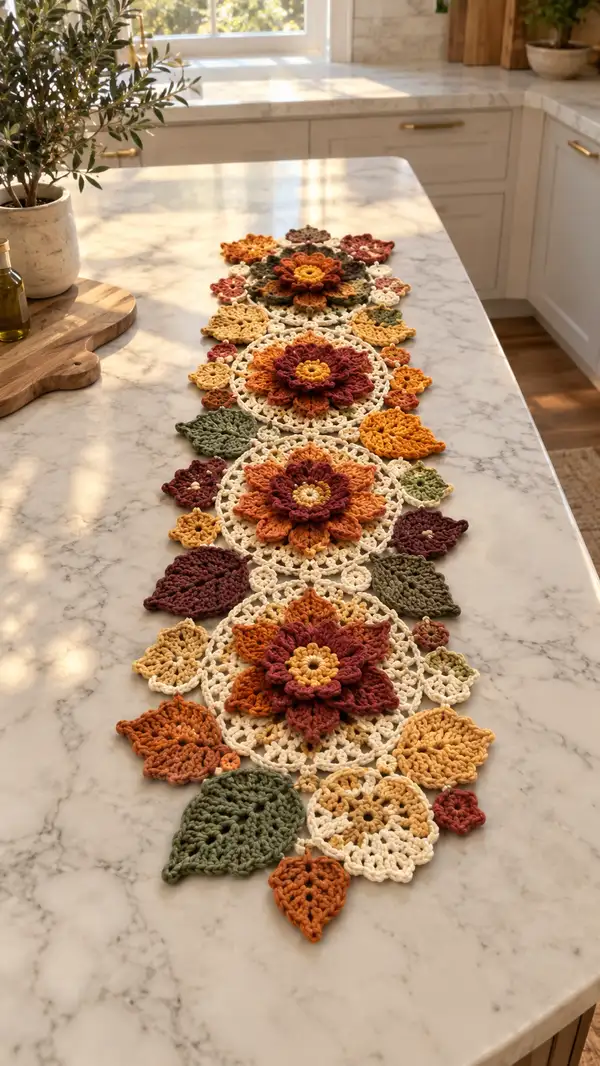
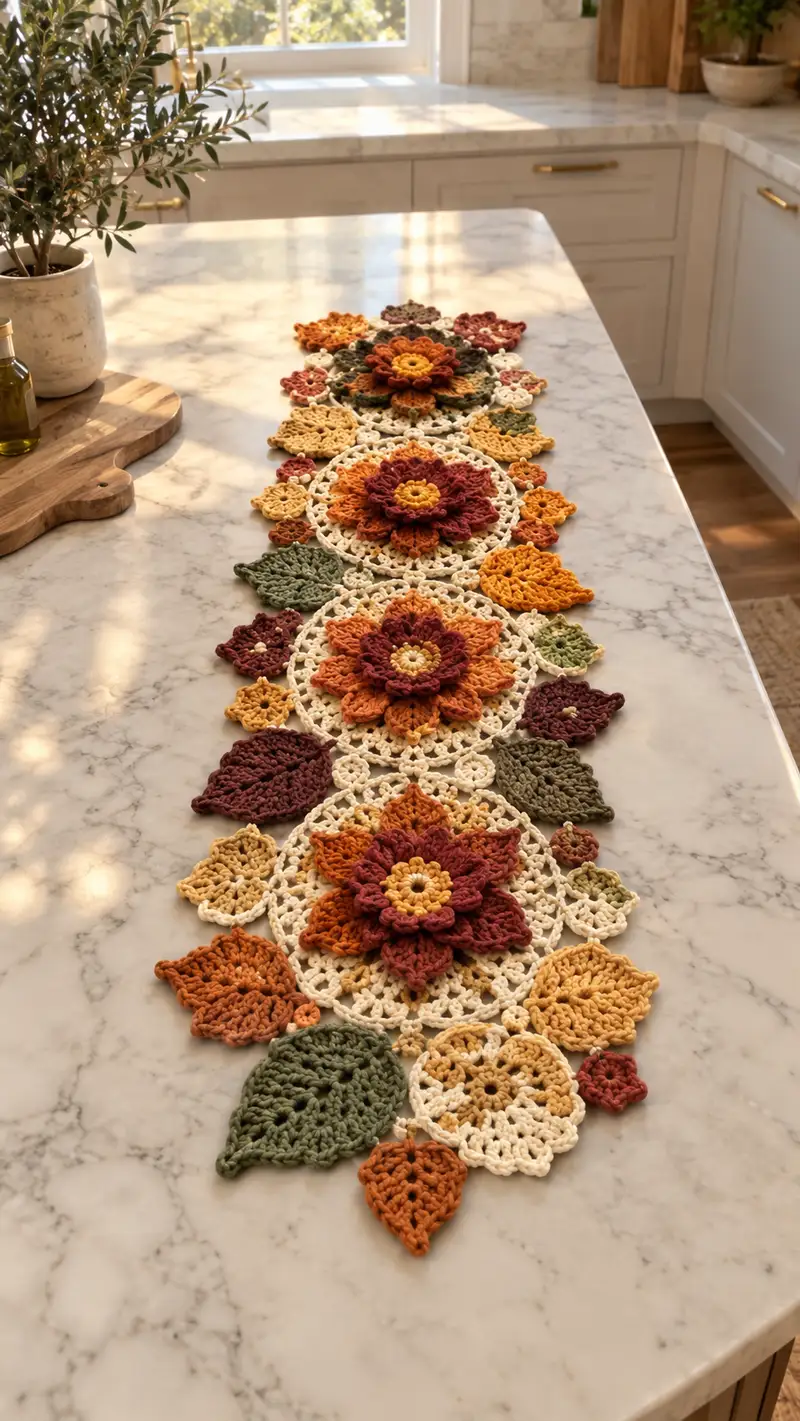
A richly textured floral medallion table runner worked in warm ivory, rust, mustard and olive tones. This runner features layered 3D petals, lace medallion bases and a mix of joined leaves and small flowers for a romantic autumnal look. Finished runner lies flat as a decorative centerpiece and showcases crochet motifs joined with airy lace joins for a lightweight, elegant piece. Ideal for seasonal decor or a handmade gift to brighten a dining or kitchen island.
Progress Tracker
0% Complete
— Materials & Gauge :
Info :
Gauge is not critical for this decorative runner but for proportion and to match pictured size, 10cm/4in of lace round equals approximately 12 sts x 6 rows in sc when using 4.0mm hook and worsted cotton. Adjust hook if necessary. Block motifs for consistent assembly.
— Large Floral Medallion (Make 4) :
Round 3 :
(1 sc, inc) x 6 (18)
Round 4 :
(2 sc, inc) x 6 (24)
Round 5 :
(3 sc, inc) x 6 (30)
Round 6 :
(4 sc, inc) x 6 (36)
Round 7 :
(5 sc, inc) x 6 (42)
Round 8 :
(6 sc, inc) x 6 (48)
Round 9 :
1 sc in each st (48)
Info :
Change to Ivory if not already. This round creates a clean base; place stitch marker at beginning of each round. Work tightly here to form a stable base for lace joins and petals.
Round 10 :
*ch 4, skip 2, sc in next st* rep around to create 16 ch-4 spaces (48 work points counting chains) Join with sl st to first sc
Round 11 :
Sl st into first ch-4 sp, ch1, sc in same sp, *ch 3, sc in next ch-4 sp* rep around (16 ch-3 loops). Join with sl st (16 loops)
Info :
These loops will become the attachment points for petals. Use a contrasting color for the first petal layer (Rust) so petals sit above the lace base.
Round 12 :
Change to Rust. Work in each ch-3 loop: (sc, hdc, 3 dc, hdc, sc) into each loop — work 16 petal bases (petal groups; treat as 16 petals for a full layered look) Fasten off color leaving a tail for weaving (petal base)
Info :
Petal bases are a quick cluster; if you prefer 8 larger petals use every other loop instead (work in every second loop). The pictured medallion uses an effect of 8 pronounced petals formed by layering two staggered sets (16 base groups gives the dense layered effect).
Round 13 :
Change to Burnt Orange for inner raised petal row. Join with sl st to back loop of a chosen petal base to create a raised petal. For each petal base (16): [ch1, (sc, dc, tr, dc, sc) in front of petal base, sl st to next petal base] — make 16 raised inner petals (work is by petal not linear stitch count)
Info :
When making raised petals, insert hook under the front loops or into the space between petal base and lace ring to pull petals forward — this creates a strong 3D form. Keep petals fairly tight and consistent in stitch tension.
Round 15 :
Fasten off Burnt Orange if you want a two-tone petal look; join Deep Berry (or second accent) behind the inner petals to create outer petal layer. Join yarn at the base between two petals on the lace ring.
Round 16 :
Outer petal layer (Deep Berry): Into each ch-3 loop and behind inner petals work: ch1, (sc, hdc, 5 dc, hdc, sc) then sl st to next petal base to create 16 fuller outer petals (petal groups)
Info :
These outer petals are larger and more textured. Use a slightly larger hook (3.5mm) for the petal rounds if you want more pronounced petals but maintain same yarn weight for uniformity.
Round 17 :
Return to Ivory. Work around outer bases creating a decorative lace ring: *ch4, sl st in tip of petal (or base space), ch3, sl st in next base* rep around. This forms a scalloped lace border connecting petals visually to the main medallion (work results in 16 scallops)
Round 18 :
1 sc in each scallop join and in between petals around to create a stable edge. Adjust to make an even circular edge; total effective stitches approximately 48 depending on join choices
Info :
Fasten off leaving long tail if you plan to sew medallions together using this round as a joining ring. Block each medallion flat so petals maintain 3D form and lace rings open to a consistent diameter.
— Small Medallion (Make 6-8) :
Round 3 :
(1 sc, inc) x 6 (18)
Round 4 :
Change to Mustard. *ch5, sl st in next st* rep 6 times to create 6 ch-5 loops (work base ring)
Round 5 :
In each ch-5 loop work: (sc, hdc, 3 dc, hdc, sc) to make 6 mini petals (6 petal groups)
Round 6 :
Change to Ivory and join with sl st around to make small lace edge: *ch3, sl st in base* rep 6 times; fasten off leaving tail for joining
Info :
Small medallions act as filler pieces between large medallions and leaves. Make as many as needed to fill the runner shape and give visual balance.
— Layered Center Disc (Make 4 — Medallion Centers) :
Round 3 :
Change to Mustard. (1 sc, inc) x 6 (18)
Round 4 :
Switch to Burnt Orange. Work in FLO: 1 sc in each st (18) to create a subtle ridge for the petal base
Round 5 :
Fasten off leaving tail. These layered discs are sewn to the very center of each large medallion before the petal layers are added for a dimensional central button effect.
Info :
Sew these small discs at the center of the medallion early so petals are crocheted around them and tuck the disc tail under as you work for a neat finish.
— Leaves (Make 16-20 assorted sizes) :
Leaf Large - Round 1 :
ch 10, sc in 2nd ch from hook, hdc in next, dc in next 3, hdc in next, sc in next, sl st to last chain tip (work up one side)
Leaf Large - Round 2 :
Working on opposite side of chain: sc in next, hdc, dc 3 times, hdc, sc, sl st to join (shaped leaf formed)
Leaf Large - Round 3 :
Fasten off leaving tail for sewing. Make 8 large leaves in Olive.
Info :
For a veined look, embroider a central vein with running stitch using the same yarn or a contrast thread. For smaller leaves, ch7 and follow same ratio of stitches to form 4-stitch wider leaves.
Leaf Medium - Round 1 :
ch 8, sc in 2nd ch, hdc, dc 2, hdc, sc, sl st; return on other side: sc, hdc, dc2, hdc, sc sl st; fasten off (smaller leaf)
Leaf Small - Round 1 :
ch 6, sc, hdc, dc, hdc, sc around chain; fasten off (tiny leaf / accent)
Info :
Vary leaf direction and size to create a natural-looking runner. Make extra leaves — you can always omit or add to alter the layout before joining.
— Tiny Flowers & Fillers (Make 12-20) :
Round 2 :
ch1, in each st around work (sc, ch2) x 6 to create 6 tiny loops; sl st to first sc (6 loops)
Round 3 :
In each loop work (sc, 3 dc, sc) to make 6 picot-style petals; fasten off and weave in ends
Info :
Tiny flowers are used as accents between leaves and medallions. Make them in rust and mustard for contrast.
— Joining Motifs & Lace Connectors :
Info :
Decide layout on a blocking mat: the pictured runner alternates four large medallions spaced evenly with small medallions, leaves and tiny flowers filling the negative space. Layout is critical — pin everything in place before joining.
Join Ring Prep :
On each large medallion, pick four equidistant sl st points on the outer Ivory lace ring to act as primary joins to adjacent motifs (top, bottom, left, right positions) Mark with pins.
Connector Motif (Make many small connectors) - Round 1 :
6 sc in mr (6)
Connector - Round 2 :
ch4, sl st in next st around to create 6 ch-4 loops; fasten off leaving tail (use Ivory)
Info :
These small connectors are crocheted to join petal scallops and spaces between medallions. Alternatively you can crochet joining chains directly between rings using sc or sl st for a lacy effect.
Round 1 :
Assemble with whip stitch or sl st join: using Ivory tail and a tapestry needle or small crochet hook, sew connector loops to adjacent medallion loops aligning top/bottom and side points as pinned. For a neater visible join, use sc through both motif loops from front to back.
Info :
When joining, always work from the top of the runner outwards then secure the bottom side — this keeps petals arranged outward and balanced. Use even tension so the runner lays flat.
— Edge Finishing :
Round 1 :
With Ivory, work sl st evenly around the outside of the assembled runner to tidy raw joins. Work 1 sc in each open chain point and 3 sc in each scallop corner.
Round 2 :
Optional picot edging: *sc, ch3, sl st in 3rd ch* around to create small decorative points. Fasten off and weave in ends.
Info :
Trim any long tails and steam-block the finished runner carefully on a flat surface to open the lace and flatten petals slightly, preserving texture but removing curl. Use rust-proof pins to hold motifs in position while wet-blocking.
— Alternate Petal Construction (Optional for deeper 3D) :
Round 1 :
To make deeper petals, crochet individual petal segments as small ovals: ch6, sc, hdc, 3 dc, hdc, sc (attach petals one-by-one to petal base ring with sl st). For each medallion make 16 petal ovals and then fluff by pulling center up and sewing a few small tacking stitches at petal base.
Info :
Stitch counts are petal-group based - petal rounds are worked into loop spaces created earlier, so round stitch totals are expressed as groups. Keep petal tension consistent to avoid lopsided medallions.
— Detailed Round-by-Round Summary For One Full Large Medallion (Consolidated View) :
Round 3 :
(1 sc, inc) x 6 (18)
Round 4 :
(2 sc, inc) x 6 (24)
Round 5 :
(3 sc, inc) x 6 (30)
Round 6 :
(4 sc, inc) x 6 (36)
Round 7 :
(5 sc, inc) x 6 (42)
Round 8 :
(6 sc, inc) x 6 (48)
Round 9 :
1 sc in each st (48)
Round 10 :
*ch4, skip 2, sc in next st* rep around (creates 16 ch-4 loops)
Round 11 :
Sl st into first ch-4 sp, ch1, sc in same sp, *ch3, sc in next ch-4 sp* rep around (16 loops)
Round 12 :
Change to Rust. In each ch-3 loop work: (sc, hdc, 3 dc, hdc, sc) x 16 (16 petal bases)
Round 13 :
Change to Burnt Orange. Create inner raised petals: into the front area of each petal base work (sc, dc, tr, dc, sc) x 16 (16 raised petals)
Round 14 :
Fasten off Burnt Orange. Join Deep Berry behind inner petals and work larger outer petals into remaining ch spaces: ch1,(sc, hdc, 5 dc, hdc, sc) x 16
Round 15 :
Return to Ivory and work decorative scallop: *ch4, sl st in petal base tip, ch3, sl st in next base* rep around. Join with sl st and fasten off.
Info :
At each stage, count petals/groups to ensure 16 groups remain consistent. If you prefer 8 bolder petals reduce the petal groups by working into every other loop.
— Assembly & Layout Instructions :
Info :
Lay out all motifs on a large blocking board as pictured: four large medallions in a single column with small medallions, leaves and tiny flowers filling spaces. Arrange leaves to point outward alternately for a balanced composition.
Step :
Pin medallions to blocking mat and spray with water to wet-block. Shape petals upward slightly for 3D effect and allow to dry completely before joining.
Step :
Start joining the central two medallions first, using sl st through matching scallop/ch loops with Ivory yarn. Use small connector motifs or chain-bridges of ch6-8 and sl st as necessary to make a lace bridge between rings when direct loops do not align.
Info :
Sew large leaves into place using a whip stitch through the leaf tail and the medallion lace ring at the positions pinned earlier. Secure with several passes to prevent flipping in use.
Step :
Fill gaps with small medallions and tiny flowers by sewing through their back loops into the lace joins, making sure seam thread is hidden under petals. Trim excess yarn and weave tails into the body of the motifs.
Info :
Check runner on a flat surface and make any last adjustments before final edging. If some petals lift too much, tack them down with a small slip stitch or two from the underside to hold shape while remaining invisible.
— Final Blocking & Care :
Info :
Once joined, pin entire runner and steam-block lightly or wet-block fully. Cotton will relax; pins should be rust-proof. Dry flat and store rolled or flat to avoid creasing. Spot clean gently and avoid machine washing to preserve shape and petal structure.
This floral medallion table runner is a true labor of love — layered petals, leafy accents and lace joins come together to create a breathtaking seasonal centerpiece. Each motif blocks beautifully and joins with elegant negative space so the runner looks light yet full of texture. Whether you keep it for your own table or gift it to someone who appreciates handmade home decor, every stitch becomes a lasting detail. 🧶🍂✨