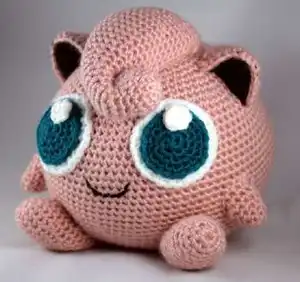
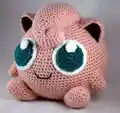
Make your own adorable Jigglypuff amigurumi with this friendly intermediate crochet pattern. You will create a round, huggable body, cute layered eyes, tidy ears, feet, arms, and the signature poof using clear step-by-step instructions. Perfect for gifting or adding to your Pokémon collection — enjoy a fun, hands-on crochet project that brings this beloved character to life.
Progress Tracker
0% Complete
— Introduction :
Info :
This pattern will show you how to create the Pokémon Jigglypuff in amigurumi form. Jigglypuff measures six inches tall, however, the final size of your amigurumi may vary depending on the crochet hook size, weight yarn, and how tight your stitch work is. The materials used are listed in Materials below.
— Materials :
Info :
5.5 mm Crochet Hook. Vanna's Choice Yarn—Pink (~1 skein). Vanna's Choice Yarn—Black (<1 skein). Vanna's Choice Yarn—White (<1 skein). Red Heart Super Saver Economy Yarn—Real Teal (<1 skein). Poly-fil. Yarn Needle. Scissors.
— Terminology :
Info :
Magic ring—Method for starting amigurumi in the round. sc—single crochet. ch—chain. inc—increase (add one stitch). dec—decrease (remove one stitch). (A) x B—Repeat A, B times. [X]—Total number of stitches for the round/row. pr x—partial row starting at stitch x. '**pr x' is my own terminology and will be better explained in the sections of the pattern where it is used.'
— Body :
Round 1 :
Magic ring 6 [6]
Round 3 :
(inc, sc 1) x 5, inc, inc [19]
Round 4 :
(inc, sc 2) x 6, sc 1 [25]
Round 5 :
sc 1, (inc, sc 3) x 6 [31]
Round 6 :
sc 3, (inc, sc 4) x 5, inc, sc 2 [37]
Round 7 :
sc 6, (inc, sc 7, inc, sc 6) x 2, inc [42]
Round 8 :
sc 3, inc, (sc 6, inc) x 5, sc 3 [48]
Round 9 :
sc 5, inc, sc 8, inc, sc 9, inc x 2, sc 4 [53]
Round 10 :
sc 8, inc, (sc 9, inc, sc 10, inc) x 2, sc 2 [58]
Round 11 :
sc 3, inc, (sc 10, inc, sc 11, inc) x 2, sc 8 [63]
Round 12 :
(sc 12, inc, sc 11, inc) x 2, sc 12, inc [68]
Round 13 :
sc 6, inc, (sc 16, inc) x 3, sc 10 [72]
Round 14 :
sc 11, inc, (sc 17, inc) x 3, sc 6 [76]
Round 15 :
sc 3, inc, (sc 24, inc) x 2, sc 22 [79]
Round 16 :
sc 18, inc, (sc 25, inc) x 2, sc 8 [82]
Round 17 :
sc 6, inc, (sc 26, inc) x 2, sc 21 [85]
Round 18 :
sc 14, inc, (sc 27, inc) x 2, sc 14 [88]
Round 19 :
(sc 43, inc) x 2 [90]
Round 20 :
sc 20, inc, sc 69 [91]
Round 21 :
sc 3, inc, sc 44, inc, sc 42 [93]
Round 22 :
sc 92, inc [94]
Round 26 :
dec, sc 92 [93]
Round 27 :
sc 42, dec, sc 44, dec, sc 3 [91]
Round 28 :
sc 69, dec, sc 20 [90]
Round 29 :
(dec, sc 43) x 2 [88]
Round 30 :
sc 14, (dec, sc 27) x 2, dec, sc 14 [85]
Round 31 :
sc 21, (dec, sc 26) x 2, dec, sc 6 [82]
Round 32 :
sc 8, (dec, sc 25) x 2, dec, sc 18 [79]
Round 33 :
sc 22, (dec, sc 24) x 2, dec, sc 3 [76]
Round 34 :
sc 6, (dec, sc 17) x 3, dec, sc 11 [72]
Round 35 :
sc 10, (dec, sc 16) x 3, dec, sc 6 [68]
Round 36 :
dec, sc 12, (dec, sc 11, dec, sc 12) x 2 [63]
Round 37 :
sc 8, (dec, sc 11, dec, sc 10) x 2, dec, sc 3 [58]
Round 38 :
sc 2, (dec, sc 10, dec, sc 9) x 2, dec, sc 8 [53]
Round 39 :
sc 4, (dec, sc 9, dec, sc 8) x 2, dec, sc 5 [48]
Round 40 :
sc 3, (dec, sc 6) x 5, dec, sc 3 [42]
Round 41 :
dec, (sc 6, dec, sc 7, dec) x 2, sc 6 [37]
Round 42 :
sc 2, dec, (sc 4, dec) x 5, sc 3 [31]
Round 43 :
(sc 3, dec) x 6, sc 1 [25]
Round 44 :
sc 1, (sc 2, dec) x 6 [19]
Round 45 :
dec, dec, (sc 1, dec) x 5 [12]
— Eyes :
Info :
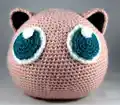
Each eye is made up of three circles: the sclera (large white circle), the iris (teal circle), and the highlight (small white circle). The circles are stacked on each other and then stitched to the body. You will need to make 2 eyes total (six circles total).
— Sclera—White :
Round 1 :
Magic ring 6 [6]
Round 3 :
(inc, sc 1) x 6 [18]
Round 4 :
(sc 1, inc, sc 1) x 6 [24]
Round 5 :
(sc 3, inc) x 6 [30]
— Iris—Teal :
Round 1 :
Magic ring 6 [6]
Round 3 :
(inc, sc 1) x 6 [18]
Round 4 :
(sc 1, inc, sc 1) x 6 [24]
— Highlight :
Round 1 :
Magic ring 6 [6]
— Ears :
Info :
Each ear is made up of two triangles: the outer ear (pink) and the inner ear (black). These pieces are worked as turned rows, not in the round. Once both triangles are finished they are crocheted together along two side edges, leaving the initial chained edge open so the ear maintains shape. Use pink yarn to hide any black showing through after joining.
— Inner Ear—Black :
Row 2 :
sc in second ch, sc 5, ch 1, turn [6]
Row 3 :
dec, sc 4, ch 1, turn [5]
Row 4 :
dec, sc 3, ch 1, turn [4]
— Outer Ear—Pink :
Row 2 :
sc in second ch, sc 11, ch 1, turn [12]
Row 3 :
dec, sc 3, dec, sc 3, dec, ch 1, turn [9]
Row 4 :
dec, sc 1, dec, sc 2, dec, ch 1, turn [6]
— Feet :
Round 1 :
Magic ring 7 [7]
Round 2 :
inc, (inc, sc 1) x 3 [11]
Round 3 :
inc, sc 1, inc, sc 4, inc, sc 3 [14]
Round 5 :
sc 8, inc, sc 3, inc, sc 2 [17]
Round 7 :
sc 5, inc, sc 4, dec, sc 5 [17]
Round 9 :
dec, sc 9, inc, sc 5 [17]
Round 10 :
sc 9, dec, sc 6 [16]
Round 11 :
sc 12, dec, sc 2 [15]
Round 12 :
sc 4, dec, sc 3, dec, sc 4 [13]
Round 13 :
dec, sc 6, dec, sc 3 [11]
Round 14 :
(dec) x 4, sc 1, dec [6]
— Arms :
Info :
Each arm is worked in the round and includes partial rows. After round 3 you will tie off and start new strands at specified stitches to create the partial strands. Once complete, add a clean edge around the outer edge (crochet once around), stuff and attach to the body. For the arms there should be 10 stitches total along the edge after adding the clean edge.
Round 1 :
Magic ring 5 [5]
Round 2 :
(inc, sc 1) x 2, inc [8]
Round 3 :
sc 3, inc, sc 4 [9]
Round 4 :
pr 2: sc 2, inc, sc 3 [7]
— Poof :
Info :
The poof is worked in the round then switches to partial rows and multiple color strands. For rounds where 'pr' is used you will be working partial rows and may need to start new strands for each partial row. Do not cut certain strands until instructed so the teal partial rows can be worked correctly. After completing row 34 add a clean edge to the unfinished edge for attaching to the body. Pinch and tie the poof front and back then stuff and attach.
Round 1 :
Magic ring 6 [6]
Round 2 :
(inc) x 5, sc 1 [11]
Round 3 :
sc 2, inc x 3, sc 1, inc [15]
Round 4 :
sc 3, inc, sc 7, inc, sc 3 [17]
Round 5 :
sc 8, dec, sc 7 [16]
Round 6 :
dec, sc 3, dec, sc 4, dec, sc 3 [13]
Round 7 :
dec, sc 1, dec, dec, sc 1, dec, sc 1, dec [8]
Round 8 :
pr 3: inc, sc 2, inc [6]
Round 12 :
sc 4, inc, sc 5 [11]
Round 13 :
inc, sc 10 [12]
Round 15 :
sc 3, inc, sc 5, inc [14]
Round 17 :
sc 1, inc, sc 6, inc, sc 5 [16]
Round 18 :
sc 6, inc, sc 6, inc, sc 1 [18]
Round 19 :
sc 3, inc, sc 8, inc, sc 5 [20]
Round 20 :
pr 3: sc 18 [18]
Round 21 :
pr 1: sc 8, inc, sc 9 [19]
Round 22 :
pr 1: sc 4, inc, sc 14 [20]
Round 23 :
pr 1: sc 20 [20]
Round 24 :
pr 1: sc 20 [20]
Round 25 :
pr 1: sc 20 [20]
Round 26 :
pr 1: sc 8, dec, sc 10 [19]
Round 27 :
pr 1: sc 12, dec, sc 5 [18]
Round 28 :
pr 1: sc 5, dec, sc 11 [17]
Round 29 :
pr 1: sc 4, dec, sc 5, dec, sc 4 [15]
Round 30 :
pr 1: sc 6, dec, sc 7 [14]
Round 31 :
pr 1: sc 8, dec, sc 4 [13]
Round 32 :
pr 1: sc 3, dec, sc 3, dec, sc 3 [11]
Round 33 :
pr 1: sc 5, dec, sc 4 [10]
Round 34 :
pr 1: sc 2, dec, sc 2, dec, sc 2 [8]
— Closing Thoughts :
Info :
At this point your Jigglypuff should be complete. You can add accessories like a microphone or hat for extra style. Patterns are a guide — feel free to interpret and make creative changes. If you have questions feel free to contact the pattern author for clarification.
This Jigglypuff amigurumi pattern is crafted to bring a smile with its round body and expressive layered eyes. Gather your yarn and hook, and enjoy shaping each charming detail as you crochet. Share your finished Jigglypuff with friends or keep it as a cozy collectible — happy stitching! 🧶🎀