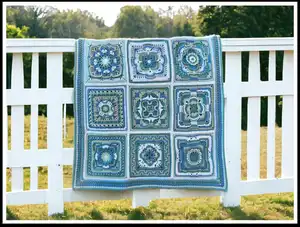
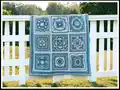
Finish your Legacy Blanket with the Justyce Destany Border — a thoughtfully designed edging that frames twelve legacy squares with texture and clean lines. This pattern walks you through joining the squares with a zipper join and adding a twelve-round border using simple to mid-intermediate techniques. Youll enjoy the layered stitches and crisp corners that make a handmade blanket look professionally finished.
Progress Tracker
0% Complete
— Border :
Info :
The Justyce Destany Border is the final piece needed to complete the Legacy Blanket. For this design, I used all twelve legacy squares, joined them with a zipper join, and designed a new border that I named Justyce Destany after the newest addition to our family! You can find all 12 legacy squares used in this design in my Ravelry, Ribblr, Love Crafts, Makerist, and Creative Fabrica shops, along with all of my other designs. A Legacy Blanket e-book is also available for those who want all patterns.
Info :
Hook: 5 mm hook. Finished and blocked blanket size: 44" X 57". 12" squares, 39 sts per side. 4 squares x 3 squares, plus a 2 ½" border. If using more than 12 squares, the final dimensions will differ. Crochet Terms: US terminology throughout. Skill Level: Mid-Intermediate. Gauge: 13 sc x 14 rows = 4" square. Additional Items Needed: Stitch markers and darning needle.
Info :
Yarn and Colors Used: I Love This Yarn (Worsted Weight), 100% Acrylic; A - White; B - Medium Blue; C - Glacier; D - Sea Blue; E - Light Gray. Squares - 2,700 total yds with colorways of your choice. Foundation & join - Color A, 165 yards. Border - Color A, 125 yds; Color B, 170 yds; Color C, 117 yds; Color D, 203 yds; Color E, 44 yds.
Info :
STITCHES USED: standing stitch, invisible join, zipper join, slst (Slipstitch), st(s) (Stitch/stitches), sp (Space), ch (Chain), yo (Yarn over), rnd (Round)
Info :
Common stitch definitions and video links are provided in the pattern for standing stitch, invisible join, and zipper join. See the pattern pages for Right-Handed / Left-Handed video links and City Farmhouse Studio zipper join video references.
Info :
STITCH ABBREVIATIONS USED INSTRUCTIONS: sc (Single crochet); hdc (Half double crochet); BPhdc (Back post half double crochet); hdc2tog (Half double crochet 2 together); dc (Double crochet); 2dc-cluster (2 double crochet cluster); long dc (Long double crochet); FPtr (Front post treble crochet); CCO (2dc-cluster cross-over); 3LP (Third loop of stitch)
Info :
Symbol Guide and special usage of parentheses, brackets and asterisks are defined in the pattern. COUNT TOTALS: Total chain spaces are included in the st count; corner chain spaces are not included in the total. Example counts are provided for the entire blanket and per side.
Info :
Special Instructions: These instructions are specifically for the border design. Counts shown on rnds 2-12 are for a 12 square blanket. This design can be customized to fit any number of squares, each with 39 stitches per side before rnd 1. However, if using more or less than 12 squares, note that the counts in each round will change.
Info :
Instructions for ALL rounds start with a standing stitch and end with an invisible join to 2nd st of rnd, and fasten off. If not changing colors, you can opt to finish the rnd with a slip stitch join and use the appropriate "ch" or "chainless starting stitch" to begin the next round. Keep in mind that if you choose the slip stitch end, the "ch" or "chainless starting stitch" will replace the first standing st of the round.
RND 1 :
Color: White, A. Note: This rnd creates a foundation in preparation for the join in rnd 2. Please note that all squares used for this blanket must have 39 stitches per side and 41 stitches per side after rnd 1. Start in any ch-2 corner sp, • *(sc, ch 2, sc) in ch-2 corner sp; sc in NEXT 39 sts; repeat from * around; cut yarn, invisible join. Counts per square: 164 sc, 4 ch-2 corner sp (164 total/41 per side) • Complete 1st bullet point for all 12 squares. Counts for ALL squares: 1,968 sc, 48 ch-2 corner sps (1,968 total)
RND 2 :
Color: White, A. Determine the placement of your squares and join them together with a zipper join. This video by City Farmhouse Studio explains in detail how to complete the join.
RND 3 :
Color: White, A. Starting in any ch-2 corner sp, • (sc, ch 2, sc) in ch-2 corner sp; [sc in NEXT 41 sc; hdc2tog in ch-2 sp of square just worked and NEXT UNworked ch-2 sp, skipping join] rep up to second to last ch-2 sp before NEXT ch-2 corner sp; sc in NEXT 41 sc; repeat from * around; cut yarn, invisible join. Counts: 582 sc (125 each short side, 166 each long side), 10 hdc2tog (2 each short side, 3 each long side), 4 ch-2 corner sp (592 total/127 sts each short side, 169 sts each long side)
RND 4 :
Color: Medium Blue, B. * Starting in any ch-2 corner sp, • *(hdc, ch 2, hdc) in ch-2 corner sp; hdc across to NEXT ch-2 corner sp; repeat from * around; cut yarn, invisible join. Counts: 600 hdc, 4 ch-2 corner sp (600 total/129 sts each short side, 171 sts each long side)
RND 5 :
Color: Glacier, C. Starting in any ch-2 corner sp, • *(hdc, ch 2, hdc) in ch-2 corner sp; BPhdc across to NEXT ch-2 corner sp; repeat from * around; cut yarn, invisible join. Counts: 8 hdc (2 hdc both short and long side), 600 BPhdc (129 each short side, 171 each long side), 4 ch-2 corner sp (608 total/131 sts each short side, 173 sts each long side)
RND 6 :
Color: Sea Blue, D. Starting in 1st hdc after any ch-2 corner sp, • *CCO - working 2dc-cluster in 1st hdc after ch-2 corner sp and long dc in previous ch-2 sp; • sk BPhdc, CCO - working 2dc-cluster in NEXT BPhdc and long dc in BPhdc just skipped; rep up till last BPhdc before NEXT ch-2 corner sp; • sk BPhdc, CCO - working 2dc-cluster in NEXT hdc and long dc in BPhdc just skipped; • CCO - working 2dc-cluster in NEXT ch-2 corner sp and long dc in previously worked hdc, ch 2; repeat from * around; cut yarn, invisible join to long dc of 1st CCO of rnd. Counts: 310 CCO, 4 ch-2 corner sp (310 total/67 sts each short side, 88 sts each long side)
RND 7 :
Color: Light Gray, E. Starting in any ch-2 corner sp, *(sc, ch 2, sc) in ch-2 corner sp; sc in each 2dc-cluster and each long dc; repeat from * around; cut yarn, invisible join. Counts: 628 sc, 4 ch-2 corner sp (628 total/136 sts each short side, 178 sts each long side)
RND 8 :
Color: Medium Blue, B. Note: St placement for this FPtr: insert hook from front-to-back around 2dc-cluster CCO of rnd 6, then back-to-front under the top 2 shallow loops; sk sc of rnd 7 behind FPtr just worked. Starting in ch-2 corner sp before any side, • *(2 dc, ch 2, 2 dc) in ch-2 corner sp; dc in NEXT sc; FPtr around CCO 2dc-cluster of rnd 6; dc in NEXT sc of rnd 7; rep until last 3 sc before NEXT ch-2 corner sp; FPtr around CCO 2dc-cluster of rnd 6; sk NEXT 2 sc, dc in NEXT sc of rnd 7; repeat from * around; cut yarn, invisible join. Counts: 330 dc (72 each short side, 93 each long side), 310 FPtr (67 each short side, 88 each long side), 4 ch-2 corner sp (640 total/139 sts each short side, 181 sts each long side)
RND 9 :
Color: White, A. Starting in any ch-2 corner of any side, • *(sc, ch 2, sc) in ch-2 corner sp; hdc in 3LP of dc; sc in dc; [hdc in 3LP of dc; sc in FPtr] until last 3 dc's before NEXT ch-2 corner sp; hdc in 3LP of dc; sc in dc; hdc in 3LP of dc; repeat from * around; cut yarn, invisible join. Counts: 326 sc (71 each short side, 92 each long side), 322 hdc (70 hdc each short side, 91 each long side), 4 ch-2 corner sp (648 total/141 sts each short side, 183 sts each long side)
RND 10 :
Color: Glacier, C. Starting in any ch-2 corner sp, • *(sc, ch 2, sc) in ch-2 corner sp; sc across to NEXT ch-2 corner sp; repeat from * around; cut yarn, invisible join. Counts: 656 sc, 4 ch-2 sp (656 total/143 sts each short side, 185 sts each long side)
RND 11 :
Color: Sea Blue, D. Starting in any ch-2 corner sp, • *(sc, ch 2, sc) in ch-2 corner sp; sc across to NEXT ch-2 corner sp; repeat from * around; cut yarn, invisible join. Counts: 664 sc, 4 ch-2 sp (664 total/145 sts each short side, 187 sts each long side)
RND 12 :
Color: Sea Blue, D. Note: This rnd will create a firm edging for the blanket. Be careful not to make your slst(s) too tight. Turn the work and working on backside only and in 2nd sc after ch-2 corner sp of any side, *slst across to NEXT ch-2 corner sp; slst in NEXT ch-2 corner sp and NEXT sc; repeat from * around; cut yarn, invisible join and weave in ALL yarn ends. Counts: 668 slst (668 total/145 sts each short side, 189 sts each long side) Video: NattypatCrochet.
Info :
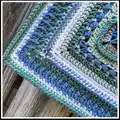
Blocking is recommended to put the finishing touches on the squares for the blanket; you can either wet block or steam block (be careful when steam blocking acrylic yarn). This opens up stitches and gives a more professional appearance. You may print a copy of this pattern for your use; do not distribute pattern or photos in any other form. Link to the designers website or shop if sharing finished items as requested in the pattern.
This Justyce Destany Border pattern adds a beautiful, structured frame to your Legacy Blanket that elevates the look of your handmade heirloom. The layered stitchwork and clean corners create a professional finish that highlights each legacy square and colorway. Whether youre keeping this blanket or gifting it, the final border makes it truly special. 🧶✨