๐Ÿงถ Beautiful โœจ Detailed ๐Ÿ’ Adorable

Ballerina Doll Amigurumi Pattern

Ballerina Doll Amigurumi Pattern
4.0โ˜… Rating
8-10 Hours Time Needed
1.7K Made This
โœ‚๏ธ

Intermediate Level

Ideal for those with basic knitting experience, featuring slightly more advanced stitches and techniques to expand your skills.

โฑ๏ธ

All-Day Adventure

Requires 8-10 hours, ideal for a full day of immersive knitting.

๐Ÿงธ

Cute Companion

An adorable friend to cherish, handcrafted with love to bring comfort and joy for years to come.

About This Ballerina Doll Amigurumi Pattern

Ballerina Doll Amigurumi Pattern crochet pattern - detailed view of completed project

With her peaceful closed eyes and sweet expression, this ballerina captures the grace and elegance of dance. She's dressed in a lovely gray dress with white accents and a matching bow at the waist.

Why You'll Love This Ballerina Doll Amigurumi Pattern

I absolutely adore this ballerina pattern because she has such a timeless, elegant charm that makes her stand out from typical amigurumi dolls. I love how the dress flows with that beautiful white trim along the edge, and the way the hair comes together in that perfect little bun just melts my heart every time. There's something so satisfying about seeing all the separate pieces come together into this graceful dancer. I think you'll fall in love with crafting her delicate features and watching her personality emerge stitch by stitch!

Ballerina Doll Amigurumi Pattern step 1 - construction progress Ballerina Doll Amigurumi Pattern step 2 - assembly progress Ballerina Doll Amigurumi Pattern step 3 - details and accessories Ballerina Doll Amigurumi Pattern step 4 - final assembly and finishing

Switch Things Up

I fell completely in love with this ballerina doll the moment I saw her graceful pose and sweet sleeping face. There's something so peaceful and elegant about the way she's designed that just makes you want to start crocheting right away. I really appreciate how the pattern breaks down each component clearly, from the legs and body worked as one continuous piece to the separate dress and hair sections.

What I find particularly charming is the attention to detail in the accessories. The little bow at the waist of the dress adds such a lovely touch, and those ballet shoes with their long straps wrapping up the legs are absolutely adorable. I think the mustard-colored hair styled in a bun is such a beautiful choice that gives her real character and personality.

Working on the dress section was one of my favorite parts because watching it transform from simple chains into that flowing, ruffled skirt with the white trim is so satisfying. I also love that you can customize the colors to create your own unique dancer. Maybe a pink dress for a sugar plum fairy or a white one for a swan lake ballerina? The possibilities really are endless with this versatile pattern!

Common Mistakes & How to Fix Them

โœ— Forgetting to stuff the legs firmly before joining them together can result in a floppy doll that won't stand properly. โœ— Skipping stitch markers when working the dress rounds often leads to miscounting and an uneven ruffle at the bottom edge. โœ— Not leaving long enough yarn tails for sewing pieces together makes assembly frustrating and can weaken the final joins. โœ— Rushing through the hair attachment process without proper pinning first can result in uneven or lopsided hair placement on the head.

Ballerina Doll Amigurumi Pattern

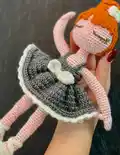
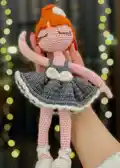
Create your very own graceful ballerina doll with this charming crochet pattern! This sweet little dancer features elegant details including a flowing gray dress with white trim, adorable ballet shoes, and beautiful mustard-colored hair styled in a classic bun. Standing approximately 10 cm tall, she makes a perfect handmade gift for dance lovers or anyone who appreciates delicate, feminine designs. Whether you're making her for a special child or adding to your own collection, this ballerina will pirouette her way into your heart with every stitch you create.

Intermediate 8-10 Hours

Materials Needed for Ballerina Doll Amigurumi Pattern

โ€” Main Fabric

  • 01
    Yarn in Light Pink (Main Color) for body, head, arms, and legs
  • 02
    Yarn in Black (Color A) for shoes and bow accents
  • 03
    Yarn in Gray (Color B) for dress
  • 04
    Yarn in Mustard (Color C) for hair

โ€” Tools Required

  • 01
    2.5mm crochet hook or size that fits your yarn
  • 02
    Scissors
  • 03
    Stuffing/fiberfill
  • 04
    Tapestry needle
  • 05
    Stitch markers
  • 06
    Pins

Progress Tracker

0% Complete

โ€” Legs & Body :

Info :

Use Main Color (Light Pink)

Rnd 1 :

10 ch, 10 ch into 20 sc

Rnd 2-5 :

(4 ring) sc into sc (20)

Rnd 6 :

7 sc into sc (6 sc dec) 7 sc into sc (14)

Rnd 7 :

5 sc into sc (4 sc dec) 5 sc into sc (10)

Rnd 8 :

4 sc into sc (2 sc dec) 4 sc into sc (8)

Rnd 9-16 :

(8 ring) sc into sc (8)

Rnd 17 :

2 sc inc (10)

Rnd 18-21 :

(4 ring) sc into sc (10)

Rnd 22 :

2 sc inc (12)

Rnd 23-30 :

(8 ring) sc into sc (12)

Rnd 31 :

2 sc inc (14)

Rnd 32-35 :

(4 ring) sc into sc (14) FO

Info :

Bring the legs together, make 2 ch between

Rnd 36 :

14 sc into sc, 2ch into sc, 14 sc into sc (30 sc)

Rnd 37-43 :

(7 ring) sc into sc (30 sc)

Rnd 44 :

(6 times) 3 sc into sc next dec (24)

Rnd 45 :

sc into sc (24)

Rnd 46 :

(6 times) 3 sc into sc next inc (30)

Info :

Fill the body. Keep filling as you go.

Rnd 47-53 :

(7 ring) sc into sc (30)

Rnd 54 :

5 sc into sc, join the first arm (5 sc), 10 sc into sc, join the second arm (5 sc), 5 sc into sc (30 sc)

Rnd 55 :

(6 times) 3 sc into sc next dec (24)

Rnd 56 :

(6 times) 2 sc into sc next dec (18)

Rnd 57 :

sc into sc (18)

Rnd 58 :

(6 times) 1 sc into sc next dec (12)

Rnd 59-62 :

(4 ring) sc into sc (12) FO. Leave a long thread to sew on.

โ€” Arms :

Info :

Use Main Color (Light Pink)

Rnd 1 :

6 sc in a mr

Rnd 2-6 :

(5 ring) sc into sc (6)

Rnd 7 :

3 ch, turn, 3ch into sc, 6 sc into sc

Rnd 8 :

(4 times) sc inc (10 sc)

Rnd 9-28 :

(20 ring) sc into sc (10) FO. Fill the sleeves.

Flower Buckle - Rnd 1 :

18 ch

Rnd 2 :

(6 times) 1 ch into 3 hdc, 1 ch into sc

Rnd 3 :

(6 times) 1 ch into 3 cr, 1 ch into sc FO

Info :

Leave a long thread to sew on.

โ€” Dress :

Info :

Use B Color (Gray)

Rnd 1 :

35 ch

Rnd 2 :

35 ch into sc (35 sc) turn

Rnd 3-9 :

(7 ring) sc into sc (35)

Rnd 10 :

(35 times) 1 sc into 3 cr (105 cr)

Rnd 11-15 :

(5 ring) cr into cr (105 cr)

Rnd 16 :

in blo, cr into hdc (105 hdc)

Rnd 17 :

A Color - in flo along the ring: 1 sc into sc, 1 sc into 3 hdc FO

โ€” Bow & Hangers :

Bow - A Color :

10 ch

Rnd 2 :

(2 ring) 10 ch into cr FO. Wrap it in the middle, sew it to the waist of the dress.

Hanger - Make 2 :

Rnd 1 :

21 ch

Rnd 2 :

21 ch into sc FO

Info :

Leave a long thread to sew on.

โ€” Head :

Info :

Use Main Color (Light Pink)

Rnd 1 :

6 sc in a mr

Rnd 2 :

6 sc inc (12)

Rnd 3 :

(6 times) 1 sc into sc next inc (18)

Rnd 4 :

(6 times) 2 sc into sc next inc (24)

Rnd 5 :

(6 times) 3 sc into sc next inc (30)

Rnd 6 :

(6 times) 4 sc into sc next inc (36)

Rnd 7 :

(6 times) 5 sc into sc next inc (42)

Rnd 8-17 :

(10 ring) sc into sc (42)

Rnd 18 :

(6 times) 5 sc into sc next dec (36)

Rnd 19 :

(6 times) 4 sc into sc next dec (30)

Rnd 20 :

(6 times) 3 sc into sc next dec (24)

Rnd 21 :

(6 times) 2 sc into sc next dec (18)

Rnd 22 :

(6 times) 1 sc into sc next dec (12)

Rnd 23 :

6 sc dec (6 sc) FO

Info :

Leave a long thread to sew on.

โ€” Hair :

Info :

Use C Color (Mustard)

Rnd 1 :

6 sc in a mr

Rnd 2 :

6 sc inc (12)

Rnd 3 :

1 sc into sc next inc (18)

Rnd 4 - First Layer :

20 ch, ch into sc (20 sc) - 12 hair strands

Info :

13 ch, ch into sc - 10 hair strands

Top Layer :

50 ch, ch into sc - 5 hair strands

Info :

Gather strands of hair, wrap and sew.

โ€” Shoes :

Info :

Use A Color (Black)

Rnd 1 :

12 ch

Rnd 2 :

12 ch inc (24 sc)

Rnd 3-6 :

(4 ring) sc into sc (24)

Rnd 7-8 :

sc into sc (4 sc dec) 8 sc into sc (20)

Rnd 8 :

2 sc into sc, 14 ch. Turn, 14 ch into sc (14 sc)

Rnd 9-14 :

sc into sc, 14 ch. Turn, ch into sc FO

Info :

Leave a long thread to sew on.

Assembly Instructions

  • Sew the head securely to the neck opening of the body using the long thread you left, making sure it's centered and stable.
  • Attach the dress to the body by slipping it over the doll and sewing the hangers to the shoulders for a secure fit.
  • Sew the bow to the center front waist of the dress, wrapping the middle section tightly before attaching.
  • Position the hair cap on top of the head and sew it securely, then gather and wrap the hair strands to form the bun on top.
  • Attach the ballet shoes to the bottom of the legs, ensuring they face forward and are evenly placed.
  • Embroider the closed eyes and eyelashes onto the face using brown or black yarn for a sweet sleeping expression.

Important Notes

  • ๐Ÿ’กUse stitch markers to keep track of your rounds, especially during the leg joining process
  • ๐Ÿ’กStuff the legs and body firmly but evenly for the best shape and to help the doll stand
  • ๐Ÿ’กPin all pieces in place before sewing to ensure correct and symmetrical positioning
  • ๐Ÿ’กWhen making the hair strands, count carefully to ensure even coverage around the head
  • ๐Ÿ’กLeave long enough yarn tails for secure assembly of all the separate pieces

This lovely Ballerina Doll pattern was created to bring a touch of grace and elegance to your crochet collection! With her flowing gray dress, delicate ballet shoes, and beautiful styled hair, she captures the timeless charm of dance. Whether she's meant for display or for a special little one to treasure, this ballerina will dance her way into hearts everywhere. ๐Ÿงถ Happy crocheting! ๐Ÿฉฐโœจ

You ask,

we answer.

FAQs

What size will the finished ballerina doll be?

The finished doll measures approximately 20 cm in circumference and about 10 cm in length, making her a perfect palm-sized companion.

Can I use different yarn weights for this pattern?

Yes, you can use different yarn weights, but this will affect the final size of your doll. Just make sure to use a hook size appropriate for your yarn choice.

How do I create the sleeping eyes on the face?

The closed eyes are embroidered onto the face using brown or black yarn. Simply stitch curved lines with small lashes extending downward for that peaceful, sleeping expression.

Is this pattern suitable for beginners?

This pattern is best suited for intermediate crocheters who are comfortable with basic amigurumi techniques, color changes, and assembling multiple pieces together.

Can I sell dolls made from this pattern?

Yes! The designer welcomes you to sell items made from this pattern, and only asks that you link back to their shop and give credit to them as the designer.