🧢 Beautiful ✨ Detailed πŸ’ Adorable

Keychain Mini Penguin Amigurumi Pattern

Keychain Mini Penguin Amigurumi Pattern
4.4β˜… Rating
2-4 Hours Time Needed
3.8K Made This
βœ‚οΈ

Intermediate Level

Ideal for those with basic crochet experience, featuring slightly more advanced stitches and techniques to expand your skills.

⏱️

Bite-Sized Project

Finishes in 2-4 hoursβ€”perfect for an afternoon of creative relaxation.

🧸

Cute Companion

An adorable friend to cherish, handcrafted with love to bring comfort and joy for years to come.

About This Keychain Mini Penguin Amigurumi Pattern

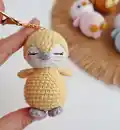
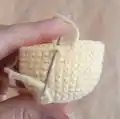
This pattern teaches you how to crochet a tiny keychain penguin with a wedge-shaped face detail and embroidered or safety eyes. It features separate crocheted parts for the head, body, beak, wings, paws and tail, with photo references to guide assembly. The finished toy is compact and perfect for keyrings or small gifts.

Keychain Mini Penguin Amigurumi Pattern crochet pattern - detailed view of completed project

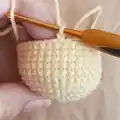
Worked in continuous spiral rounds with US terminology, the pattern uses sport/fine yarn and a small hook for firm stitches. Clear abbreviations, step-by-step rounds, and assembly notes make the process easy to follow.

Why You'll Love This Keychain Mini Penguin Amigurumi Pattern

I absolutely love this pattern because it creates a tiny, irresistible penguin that fits perfectly on a keychain and brightens up any day. I enjoy the wedge-shaped face detail β€” it gives the penguin character with minimal effort. The pattern is satisfying to make quickly yet still offers enough shaping to feel rewarding. I also love that you can choose to embroider the eyes or use safety eyes depending on the recipient. It’s a delightful mix of quick crafting and charming results.

Keychain Mini Penguin Amigurumi Pattern step 1 - construction progress Keychain Mini Penguin Amigurumi Pattern step 2 - assembly progress Keychain Mini Penguin Amigurumi Pattern step 3 - details and accessories Keychain Mini Penguin Amigurumi Pattern step 4 - final assembly and finishing

Switch Things Up

I love customizing this mini penguin by changing yarn colors; try pastel shades for a softer look or bold hues for a playful flock.

I sometimes make a larger version by switching to a bulkier yarn and a larger hook to create a cuddle-sized penguin instead of a keychain.

I often add tiny accessories like a crocheted scarf, a bow, or embroidered freckles to give each penguin its own personality.

For safety eyes, try different sizes (4mm or 5mm) to change the character β€” smaller eyes give a sleepy look while larger eyes appear more alert.

Swap the embroidery thread color for the eye lashes to make the penguin look like it's winking or wide awake depending on placement.

I sometimes use metallic or wooden keychain fittings for a different finish β€” brass gives a vintage feel, while silver looks modern.

Try mixing yarn brands or fibers for subtle texture differences; a cotton blend gives a neat stitch definition, while acrylic can be softer and squishier.

To make a magnet instead of a keychain, sew a small disc pocket onto the back and insert a flat magnet before closing.

I like to embroider tiny hearts or initials on the belly area for personalized gifts β€” use contrasting yarn and practice the placement first.

For a more durable toy, reinforce seams with extra stitches and use a shorter tail for sewing so parts are tightly secured and safe for handling.

Common Mistakes & How to Fix Them

βœ— Skipping the magic ring or making it too loose will create a hole at the top; secure the MR tightly and close the first rounds firmly. βœ— Not stuffing as you go leads to lumps and uneven shaping; add small amounts of stuffing gradually and shape with your fingers. βœ— Joining rounds accidentally can create a visible seam and disrupt the spiral; work in a continuous spiral and use a stitch marker to mark the start. βœ— Forgetting to leave long tails for sewing makes assembly harder later; always fasten off leaving a long end for sewing and finishing. βœ— Placing safety eyes too close or too far apart changes the expression of the penguin; place eyes between rows 10-11 with 7-8 sc between them for best results.

Keychain Mini Penguin Amigurumi Pattern

Make a charming keychain-sized penguin with this step-by-step amigurumi pattern. You will enjoy simple shaping, a cute wedge face detail, and easy assembly to create a tiny handmade friend. Perfect for gifting or decorating your keys, this pattern uses lightweight yarn for a neat, compact finish. Follow the detailed rounds and photo references to complete your mini penguin.

Intermediate 2-4 Hours

Materials Needed for Keychain Mini Penguin Amigurumi Pattern

β€” Main Fabric

  • 01
    Yarn Art Jeans (50g/160 m, 55% cotton/45% acrylic, Sport / Fine): color No 62 (white) - 50g
  • 02
    Yarn Art Jeans (50g/160 m, 55% cotton/45% acrylic, Sport / Fine): color No 88 (yellow) - 50g
  • 03
    Yarn Art Jeans (50g/160 m, 55% cotton/45% acrylic, Sport / Fine): color No 80 (light gray) - 20g
  • 04
    Suitable alternative: Alize Cotton Gold (55% cotton 45% acrylic, 100g/330m) - adjust quantity accordingly
  • 05
    Suitable alternative: Schachenmayr Catania Originals (100% cotton, 50g/125m) - adjust quantities accordingly

β€” Tools Required

  • 01
    Crochet hook size 2.00 mm (US B, UK 14)
  • 02
    Polyester stuffing (hollowfibre recommended)
  • 03
    Thin black embroidery thread for eyes
  • 04
    Small black beads or safety eyes 4-5 mm (optional)
  • 05
    Yarn needle for sewing parts and weaving ends
  • 06
    Scissors
  • 07
    Stitch marker (or a piece of yarn to mark rounds)
  • 08
    Keychain fittings and ring

Progress Tracker

0% Complete

β€” Head :

Info :

Use the white yarn.

R1 :

6sc in MR (6)

R2 :

6 inc (12)

R3 :

(1sc, inc)*6 times (18)

R4 :

1sc, inc, (2sc, inc)*5 times,1sc (24)

R5 :

(3sc, inc)*6 times (30)

R6 :

2sc, inc, (4sc, inc)*5 times,2sc (36)

R7 - 12 :

36 sc (6 rounds)

R13 :

2sc, dec, (4sc, dec)*5 times,2sc (30)

R14 :

(3sc, dec)*6 times (24)

R15 :

1sc, dec, (2sc, dec)*5 times,1sc (18), slst.

Info :

Fasten the thread, leave a long end for sewing. If you are using safety eyes, place them between rows 10 and 11 of the head at 7-8 sc. Head tightly stuffed with filler (Image 1-2).

β€” Another head part :

Info :

Use the yellow yarn.

R1 :

6sc in MR (6)

R2 :

6 inc (12)

R3 :

(1sc, inc)*6 times (18)

R4 :

1sc, inc, (2sc, inc)*5 times,1sc (24)

R5 :

(3sc, inc)*6 times (30)

R6 :

2sc, inc, (4sc, inc)*5 times,2sc (36)

R7 - 13 :

36 sc (7 rounds) (Image 3-5)

Info :

Fasten the thread, leave a long end for sewing. Since the volume and height of your penguin's head may differ from mine after filling, the 13th row may not be necessary.

β€” Wedge detail :

Info :

From the end of the 13th row count forward 16 sc and join the new yarn to the 17th sc, then crochet (Image 6):

R1 :

ch1 (this is the 1st sc of the row),5 sc, turn the detail (6) (Image 7-8)

R2 :

from the second sc 5 sc, turn the detail (5) (Image 9-10)

R3 :

from the second sc 4 sc, turn the detail (4)

R4 :

from the second sc 3 sc, turn the detail (3)

R5 :

from the second sc 2 sc (2)

Info :

Thread secure, hide the end of the thread. Sew this part to the head (Image 12-14).

β€” Beak :

Info :

Use the light gray yarn.

R1 :

6 sc in MR

R2 :

6 sc, slst.

Info :

Fasten the thread, leave a long end for sewing. Beak sew right under, wedge-shaped part of the penguin's face. (Image 15)

β€” Eyes :

Info :

We embroider eyes in the way as on the photos (Image 16 -20). If you are sewing eyes, place them between rows 10 and 11 of the head at a distance of 7-8 sc (Image 21).

β€” Body :

Info :

Use the yellow yarn.

R1 :

6sc in MR (6)

R2 :

6 inc (12)

R3 :

(1sc, inc)*6 times (18)

R4 :

1sc, inc, (2sc, inc)*5 times,1sc (24)

R5 :

(3sc, inc)*6 times (30)

R6 :

2sc, inc, (4sc, inc)*5 times,2sc (36)

R7 - 10 :

36 sc (4 rounds)

R11 :

(10sc, dec) *3 (33)

R12 :

33sc

R13 :

(9sc, dec) *3 (30)

R14 :

30sc

R15 :

(8sc, dec) *3 (27)

R16 :

(7sc, dec) *3 (24)

R17 :

(6sc, dec) *3 (21)

R18 :

(5sc, dec) *3 (18), slst.

Info :

Thread secure, hide the end of the thread. Head tightly stuffed with filler. (Image 22-23)

Info :

Sew the head to the body of the penguin. (Image 24-26)

β€” Wings (2 parts) :

Info :

Use the yellow yarn.

R1 :

6 sc in MR

R2 :

(1sc, inc) *3 (9)

R3 :

9 sc (9)

R4 :

(2sc, inc) *3 (12)

R5 :

(3sc, inc) *3 (15)

Info :

Detail fold in half and crochet 7 sc. Fasten the thread, leave a long end for sewing. (Image 27)

Info :

Wings sew between the 17 and 18 rows of the body of a penguin. (Image 28)

β€” Paws (2 parts) :

Info :

Use the light gray yarn.

R1 :

6 sc in MR

R2 :

(1sc, inc)*3 times (9)

R3 - 4 :

9sc (2 rounds)

Info :

Detail fold in half and crochet 4 sc. Fasten the thread, leave a long end for sewing. (Image 29) We sew to the body at a distance 1 - 2 sc.

β€” Tail (1 detail) :

Info :

Use the yellow yarn.

R1 :

6 sc in MR

R2 :

(1sc, inc)*3 times (9)

Info :

Detail fold in half and crochet 4 sc. Fasten the thread, leave a long end for sewing. (Image 30) Sew on the body as shown in the photo above. (Image 31)

β€” Finishing :

Info :

Place keychain ring and your mini penguin is done!

Assembly Instructions

  • Sew the wedge detail and yellow head part to the white head front using the long yarn tails, matching edges and hiding seams with neat whipstitches (see Images 12-14).
  • Attach the beak under the wedge-shaped part of the face, sewing with the long tail and securing with hidden stitches so the beak sits centered below the eyes (Image 15).
  • Sew the head to the body by aligning the bottom of the head opening with the top of the body, then use a yarn needle to stitch evenly around for a neat join (Images 24-26).
  • Position wings between rows 17 and 18 of the body and sew each wing in place, making sure they are symmetrical and angled slightly forward (Image 28).
  • Attach paws and tail: sew paws to the bottom front of the body spaced about 1-2 sc apart, and sew the folded tail to the back center of the body as shown (Images 29-31).

Important Notes

  • πŸ’‘Work in a continuous spiral and do not join rounds unless otherwise stated to avoid visible seams and keep shaping smooth.
  • πŸ’‘Fasten off work using a needle join and leave long ends for sewing parts together to achieve a tidy, secure finish.
  • πŸ’‘Stuff the amigurumi as you go with hollowfibre stuffing, adding small amounts gradually for even shaping and a firm finish.
  • πŸ’‘Use a stitch marker or a piece of yarn to mark the beginning of each round, especially important when shaping and counting stitches.

This sweet Keychain Mini Penguin pattern is perfect for making small handmade gifts and adorable keychain companions. Create a whole flock in different colors for a charming display or bundle of gifts. Whether you prefer embroidered eyes or safety eyes, each penguin will have a unique personality. 🧢✨🐧

You ask,

we answer.

FAQs

What size will the finished piece be?

The finished amigurumi measures approximately 9.5 cm tall when using the recommended yarn (Yarn Art Jeans) and a 2.00 mm hook.

Can I use different yarn weights for this pattern?

Yes, you can use different yarn weights but it will affect the final size; use a suitable hook for your yarn and expect a larger or smaller penguin accordingly.

Do I need prior crochet experience for this pattern?

This pattern is rated intermediate, so basic knowledge of single crochet, increases, decreases and sewing parts together is recommended.

How long does this project typically take to complete?

Most crocheters finish this keychain mini penguin in 2-4 hours, depending on experience, assembly speed, and whether you embroider or use safety eyes.